Caterpillar Cat D6T XL PAT TRACK-TYPE TRACTOR (Prefix SGA) Service Repair Manual Instant Download
Please open the website below to get the complete manualnn//
Download Presentation

Please find below an Image/Link to download the presentation.
The content on the website is provided AS IS for your information and personal use only. It may not be sold, licensed, or shared on other websites without obtaining consent from the author. Download presentation by click this link. If you encounter any issues during the download, it is possible that the publisher has removed the file from their server.
E N D
Presentation Transcript
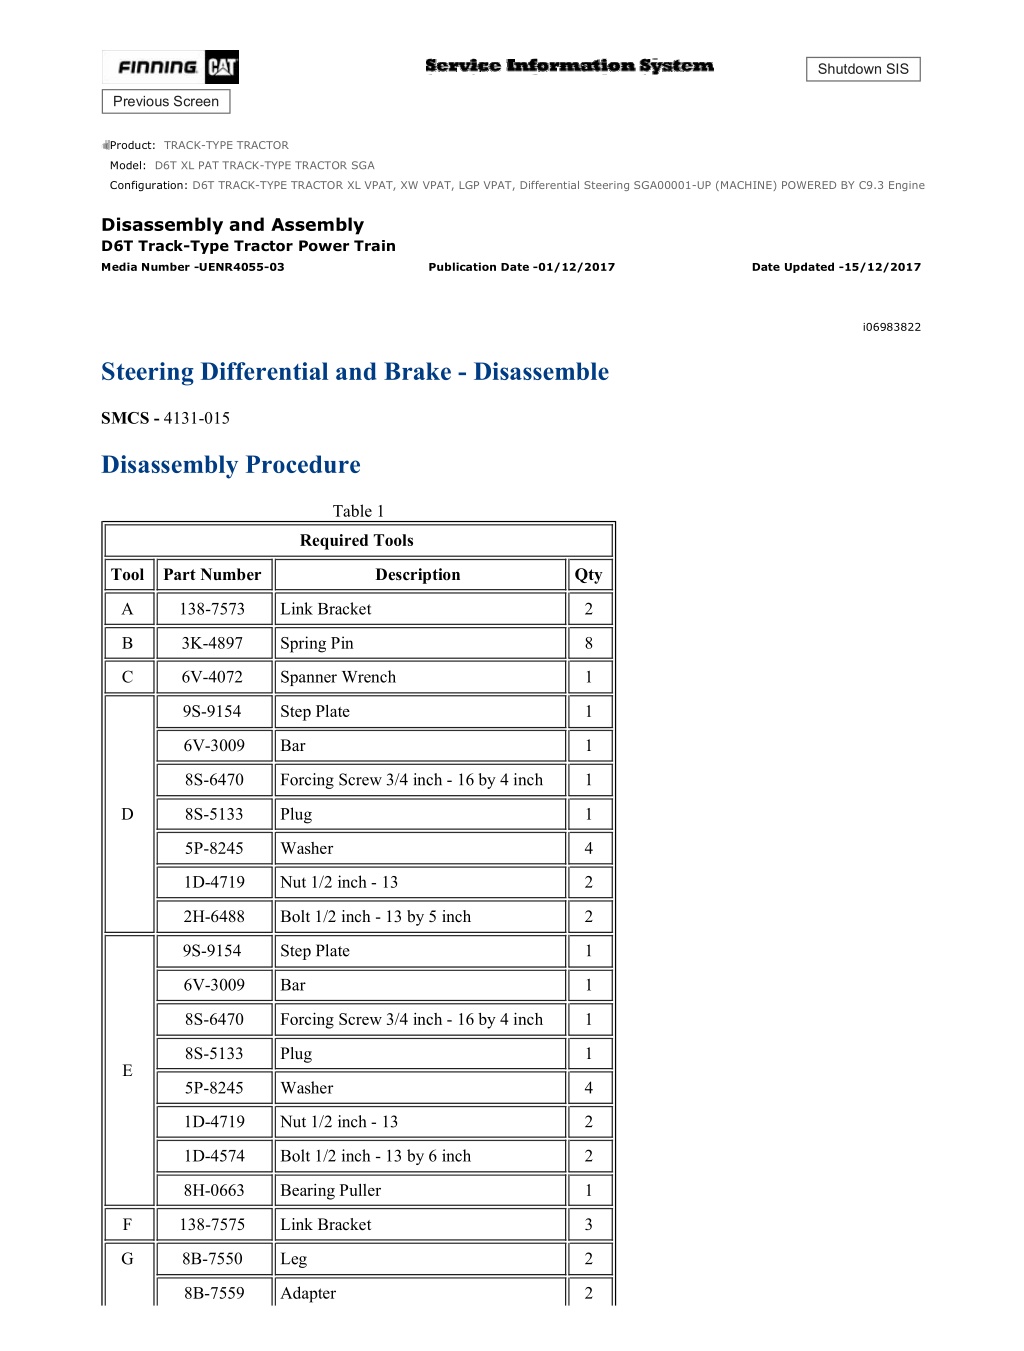
D6T TRACK-TYPE TRACTOR XL VPAT, XW VPAT, LGP VPAT, Differential Ste... 1/14 Shutdown SIS Previous Screen Product: TRACK-TYPE TRACTOR Model: D6T XL PAT TRACK-TYPE TRACTOR SGA Configuration: D6T TRACK-TYPE TRACTOR XL VPAT, XW VPAT, LGP VPAT, Differential Steering SGA00001-UP (MACHINE) POWERED BY C9.3 Engine Disassembly and Assembly D6T Track-Type Tractor Power Train Media Number -UENR4055-03 Publication Date -01/12/2017 Date Updated -15/12/2017 i06983822 Steering Differential and Brake - Disassemble SMCS - 4131-015 Disassembly Procedure Table 1 Required Tools Tool Part Number Description Qty A 138-7573 Link Bracket 2 B 3K-4897 Spring Pin 8 C 6V-4072 Spanner Wrench 1 9S-9154 Step Plate 1 6V-3009 Bar 1 8S-6470 Forcing Screw 3/4 inch - 16 by 4 inch 1 D 8S-5133 Plug 1 5P-8245 Washer 4 1D-4719 Nut 1/2 inch - 13 2 2H-6488 Bolt 1/2 inch - 13 by 5 inch 2 9S-9154 Step Plate 1 6V-3009 Bar 1 8S-6470 Forcing Screw 3/4 inch - 16 by 4 inch 1 8S-5133 Plug 1 E 5P-8245 Washer 4 1D-4719 Nut 1/2 inch - 13 2 1D-4574 Bolt 1/2 inch - 13 by 6 inch 2 8H-0663 Bearing Puller 1 F 138-7575 Link Bracket 3 G 8B-7550 Leg 2 8B-7559 Adapter 2 https://127.0.0.1/sisweb/sisweb/techdoc/techdoc_print_page.jsp?returnurl=/sis... 2021/8/21
D6T TRACK-TYPE TRACTOR XL VPAT, XW VPAT, LGP VPAT, Differential Ste... 2/14 3H-0465 Plate 4 1P-0498 Plate 1 1B-4207 Nut 3/4 inch - 16 2 5H-9976 Forcing Screw 1 inch - 14 by 5 3/4 inch 1 5B-0637 Nut 1 inch - 14 1 8H-0684 Ratchet Wrench 1 8B-7563 Handle 1 5F-7353 Washer (Thrust) 1 8B-7548 Push-Puller Tool Gp 1 Start By: a. Remove the left final drive, the steering differential, and the brake. Refer to Disassembly and Assembly, "Final Drive, Steering Differential, and Brake (Left Side) - Remove" . Illustration 1 g00823680 1. Remove bolts (1) and washers. 2. Remove two opposite bolts (2). https://127.0.0.1/sisweb/sisweb/techdoc/techdoc_print_page.jsp?returnurl=/sis... 2021/8/21
D6T TRACK-TYPE TRACTOR XL VPAT, XW VPAT, LGP VPAT, Differential Ste... 3/14 Illustration 2 g00823691 3. Attach Tooling (A) and a suitable lifting device. 4. Remove sliding carrier (3). The weight of sliding carrier (3) is approximately 48 kg (105 lb). 5. Remove Tooling (A). Illustration 3 g06187075 6. Remove remaining bolts (2) and slinger (4) from planetary carrier (7). 7. Remove retaining ring (5), thrust ring (5A), and planetary carrier (7) from ring gear (6). https://127.0.0.1/sisweb/sisweb/techdoc/techdoc_print_page.jsp?returnurl=/sis... 2021/8/21
https://www.ebooklibonline.com Hello dear friend! Thank you very much for reading. Enter the link into your browser. The full manual is available for immediate download. https://www.ebooklibonline.com
D6T TRACK-TYPE TRACTOR XL VPAT, XW VPAT, LGP VPAT, Differential Ste... 4/14 Illustration 4 g00823775 8. Remove seal ring (10) from planetary carrier (7). 9. Use a hammer and a punch to push pin (12) in shaft (11). 10. Remove shaft (11), planetary gear (9), discs (8), and bearing (13) from planetary carrier (7). 11. Remove pin (12) from shaft (11). 12. Repeat Steps 9 through 11 for the remaining planetary gears. https://127.0.0.1/sisweb/sisweb/techdoc/techdoc_print_page.jsp?returnurl=/sis... 2021/8/21
D6T TRACK-TYPE TRACTOR XL VPAT, XW VPAT, LGP VPAT, Differential Ste... 5/14 Illustration 5 g00823759 13. Remove lockring (14) and remove retaining ring (16). 14. Remove sun gear (15) from planetary carrier (18). 15. Remove spacer (17). Illustration 6 g00823816 16. Remove bolts (19), plate (20), and gear (21) from planetary carrier (18). 17. Use Tooling (B) to compress the retaining ring that holds planetary carrier (18) in ring gear (6). 18. Separate planetary carrier (18) from ring gear (6). 19. Remove the retaining ring from planetary carrier (18). 20. Use a hammer and a punch to push pin (23) in shaft (24). https://127.0.0.1/sisweb/sisweb/techdoc/techdoc_print_page.jsp?returnurl=/sis... 2021/8/21
D6T TRACK-TYPE TRACTOR XL VPAT, XW VPAT, LGP VPAT, Differential Ste... 6/14 Illustration 7 g00823872 21. Remove shaft (24), planetary gear (22), discs (26), and bearing (25) from planetary carrier (18). 22. Remove pin (23) from shaft (24). 23. Repeat Steps 20 through 22 for the remaining planetary gears. Illustration 8 g00823878 https://127.0.0.1/sisweb/sisweb/techdoc/techdoc_print_page.jsp?returnurl=/sis... 2021/8/21
D6T TRACK-TYPE TRACTOR XL VPAT, XW VPAT, LGP VPAT, Differential Ste... 7/14 24. Place a bolt in the teeth of bevel pinion (27) to prevent movement. Illustration 9 g00823884 25. Bend the tang on lock washer (29) away from nut (28). 26. Use Tooling (C) to remove nut (28) from the pinion. 27. Remove lockwasher (29) and washer (30) from the pinion. 28. Remove bolt (32). 29. Remove planetary carrier (31) from the support bracket. https://127.0.0.1/sisweb/sisweb/techdoc/techdoc_print_page.jsp?returnurl=/sis... 2021/8/21
D6T TRACK-TYPE TRACTOR XL VPAT, XW VPAT, LGP VPAT, Differential Ste... 8/14 Illustration 10 g00823890 30. Use Tooling (D) to force bevel pinion (27) from bearing cone (33) and planetary carrier (31). Illustration 11 g00824243 31. Use Tooling (E) to remove bearing cone (34) from planetary pinion (27). https://127.0.0.1/sisweb/sisweb/techdoc/techdoc_print_page.jsp?returnurl=/sis... 2021/8/21
D6T TRACK-TYPE TRACTOR XL VPAT, XW VPAT, LGP VPAT, Differential Ste... 9/14 Illustration 12 g00824263 32. Remove bearing cups (35) from carrier (31). Illustration 13 g00824265 33. Remove bolts (36). 34. Remove support bracket (37) and shims (38) from the housing. https://127.0.0.1/sisweb/sisweb/techdoc/techdoc_print_page.jsp?returnurl=/sis... 2021/8/21
D6T TRACK-TYPE TRACTOR XL VPAT, XW VPAT, LGP VPAT, Differential S... 10/14 35. Remove bolts (39). 36. Remove bevel gear (40) from housing (41). Illustration 14 g00824268 37. Attach Tooling (F) and a suitable lifting device to brake housing (42). 38. Remove bolts (43). 39. Remove brake housing (42) from the final drive housing (44). The weight of brake housing (42) is approximately 150 kg (335 lb). https://127.0.0.1/sisweb/sisweb/techdoc/techdoc_print_page.jsp?returnurl=/sis... 2021/8/21
D6T TRACK-TYPE TRACTOR XL VPAT, XW VPAT, LGP VPAT, Differential S... 11/14 Illustration 15 g00824819 Illustration 16 g00824349 Personal injury can result from parts and/or covers under spring pressure. https://127.0.0.1/sisweb/sisweb/techdoc/techdoc_print_page.jsp?returnurl=/sis... 2021/8/21
D6T TRACK-TYPE TRACTOR XL VPAT, XW VPAT, LGP VPAT, Differential S... 12/14 Spring force will be released when covers are removed. Be prepared to hold spring loaded covers as the bolts are loosened. 40. Remove bolts and washers (45). 41. Remove retainer (46) and thrust washer (47). 42. Remove hub (48), friction discs, and brake plates (49). 43. If necessary, remove ring (50) from hub (48). 44. Remove thrust washer (51). Illustration 17 g00824351 Personal injury can result from parts and/or covers under spring pressure. Spring force will be released when covers are removed. Be prepared to hold spring loaded covers as the bolts are loosened. 45. Remove bolts (52) slowly. 46. Remove retainer (53), ring (54), and ring seal (55) from brake housing (42). https://127.0.0.1/sisweb/sisweb/techdoc/techdoc_print_page.jsp?returnurl=/sis... 2021/8/21
D6T TRACK-TYPE TRACTOR XL VPAT, XW VPAT, LGP VPAT, Differential S... 13/14 Illustration 18 g00824691 47. Remove bolts (56), plate (57), shim pack (58), piston (59), and spring (60) from brake housing (42). Illustration 19 g00824366 48. Use Tooling (G) to separate brake housing (42) and bearing cone (61) from housing (41). 49. Attach a suitable lifting device and Tooling (F) to brake housing (42). https://127.0.0.1/sisweb/sisweb/techdoc/techdoc_print_page.jsp?returnurl=/sis... 2021/8/21
D6T TRACK-TYPE TRACTOR XL VPAT, XW VPAT, LGP VPAT, Differential S... 14/14 50. Remove brake housing (42) from housing (41). The weight of brake housing (42) is approximately 77 kg (170 lb). The weight of housing (41) is approximately 25 kg (55 lb). Illustration 20 g00824415 NOTICE The component will be destroyed if the component is removed. 51. If necessary, remove bearing cone (61) from housing (41). 52. Remove bearing cups (62) and (64) from brake housing (42). NOTICE The component will be destroyed if the component is removed. 53. If necessary, remove bearing cone (65) from housing (41). 54. Remove O-ring seal (63) from brake housing (42). Copyright 1993 - 2021 Caterpillar Inc. Sat Aug 21 11:54:58 UTC+0800 2021 All Rights Reserved. Private Network For SIS Licensees. https://127.0.0.1/sisweb/sisweb/techdoc/techdoc_print_page.jsp?returnurl=/sis... 2021/8/21
D6T TRACK-TYPE TRACTOR XL VPAT, XW VPAT, LGP VPAT, Differential Ste... 1/15 Shutdown SIS Previous Screen Product: TRACK-TYPE TRACTOR Model: D6T XL PAT TRACK-TYPE TRACTOR SGA Configuration: D6T TRACK-TYPE TRACTOR XL VPAT, XW VPAT, LGP VPAT, Differential Steering SGA00001-UP (MACHINE) POWERED BY C9.3 Engine Disassembly and Assembly D6T Track-Type Tractor Power Train Media Number -UENR4055-03 Publication Date -01/12/2017 Date Updated -15/12/2017 i04165349 Steering Differential and Brake - Assemble SMCS - 4131-016 Assembly Procedure Table 1 Required Tools Tool Part Number Description Qty A 138-7573 Link Bracket 2 B 3K-4897 Spring Pin 8 C 6V-4072 Spanner Wrench 1 F 138-7575 Link Bracket 3 8S-5132 Plate 1 3B-1915 Bolt (3/8 inch by 16 by 1 3/8 inch) 3 6V-8801 Nut (3/8 inch by 16) 3 5M-2894 Washer 6 H 1B-9575 Bolt (5/16 inch by 18 by 1 3/4 inch) 1 1D-4716 Nut (5/16 inch by 18) 1 9M-1974 Washer 2 5M-2894 Washer 2 J 6V-4980 Torque Screwdriver 1 6V-4980 Torque Screwdriver 1 K FT-2214 Adapter 1 L 8T-5096 Dial Indicator Group 1 Reference: Refer to Specifications, SENR8324, "Differential Drive and Brake Group" . https://127.0.0.1/sisweb/sisweb/techdoc/techdoc_print_page.jsp?returnurl=/sis... 2021/8/21
D6T TRACK-TYPE TRACTOR XL VPAT, XW VPAT, LGP VPAT, Differential Ste... 2/15 Illustration 1 g00824415 1. Install O-ring seal (63) in brake housing (42). Note: If bearing cone (65) was removed, a new bearing cone must be installed. 2. Raise the temperature of bearing cone (65). 3. Install bearing cone (65) on housing (41). 4. Lower the temperature of bearing cups (62) and (64). 5. Install bearing cups (62) and (64) in brake housing (42). Note: If bearing cone (61) was removed, a new bearing cone must be installed. 6. Raise the temperature of bearing cone (61). 7. Install bearing cone (61) in housing (41). https://127.0.0.1/sisweb/sisweb/techdoc/techdoc_print_page.jsp?returnurl=/sis... 2021/8/21
D6T TRACK-TYPE TRACTOR XL VPAT, XW VPAT, LGP VPAT, Differential Ste... 3/15 Illustration 2 g01203053 8. Attach a suitable lifting device and Tooling (F) to brake housing (42). 9. Install brake housing (42) onto housing (41). The weight of brake housing (42) is approximately 77 kg (170 lb). The weight of housing (41) is approximately 25 kg (55 lb). Illustration 3 g01203571 10. Install plate (57) and three bolts (56). https://127.0.0.1/sisweb/sisweb/techdoc/techdoc_print_page.jsp?returnurl=/sis... 2021/8/21
D6T TRACK-TYPE TRACTOR XL VPAT, XW VPAT, LGP VPAT, Differential Ste... 4/15 11. Install Tooling (K) on plate (57). Do not install the shims at this time. 12. Position brake housing (42) on suitable blocks to raise housing (41) off the floor. 13. Use Tooling (K) to rotate housing (41). 14. Use Tooling (K) to measure the bearing preload. Tighten three bolts (56) equally until the proper preload is reached. The bearing preload should be 3 1 N m (28 8 lb in). Illustration 4 g00831700 15. When the bearing preload is correct, use a feeler gauge to measure Gap (X) between the housing and plate (57) in three places. Average the three measurements to determine the correct shim pack thickness. 16. Remove three bolts (56) and plate (57). 17. Position correct shim pack (58) and plate (57) on the housing. 18. Install three bolts (56). 19. Tighten bolts (56) to a torque of 47 9 N m (35 7 lb ft). 20. Use Tooling (K) to recheck the bearing preload. 21. Install three remaining bolts (56). 22. Tighten three remaining bolts (56) to a torque of 47 9 N m (35 7 lb ft). https://127.0.0.1/sisweb/sisweb/techdoc/techdoc_print_page.jsp?returnurl=/sis... 2021/8/21
D6T TRACK-TYPE TRACTOR XL VPAT, XW VPAT, LGP VPAT, Differential Ste... 5/15 Illustration 5 g01299036 Improper assembly of parts that are spring loaded can cause bodily injury. To prevent possible injury, follow the established assembly procedure and wear protective equipment. 23. Install spring (60) and piston (59) in brake housing (42). The spring must be installed with the outer edge downward. https://127.0.0.1/sisweb/sisweb/techdoc/techdoc_print_page.jsp?returnurl=/sis... 2021/8/21
D6T TRACK-TYPE TRACTOR XL VPAT, XW VPAT, LGP VPAT, Differential Ste... 6/15 Illustration 6 g00824351 24. Install ring seal (55), ring (54), and retainer (53) in brake housing (42). 25. Install bolts (52). Illustration 7 g00824819 https://127.0.0.1/sisweb/sisweb/techdoc/techdoc_print_page.jsp?returnurl=/sis... 2021/8/21
D6T TRACK-TYPE TRACTOR XL VPAT, XW VPAT, LGP VPAT, Differential Ste... 7/15 Illustration 8 g00824349 26. Install thrust washer (51). 27. Install ring (50) in hub (48). 28. Install friction discs and brake plates (49). Install hub (48). 29. Install thrust washer (47). Install retainer (46). 30. Install bolts and washers (45). https://127.0.0.1/sisweb/sisweb/techdoc/techdoc_print_page.jsp?returnurl=/sis... 2021/8/21
D6T TRACK-TYPE TRACTOR XL VPAT, XW VPAT, LGP VPAT, Differential Ste... 8/15 Illustration 9 g01203055 31. Attach Tooling (F) and a suitable lifting device to brake housing (42). 32. Install brake housing (42) in final drive housing (44). The weight of brake housing (42) is approximately 150 kg (335 lb). 33. Install bolts (43). Illustration 10 g00824265 34. Install bevel gear (40) into housing (41). 35. Install bolts (39). 36. Install shims (38) and support bracket (37) in the housing. 37. Install bolts (36). https://127.0.0.1/sisweb/sisweb/techdoc/techdoc_print_page.jsp?returnurl=/sis... 2021/8/21
D6T TRACK-TYPE TRACTOR XL VPAT, XW VPAT, LGP VPAT, Differential Ste... 9/15 Illustration 11 g00824263 38. Lower the temperature of bearing cups (35). 39. Install bearing cups (35) in planetary carrier (31). Illustration 12 g00831777 40. Raise the temperature of bearing cone (34). https://127.0.0.1/sisweb/sisweb/techdoc/techdoc_print_page.jsp?returnurl=/sis... 2021/8/21
D6T TRACK-TYPE TRACTOR XL VPAT, XW VPAT, LGP VPAT, Differential S... 10/15 41. Install bearing cone (34) on pinion (27). 42. Raise the temperature of bearing cone (33). 43. Install bevel pinion (27) in planetary carrier (31) and bearing cone (33). Illustration 13 g00831809 44. Install washer (30), lockwasher (29), and nut (28) into the bevel pinion. 45. Position bevel pinion (27) in a soft jawed vise. 46. Use Tooling (C) to tighten nut (28) and preload the bearings. Illustration 14 g01206992 47. Position planetary carrier (31) on two suitable blocks. https://127.0.0.1/sisweb/sisweb/techdoc/techdoc_print_page.jsp?returnurl=/sis... 2021/8/21
D6T TRACK-TYPE TRACTOR XL VPAT, XW VPAT, LGP VPAT, Differential S... 11/15 48. Use Tooling (K) to measure the bearing preload. The correct bearing preload is 0.80 0.50 N m (7.0 4.5 lb in). 49. Bend the tang on lock washer (29) in one of the four slots in nut (28). Illustration 15 g00831845 50. Position the bevel pinion and planetary carrier (31) on the support bracket. 51. Install bolt (32). https://127.0.0.1/sisweb/sisweb/techdoc/techdoc_print_page.jsp?returnurl=/sis... 2021/8/21
D6T TRACK-TYPE TRACTOR XL VPAT, XW VPAT, LGP VPAT, Differential S... 12/15 Illustration 16 g01203057 52. Use Tooling (L) to check the backlash of pinion (27). Measure the backlash at three equally spaced teeth on planetary pinion (27). Average the three measurements. The correct backlash is 0.210 0.075 mm (0.0083 0.0030 inch). If necessary, remove support bracket (37) to add or remove shims from shim pack (38). Illustration 17 g00823872 Illustration 18 g00832063 https://127.0.0.1/sisweb/sisweb/techdoc/techdoc_print_page.jsp?returnurl=/sis... 2021/8/21
D6T TRACK-TYPE TRACTOR XL VPAT, XW VPAT, LGP VPAT, Differential S... 13/15 53. Install bearing (25) in planetary gear (22). 54. Position planetary gear (22) and discs (26) in planetary carrier (18). 55. Install shaft (24) in planetary carrier (18). 56. If the rubber in pin (23) is damaged, replace the pin. 57. Align the hole in shaft (24) with the hole in planetary carrier (18). 58. Install pin (23). Install the pin so that the end of the pin is even with the surface of planetary carrier (18). 59. Repeat Steps 53 through 58 for the remaining planetary gears. 60. Install the retaining ring in planetary carrier (18). 61. Connect planetary carrier (18) and ring gear (6). 62. Use Tooling (B) to compress the retaining ring that holds planetary carrier (18) in ring gear (6). 63. Install gear (21), plate (20), and bolts (19) in planetary carrier (18). Illustration 19 g00823759 64. Install spacer (17). 65. Install retaining ring (16), sun gear (15), and lock ring (14) into planetary carrier (18). https://127.0.0.1/sisweb/sisweb/techdoc/techdoc_print_page.jsp?returnurl=/sis... 2021/8/21
Suggest: If the above button click is invalid. Please download this document first, and then click the above link to download the complete manual. Thank you so much for reading
D6T TRACK-TYPE TRACTOR XL VPAT, XW VPAT, LGP VPAT, Differential S... 14/15 Illustration 20 g00823775 66. Install bearing (13), discs (8), planetary gear (9), and shaft (11) in planetary carrier (7). 67. Use a hammer and a punch to push pin (12) in shaft (11). 68. Install seal ring (10) on planetary carrier (7). Illustration 21 g06187075 69. Install planetary carrier (7), thrust ring (5A), and retaining ring (5) in ring gear (6). 70. Install slinger (4) and two bolts (2) in planetary carrier (7). https://127.0.0.1/sisweb/sisweb/techdoc/techdoc_print_page.jsp?returnurl=/sis... 2021/8/21
https://www.ebooklibonline.com Hello dear friend! Thank you very much for reading. Enter the link into your browser. The full manual is available for immediate download. https://www.ebooklibonline.com


