A Detailed Guide for Creating Image Galleries with Links


Guide for
Gallery with image groups and links Block


First click the small plus
symbol. Then click
Gallery with image
groups and links to begin
creating.


At the top you can write
a Title. This will not be
shown on HTML page,
but will be a Title to your
block in Admin.
Beneath Title you can set
Background theme.
To go live first click the
arrow to open the menu.
Then click Publish.
Click View live to open
your webpage and see
what you created.
Going live we can see
our Dark background
theme.
And our Light
background theme.
The content will be
explained later.
Beneath Show block you
can write a Title. The
Title functions as the
heading for the gallery
categories. Since this is
the first gallery group,
we name it All. The first
group is special, as it will
generate a special
button that will show all
groups images.
Going live we can see
our Gallery Group have
given us a button “All”
that the user can click to
sort for all images in this
group.
Also, it is shown as a
filterable link.
Beneath Title are Slug.
This is automatically
filled out.
Below Slug, you can select
when or for whom the
block will be shown.
•
Always: Will always
show.
•
Logged out: Only
shows when viewer is
logged out.
•
Logged in: Only shows
when viewer is logged
in.
•
Is customer: Only
shows when viewer is a
customer.
•
Is staff: Only shows if
viewer is a staff.
•
Is admin: Only shows
when viewer is an
admin.
Beneath Show block you
can write Text.
Going live we can see
our Text is shown when
you hoover the mouse
over the image.
Beneath Text you can
Choose an image.
Here we see the top part
of the image chooser
screen. You can choose
to either use an image
on the server already or
Upload a new image
here.
First let’s use an image
already on the server.
Here you can write a
search term.
Here you can select a
Collection of images.
At the bottom you can
also sort with Popular
tags.
At the bottom of the
image selector screen
there are navigation
buttons.
You can select an image
by clicking it.
You can also upload an
image by clicking
Upload.
Name your image here.
Click Choose File to pick
your image.
Select which Collection
the uploaded image
belongs to.
Assign tags to your
image. Separate them
with a comma.
Finally click Upload, to
upload the image.
We have now chosen an
image.
By clicking the 3 dots
you can Change image or
Edit this image.
Beneath Choose image
you can write a Link text.
It does not show in
HTML.
Beneath Link text you
can Choose a page to
send user to when they
click the image.
In the page chooser
window you can search
for the page here.
If a page on the list have
pages under it, you can
click here to see them.
You select a page by
clicking here.
Beneath Choose a page
you can write an
External link URL, where
the user is taken if they
click the image.
Beneath External link
URL you can make it
Open in new tab when
image is clicked.
You can add more
images to the Group by
clicking the plus icon.
Going live we can see we
now have 2 images in
the All group.
You can add another
Group by clicking this
plus icon.
Here we have added a
group called Bikes. We
also added an image to
the group.
Going live we can see
our new group (Bikes) in
the filterable links.
If you click the filterable
link Bikes, only the
images in the Bikes
group will be shown.
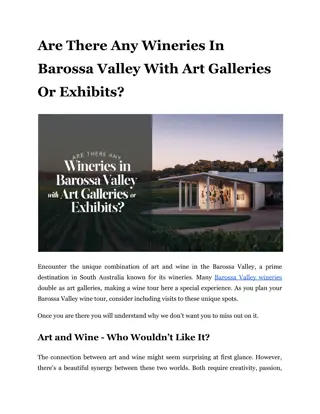
Crafting visually appealing image galleries with categorized groups and clickable links is made simple by following the step-by-step instructions provided in this comprehensive guide. From setting background themes to sorting images, this guide covers everything you need to know to create engaging and interactive galleries for your website.

Download Presentation

Please find below an Image/Link to download the presentation.
The content on the website is provided AS IS for your information and personal use only. It may not be sold, licensed, or shared on other websites without obtaining consent from the author. Download presentation by click this link. If you encounter any issues during the download, it is possible that the publisher has removed the file from their server.
E N D
Presentation Transcript
Guide for Gallery with image groups and links Block
First click the small plus symbol. Then click Gallery with image groups and links to begin creating.
At the top you can write a Title. This will not be shown on HTML page, but will be a Title to your block in Admin.
Beneath Title you can set Background theme.
To go live first click the arrow to open the menu. Then click Publish.
Click View live to open your webpage and see what you created.
Going live we can see our Dark background theme. And our Light background theme. The content will be explained later.
Beneath Show block you can write a Title. The Title functions as the heading for the gallery categories. Since this is the first gallery group, we name it All. The first group is special, as it will generate a special button that will show all groups images.
Going live we can see our Gallery Group have given us a button All that the user can click to sort for all images in this group. Also, it is shown as a filterable link.
Beneath Title are Slug. This is automatically filled out.
Below Slug, you can select when or for whom the block will be shown. Always: Will always show. Logged out: Only shows when viewer is logged out. Logged in: Only shows when viewer is logged in. Is customer: Only shows when viewer is a customer. Is staff: Only shows if viewer is a staff. Is admin: Only shows when viewer is an admin.
Beneath Show block you can write Text.
Going live we can see our Text is shown when you hoover the mouse over the image.
Beneath Text you can Choose an image.
Here we see the top part of the image chooser screen. You can choose to either use an image on the server already or Upload a new image here. First let s use an image already on the server.
Here you can write a search term.
Here you can select a Collection of images.
At the bottom you can also sort with Popular tags.
At the bottom of the image selector screen there are navigation buttons.
You can select an image by clicking it.
You can also upload an image by clicking Upload.
Click Choose File to pick your image.
Select which Collection the uploaded image belongs to.
Assign tags to your image. Separate them with a comma.
Finally click Upload, to upload the image.
We have now chosen an image.
By clicking the 3 dots you can Change image or Edit this image.
Beneath Choose image you can write a Link text. It does not show in HTML.
Beneath Link text you can Choose a page to send user to when they click the image.
In the page chooser window you can search for the page here.
If a page on the list have pages under it, you can click here to see them.
You select a page by clicking here.
Beneath Choose a page you can write an External link URL, where the user is taken if they click the image.
Beneath External link URL you can make it Open in new tab when image is clicked.
You can add more images to the Group by clicking the plus icon.
Going live we can see we now have 2 images in the All group.
You can add another Group by clicking this plus icon.
Here we have added a group called Bikes. We also added an image to the group.
Going live we can see our new group (Bikes) in the filterable links.
If you click the filterable link Bikes, only the images in the Bikes group will be shown.