DIY PPE Paper Doll: Create Your Own Personal Protective Equipment

Delve into the world of DIY Personal Protective Equipment (PPE) with this fun project. Learn how to make your own PPE Paper Doll by selecting different pieces of protective gear like gowns, gloves, masks, and headwear. Follow the step-by-step instructions to assemble your custom PPE ensemble. Perfect for educational purposes or as a creative activity for all ages.

Download Presentation

Please find below an Image/Link to download the presentation.
The content on the website is provided AS IS for your information and personal use only. It may not be sold, licensed, or shared on other websites without obtaining consent from the author. Download presentation by click this link. If you encounter any issues during the download, it is possible that the publisher has removed the file from their server.
E N D
Presentation Transcript
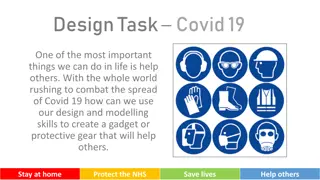
Make Your Own PPE! or the PPE Paper Doll
Use this as a base. Copy paste PPE onto this slide. Do NOT scale or crop them!
1.First, pick Body PPE Copy paste the image of the desired PPE to slide1. Do NOT scale or crop image.
Contact Gown Reusable Gown Coveralls
2. Second, pick gloves Copy paste the image of the desired PPE to slide1. Do NOT scale or crop image.
Extended cuff gloves Regular gloves
3. Lets move onto masks Copy paste the image of the desired PPE to slide1. Do NOT scale or crop image.
Procedure mask N95
3. Almost there! Moving onto head PPE Copy paste the image(s) of the desired PPE to slide1. Do NOT scale or crop image.
CAPR PAPR
Goggles Face shield
If you have something like this, you re on the right track! Let s align all of them now.
On Powerpoint: Go to Picture Format > Arrange > Align > Align Center and then Arrange > Align > Align Middle Arrange icon looks like this:
On Google Slides: Go to Arrange > Align > Center and then Arrange > Align > Middle
Troubleshooting The order is wrong - You HAVE to follow the order of the instructions or otherwise the order will get messed up. If you do mess up, you can use Arrange > send backward or send forward to correct the order. They don t align - If you change the size or crop the image, it won t align. Reset or download the file again. I want to scale it - Finish all the steps and THEN select everything to scale. You can also group them all. I want to make multiple options - Make as many copies of the first slide as you want, before making any modifications.