Discover the Art of Scratch Building in Model Railroading
Uncover the world of scratch building within model railroading, a hobby that offers endless creativity and enjoyment. Learn how to start simple, improve your skills, step up to custom designs, and the basic tools needed for this engaging activity.

Download Presentation

Please find below an Image/Link to download the presentation.
The content on the website is provided AS IS for your information and personal use only. It may not be sold, licensed, or shared on other websites without obtaining consent from the author. Download presentation by click this link. If you encounter any issues during the download, it is possible that the publisher has removed the file from their server.
E N D
Presentation Transcript
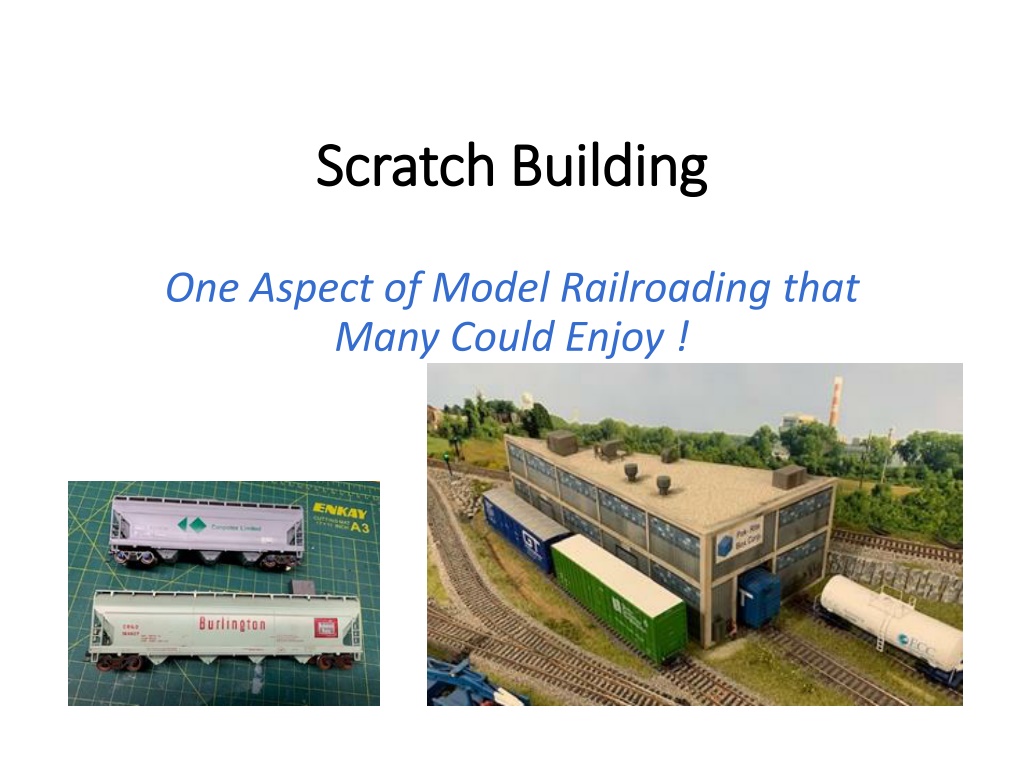
Scratch Building Scratch Building One Aspect of Model Railroading that Many Could Enjoy !
Scratch Building Scratch Building What is It ? What is It ? One of many hobbies within the model railroad hobby domain A hobby that intrigues many model railroaders but is enjoyed by only a few Scratch building can be many things . Simple modification of a kit or purchased model Combining parts of several kits Adding detail to an existing model or scene Designing and building a custom model Anyone can do it and have fun !
Step 1 Step 1 -- -- Get Started, Start Simple Get Started, Start Simple Get out your tools You probably have most of what you need Start simple put together a simple kit Build it as if you were taking it to a contest Use patience, fit the parts, paint and use glue sparingly Add some detail just simple things Glaze the windows with canopy cement Use tape to simulate a tar paper roof You Will be Amazed at the Results !
Step 2 Step 2 -- -- Improve & Expand Your Skills Improve & Expand Your Skills Build more complex models Start with a more complex plastic kit or laser cut model Modify door opening locations, add skylights,etc. Add more details Think of details that make it better fit your purpose Scratch build some of the details with wire, styrene shapes, scale lumber, etc. Add LED lights, add signage Customize paint and paint effects Try your hand at fading paint, peeling paint, etc. Weather the finished moel Expand Your Skills with Every Build
Step 3 Step 3 Step Up to Custom Design Step Up to Custom Design Identify a unique modeling opportunity How about a shallow building to fulfill a need on your layout Or perhaps a custom railcar to facilitate a custom move during operations Draw a plan Define size, identify details to include Determine materials to use Get to work You Only Learn by Trying !
Basic Tools Needed Basic Tools Needed Square & steel ruler Exacto knife Scapel & razor blades Tweezers Flush Knippers Pin Vise and Bits Tooth picks Extra blades (nothing cuts like a sharp blade)
Tools Tools Nice to Have Nice to Have Weights to hold parts in place Angle blocks, 1-2-3 blocks to position parts Shop Built Tools Needle Sticks Sanding sticks Wood sanding blocks
Materials & Adhesives Materials & Adhesives Multitude of materials to use Cardboard, printed paper Styrene shapes Scale Lumber Components in kits, purchased detail parts Phosphor bronze wire and brass wire Adhesives Wood glue (Sig alphatic resin / Tite Bond Orig. yellow) CA, epoxy, canopy cement Correct glue for materials used will save your patience Use of Correct Materials Enhance Model Appearance and Improve Modeling Pleasure
Tips & Techniques Tips & Techniques -- -- Design Design Size model and features based on typical prototype sizes Use standard sizes for doors, ceiling heights, roadways, etc. Use correct structural components and joint techniques Consider model location when defining details Background buildings and features can be smaller than those in the foreground convey sense of distance Think about what you need to see to sense realism ? Doorknob required on door near to viewer but can t be seen nor is necessary on distant door
Tips & Techniques Tips & Techniques -- -- Construction Construction Straight lines and square corners make a model Invest in angle blocks or 1-2-3 blocks Or cut your own wood blocks Keep edges sharp, crisp Glue smudges or squish-out ruins a model Use toothpick or needle stick to apply glue sparingly and precisely Always think about where it will run or squish out Inspect model using a picture Some can be masked using weathering
Tips & Technique Tips & Technique -- -- Finish Finish If surface is smooth use airbrush Sand, clean and prime; then sand again, clean and paint If you mix paint finish glosses, overcoat with proper gloss Learn from the car modelers Weather Nothing stays new for long in real world Clean, non-faded models may not look real in the installed environment Learn from the military modelers
A Few Words about Scale A Few Words about Scale HO scale is 1:87 Everyone knows 87 ft. proto = 1 ft. HO scale But who can remembers how many inches = 1 ft HO scale ? (hint: .138 but who can remember? A better way is to model in millimeters (MM) 3.5 mm HO scale = 1 ft. proto Everyone can remember that ! Also, easier to use in calculations Best Practice model in mm, use a flexible mm ruler and develop a scale conversion chart
HO Scale Conversion Chart Scale Dimension HO Scale Lumber 1:1 Notes Feet Inches Inches mm Fraction HO Size Thickness (in) Width (in) Scale Conversion Chart Scale Conversion Chart 1 x 3 1 x 4 1 x 6 2 x 2 0.011 0.023 0.031 0.023 0.034 0.046 0.069 0.023 0.004 0.10 1/2 inch 0.005 0.14 0.008 0.20 1 0.011 0.30 2 x 4 2 x 6 2 x 8 2 x 10 2 x 12 4 x 4 4 x 6 8 x 8 0.023 0.023 0.023 0.023 0.023 0.046 0.046 0.092 0.046 0.069 0.092 0.115 0.138 0.046 0.069 0.092 0.016 0.40 0.019 0.50 2 0.023 0.60 0.028 0.70 0.031 0.80 1/32 3 0.034 0.90 0.039 1.00 4 5 0.046 0.057 1.17 1.46 0.062 0.069 0.080 0.092 0.103 0.115 1.60 1.75 2.04 2.40 2.63 2.92 1/16 6 7 8 9 AWG Wire Conversion 3/32 AWG Inches mm 14 16 18 20 22 24 26 28 30 0.062 0.051 0.04 0.032 0.0253 0.643 0.0201 0.511 0.0159 0.404 0.0126 0.01 1.57 1.3 1.02 0.81 10 0.125 0.126 0.138 3.17 3.21 3.50 1/8 11 12 1 ft 1/87 HO scale 0.156 0.165 0.174 0.179 0.184 3.96 4.20 4.40 4.50 4.67 5/32 C 100 Atlas Flex Trk Hgt C 83 Peco Flex Trk Hgt 0.32 0.254 C 100 Peco Flex Trk Hgt 1 ft 4 in 16 Screw Size & Tap Drill Sizes Cl of wall studs 0.187 0.207 4.74 5.25 3/16 Screw Size 0-80 2-56 4-40 6-32 8-32 Clearance Drill 0.059 0.086 0.112 0.138 0.164 Tap Drill #56 (.046) #50 (.070) #43(.089) #36(.106) #29(.136) 1 ft 6 in 18 0.250 0.276 6.34 7.00 1/4 2 24 Cl of wall studs 0.312 0.345 7.92 8.75 5/16 2 ft 6 in 30 0.375 0.414 9.51 10.50 3/8 3 36 Dia(mm) 1.6 1.8 2 2.2 2.5 3 3.5 Ltr M1.6 M1.8 M2 M2.2 M2.5 M3 M3.5 #55 (.052) #53 (.057) #52 (.063) 0.500 0.552 0.00 14.00 1/2 4 48 0.625 0.649 0.690 0.828 1.126 1.379 1.655 1.931 2.207 2.483 2.759 3.310 15.86 16.48 17.50 21.00 28.58 35.00 42.00 49.00 56.00 63.00 70.00 84.00 5/8 4 ft 8-1/2 in 5 6 8 10 12 14 16 18 20 24 87 56.5 60 72 98 120 144 168 192 216 240 288 1044 12.000 304.50 Std Rail Gauge / NMRA Std #39 (.0995) #32 (.116) Car Weight (NMRA Std) 1oz +1/2 oz per inch length Courtesy of Jim Marquardt (NMRA NCR Div 3)
In Summary In Summary Anyone can enjoy scratch building Just try it -- build your skills over time Use the right tool for the job Remember 3.5 ! Happy Modeling !