Understanding Blood Haemolysis and Specimen Rejection in Laboratory Testing
Blood haemolysis refers to the release of haemoglobin from red blood cells, affecting test results. Specimen rejection occurs due to various factors like unsuitable conditions, safety hazards, and improper labeling. Capillary puncture technique is used for patients with difficult venous access. Guidelines for obtaining a blood sample using a lancet are detailed to ensure accurate results.

Uploaded on Oct 08, 2024 | 0 Views
Download Presentation

Please find below an Image/Link to download the presentation.
The content on the website is provided AS IS for your information and personal use only. It may not be sold, licensed, or shared on other websites without obtaining consent from the author. Download presentation by click this link. If you encounter any issues during the download, it is possible that the publisher has removed the file from their server.
E N D
Presentation Transcript
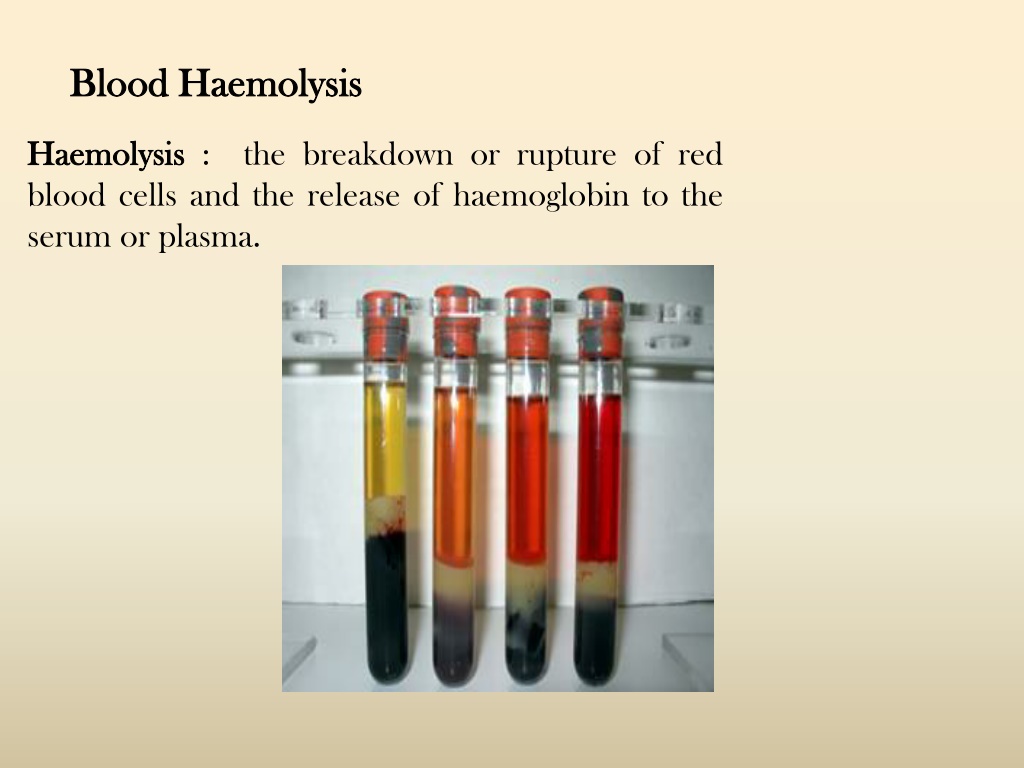
Blood Blood Haemolysis Haemolysis Haemolysis Haemolysis : blood cells and the release of haemoglobin to the serum or plasma. the breakdown or rupture of red
Specimen Rejection Common Causes
Specimen Rejection Specimen Rejection Common Causes Common Causes Unlabelled specimen Specimen labeled with name only; no unique numerical identifier Specimen arrives in laboratory without a requisition. Specimen condition is unsuitable for analysis Examples: - Insufficient volume to perform tests requested -Collected in wrong container (incorrect anticoagulant or preservative) - Improper handling, such as storage temperature or fixative - Contamination -Hemolysis, lipemia or other interference when the interfering substance invalidates the test result obtained. Specimen poses a safety hazard to laboratory personnel Examples: -Broken or leaking containers -Sharps still attached to collection container -Fluid specimens sent in large containers.
Blood Collection via Capillary Puncture Technique Blood Collection via Capillary Puncture Technique A capillary puncture may be used: 1. when only small amounts of blood are needed 2. when venipuncture would be too invasive or not possible because: The patient has poor veins not suitable for a venipuncture. The patient has only one good vein that must be saved for another procedure. The patient is extremely apprehensive about the venipuncture procedure.
General guidelines for obtaining a blood sample when General guidelines for obtaining a blood sample when using a lancet: using a lancet: 1. The thumb , middle or ring finger is best used for this sort of blood collection. If the patient's hands are cold, they may be warmed by holding them under warm running water or by briskly rubbing them. 2. Massage the finger from hand to tip 5-6 times to increase the blood flow. This maneuver can be best described as gently milking the finger -- not squeezing it! However, be careful not to over-do it as it may cause erroneous results due to concentration of tissue fluids. 3. Cleanse the selected fingertip with 70% isopropyl alcohol to remove all dirt, sweat, lotions, and invisible microorganisms. Wipe dry with a clean, dry piece of gauze or cotton. Before piercing be sure that the finger is thoroughly dry. If the puncture site is still moist the blood will not well up but begin to run. What you want is a well rounded drop of blood sitting on the finger tip. 4. If you are using a lancet, remove the lancet from its container and grasp the lancet between the thumb and forefinger.
5. If using a finger, grasp the patient's finger firmly between the fingers and thumb of your other hand. 6. With a quick stabbing wrist motion -- down and right back up -- make a puncture lateral to the ball of the finger. Using this area avoids the nerves of the fingertip and thus avoids unnecessary pain. The cut should be perpendicular to the lines in the fingerprint so that the blood will form a drop. Punctures made parallel to the fingerprint lines will allow blood to run down the finger. 7. Using the hands supporting the finger, squeeze it lightly to stimulate the flow of blood. "Milking" the finger from proximal toward the distal end will also be effective in getting a good blood flow. Be careful not to cause erroneous results due to introduction of tissue Be careful not to cause erroneous results due to introduction of tissue fluids. fluids. The cut should be deep enough so that hard pressure is not required. If gentle pressure is not enough to start blood flow, make another puncture starting at step. 8. Using a piece of dry, clean cotton gauze, wipe off the first drop of blood, as this drop may be contaminated with tissue fluid and this may interfere with the test. 9. Still holding the finger lightly, fill a (heparinized) capillary pipette or other collecting device. The capillary pipette should be held in an almost horizontal position with the tip touching the drop of blood. The tube should not be allowed to touch the finger. The tube should not be allowed to touch the finger. Should more blood be needed, a small test tube or commercial micro tube may be held beneath the finger and blood dropped into it. When the capillary tube is open at both ends:
(a) Use your gloved finger to cover the top end opening (b) hold the capillary tube horizontally and touch the open end to the drop of blood (c) the blood will flow into the tube by capillary action (d) make sure the blood rises to the top line; there should be no air bubbles. 10. When sufficient blood has been obtained, place a clean, dry gauze pad or cotton ball over the site and have the patient press with the thumb on the same hand until bleeding has stopped. Anterior surface of thumb showing most suitable site for capillary blood sample.
Skin puncture in infants. Skin puncture in infants. Puncture must be restricted to the outer Puncture must be restricted to the outer medial and lateral portions of the plantar surface of the foot where medial and lateral portions of the plantar surface of the foot where indicated by the shaded area indicated by the shaded area


 Use your gloved finger to cover the top end opening")