Film Development Guide for Beginners
Learn how to open a film canister, cut the film, load it onto a reel, develop it in a tank, and create a contact sheet in a darkroom. Follow detailed steps and tips for each stage of the film development process.

Download Presentation

Please find below an Image/Link to download the presentation.
The content on the website is provided AS IS for your information and personal use only. It may not be sold, licensed, or shared on other websites without obtaining consent from the author. Download presentation by click this link. If you encounter any issues during the download, it is possible that the publisher has removed the file from their server.
E N D
Presentation Transcript
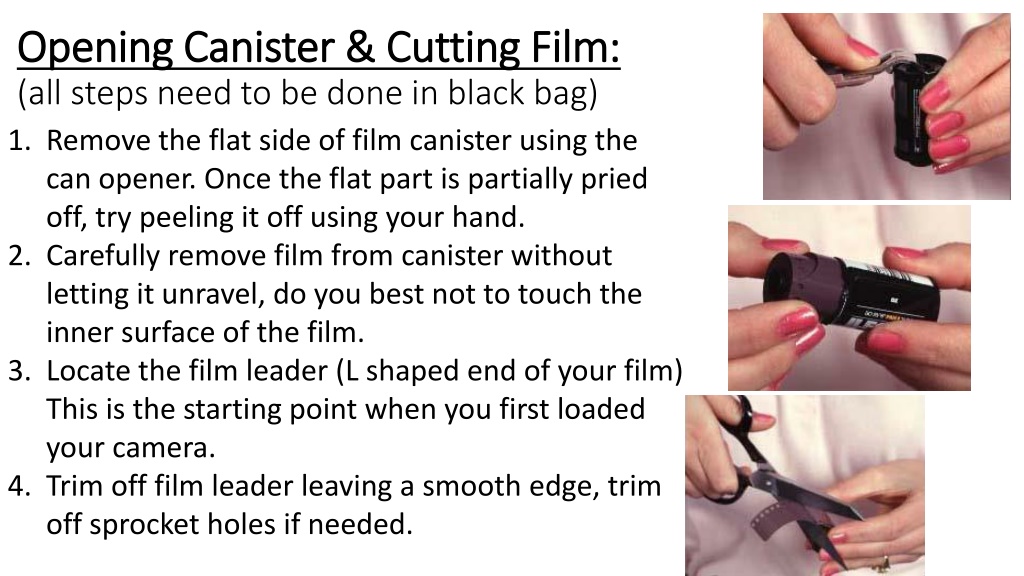
Opening Canister & Cutting Film: Opening Canister & Cutting Film: (all steps need to be done in black bag) 1. Remove the flat side of film canister using the can opener. Once the flat part is partially pried off, try peeling it off using your hand. 2. Carefully remove film from canister without letting it unravel, do you best not to touch the inner surface of the film. 3. Locate the film leader (L shaped end of your film) This is the starting point when you first loaded your camera. 4. Trim off film leader leaving a smooth edge, trim off sprocket holes if needed.
Loading film onto Reel & Tank: Loading film onto Reel & Tank: (all steps need to be done in black bag) 1. Load film onto reel by feeding the cut film end between the flat teeth of the reel. Carefully pull through over the ball bearings. Do not force it. Wind the film onto the reel by rotating the reel parts back and forth (only moving one hand) until whole roll is on reel. 2. Cut film spool off after film is loaded onto reel. 3. Put reel on rod, and place flat footed side of rod in tank. 4. Screw light safe lid onto tank, and press cap onto tank. 5. Put name on black tank with masking tape and sharpie. If you have at least 35 minutes left of class, you may develop your film.
Making a Contact Sheet: Making a Contact Sheet: (to be created once negatives are dry) Cut negatives carefully in groups of 6. Place negatives in a plastic negative sleeve, IN ORDER from left to right, starting at the top. Label your negative sleeve with your name, block, and Roll #. IN THE DARKROOM Take your filled negative sleeve and photo paper into the darkroom. Place easel on side of your enlarger station and position the glass in the center of your enlarger base. Raise the enlarger to height where the rectangle of light surrounds just the glass. Set the aperture to the brightest light and move 3 clicks to the center (most enlargers use f/8 as a neutral light exposure). Set the timer to 15 seconds to create a test strip using intervals of 5 second sections. Make test strips to find the proper time for your contact sheet (see below on how to layer items on enlarger). Remember to adjust your aperture OR time when making each additional test strip. ONCE YOU ARE READY TO PRINT FULL CONTACT SHEET . Place fresh sheet of photo paper, emulsion side up, on the baseboard of enlarger Place negatives facing up on top of the photo paper, lay the glass down & expose for the correct amount of time (determined from your test strip)
< Contact Sheet Contact Sheet Contact Sheet is a positive print of your negatives, meant to preview composition, contrast and focus. Images must be in numerical order and match your film log. (1-24 or 1-36) DO NOT CUT OUT MISTAKES! Always conference with me about best negatives to print for project requirements.