Caterpillar Cat D3K2 LGP TRACK-TYPE TRACTOR (Prefix KLL) Service Repair Manual Instant Download (KLL00001 and up)
Please open the website below to get the complete manualnn// n

Download Presentation

Please find below an Image/Link to download the presentation.
The content on the website is provided AS IS for your information and personal use only. It may not be sold, licensed, or shared on other websites without obtaining consent from the author. Download presentation by click this link. If you encounter any issues during the download, it is possible that the publisher has removed the file from their server.
E N D
Presentation Transcript
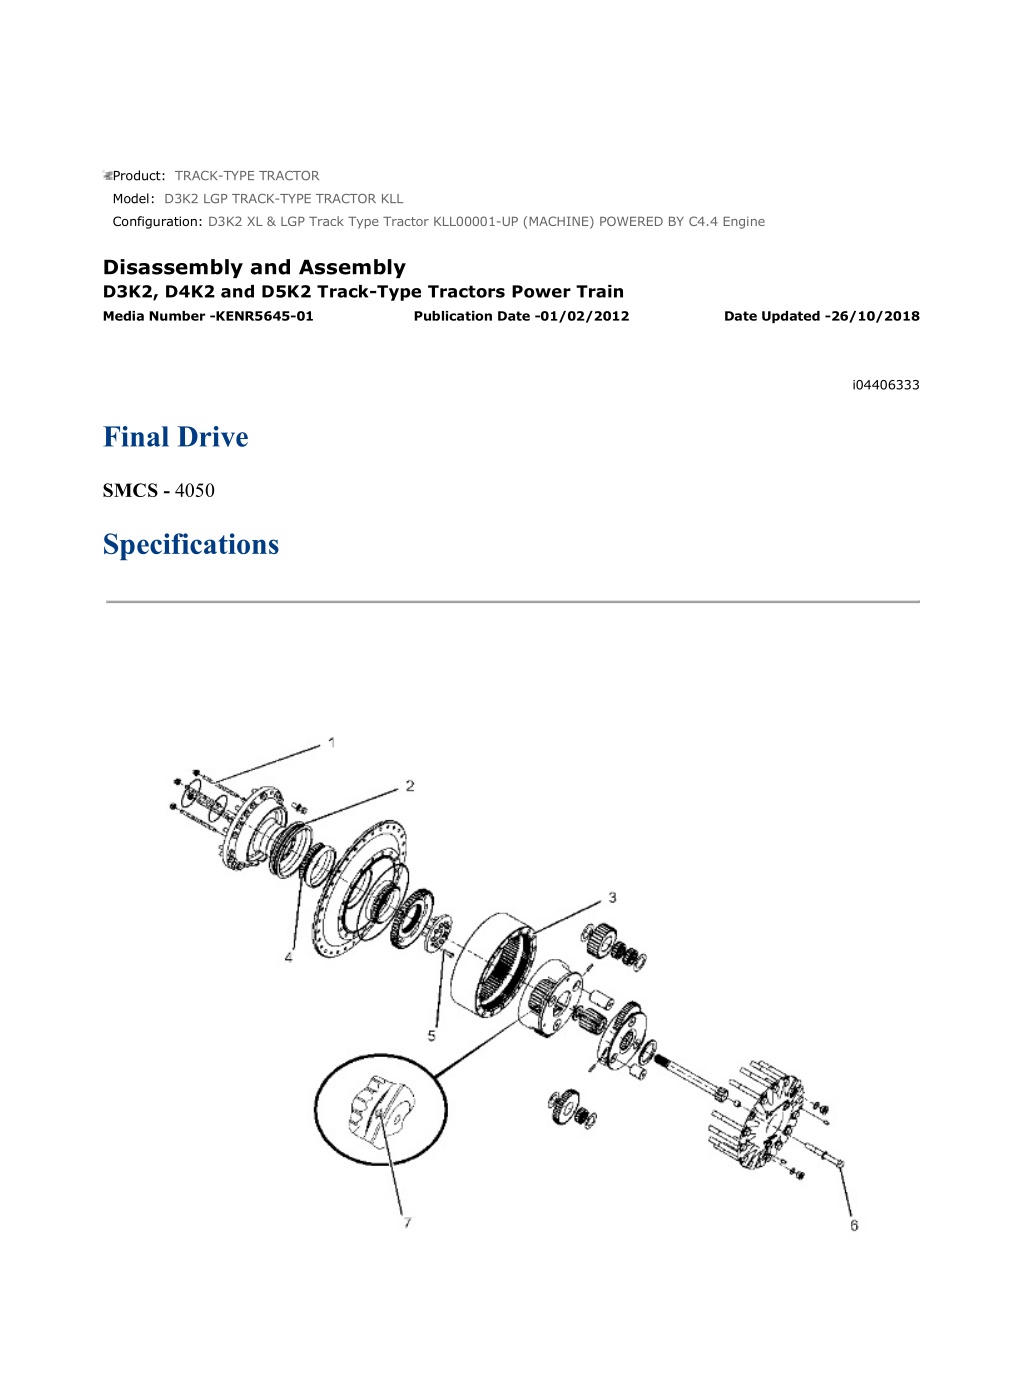
D3K2 XL & LGP Track Type Tractor KLL00001-UP (MACHINE) POWERED BY C... 1/22 Product: TRACK-TYPE TRACTOR Model: D3K2 LGP TRACK-TYPE TRACTOR KLL Configuration: D3K2 XL & LGP Track Type Tractor KLL00001-UP (MACHINE) POWERED BY C4.4 Engine Disassembly and Assembly D3K2, D4K2 and D5K2 Track-Type Tractors Power Train Media Number -KENR5645-01 Publication Date -01/02/2012 Date Updated -26/10/2018 i04406333 Final Drive SMCS - 4050 Specifications https://127.0.0.1/sisweb/sisweb/techdoc/techdoc_print_page.jsp?returnurl=/sis... 2022/5/28
D3K2 XL & LGP Track Type Tractor KLL00001-UP (MACHINE) POWERED BY C... 2/22 Illustration 1 g02762513 Table 1 Specification for 346-9793 Final Drive Gp Item Qty Part Specification Description 113-8215 Taperlock Stud 1 4 Torque to 65 10 N m (48 7 lb ft) The rubber toric seal and all surfaces that contact the seal must be clean and dry at assembly. Apply a thin film of oil to the contacting surfaces of the metal ring prior to assembly. The seal ring must be assembled square with the bore. Bulging or twisting in the rubber toric seal is not allowed. 326-9200 Duo-Cone Seal Gp 2 1 272-2317 Ring Gear 3 1 Apply blue Loctite High Flex GM for ring gear before assembly. 1. Heat the bearing cup and the cone to 120 C (248 F) for a maximum of 8 hours. 2. Install the bearing and the cone. 3. After the bearing assembly has cooled, locate the assembly squarely against locating shoulder. 4. Lubricate the bearing with lubricant prior to installation in the case or the cage. 8T-0072 Bearing Cone 4 2 8T-4194 Bolt 5 9 Torque to 120 20 N m (89 15 lb ft) 7X-2568 Bolt 6 16 Torque to 520 70 N m (384 52 lb ft) 095-0891 Spring Pin Deform pin hole slightly to the distance of 1.5 1.0 mm (0.06 0.04 inch) 7 6 https://127.0.0.1/sisweb/sisweb/techdoc/techdoc_print_page.jsp?returnurl=/sis... 2022/5/28
D3K2 XL & LGP Track Type Tractor KLL00001-UP (MACHINE) POWERED BY C... 3/22 Illustration 2 g02762513 Table 2 Specification for 346-9794 Final Drive Gp and 346-9795 Final Drive Gp Item Qty Part Specification Description 113-8216 Taperlock Stud 1 4 Torque to 110 20 N m (81 15 lb ft). The rubber toric seal and all surfaces that contact the seal must be clean and dry at assembly. Apply a thin film of oil to the contacting surfaces of the metal ring prior to assembly. The seal ring must be assembled square with the bore. Bulging or twisting in the rubber toric seal is not allowed. Refer to Special Instruction, SEHS8364-03, "Assembly and Installation of Conventional Duo-Cone Seals" for installation instructions. 326-9200 Duo-Cone Seal Gp 2 1 272-2317 Ring Gear 3 1 Apply blue Loctite High Flex GM for ring gear before assembly. https://127.0.0.1/sisweb/sisweb/techdoc/techdoc_print_page.jsp?returnurl=/sis... 2022/5/28
https://www.ebooklibonline.com Hello dear friend! Thank you very much for reading. Enter the link into your browser. The full manual is available for immediate download. https://www.ebooklibonline.com
D3K2 XL & LGP Track Type Tractor KLL00001-UP (MACHINE) POWERED BY C... 4/22 4 2 8T-0072 Bearing Cone 1. Heat the bearing cup and the cone to 120 C (248 F) for a maximum of 8 hours. 2. Install the bearing and the cone. 3. After the assembly has cooled, locate the assembly squarely against locating shoulder. 4. Lubricate the bearing with lubricant prior to installation in the case or the cage. 8T-4194 Bolt 5 9 Torque for 120 20 N m (89 15 lb ft). 7X-2568 Bolt 6 16 Torque for 520 70 N m (384 52 lb ft). 095-0891 Spring Pin Deform pin hole slightly to the distance of 1.5 1.0 mm (0.07 0.04 inch). 7 6 Removal Procedure Table 3 Required Tools Tool Part Number Part Description Qty A 138-7575 Link Bracket 1 B 1U-9200 Lever Puller Hoist 1 Start By: a. Remove the parking brake. b. Remove the sprocket. Note: Cleanliness is an important factor. Before you begin the removal procedure, thoroughly clean the exterior of the components. This will help to prevent dirt from entering the internal mechanism. Illustration 3 g01362287 https://127.0.0.1/sisweb/sisweb/techdoc/techdoc_print_page.jsp?returnurl=/sis... 2022/5/28
D3K2 XL & LGP Track Type Tractor KLL00001-UP (MACHINE) POWERED BY C... 5/22 Illustration 4 g01362304 1. Attach Tooling (A), Tooling (B), and suitable lifting devices to final drive assembly (1). The weight of final drive assembly (1) is approximately 363 kg (800 lb). 2. Remove bolts (2). 3. Remove final drive assembly (1). Installation Procedure Table 4 Required Tools Tool Part Number Part Description Qty A 138-7575 Link Bracket 1 B 1U-9200 Lever Puller Hoist 1 Illustration 5 g01362304 https://127.0.0.1/sisweb/sisweb/techdoc/techdoc_print_page.jsp?returnurl=/sis... 2022/5/28
D3K2 XL & LGP Track Type Tractor KLL00001-UP (MACHINE) POWERED BY C... 6/22 Illustration 6 g01362287 1. Attach Tooling (A), Tooling (B), and a suitable lifting device to final drive assembly (1). The weight of final drive assembly (1) is approximately 363 kg (800 lb). 2. Position final drive assembly (1) and install bolts (2). 3. Remove Tooling (A), Tooling (B), and suitable lifting devices from final drive assembly (1). End By: a. Install the sprocket. b. Install the parking brake. Disassembly Procedure Table 5 Required Tools Tool Part Number Part Description Qty A 1P-2420 Transmission Repair Stand 1 B 154-6182 Forcing Bolt 1 C 4C-8358 Eyebolt 1 D 138-7575 Link Bracket 3 150-1782 Crossblock 1 1P-0525 Plate 1 6V-9667 Bolt 2 E 8T-3282 Hard Washer 2 5F-7366 Forcing Screw 1 5B-0637 Nut 1 F 138-7574 Link Bracket 2 https://127.0.0.1/sisweb/sisweb/techdoc/techdoc_print_page.jsp?returnurl=/sis... 2022/5/28
D3K2 XL & LGP Track Type Tractor KLL00001-UP (MACHINE) POWERED BY C... 7/22 Start By: a. Remove the final drive. Note: Mark all components for assembly purposes. Cleanliness is an important factor. Before the disassembly procedure, thoroughly clean the exterior of the component. This will help to prevent dirt from entering the internal mechanism. 1. Put an alignment mark across the sections of the final drive for assembly purposes. The parts must be reinstalled in the original locations. Illustration 7 g01363580 2. Position final drive assembly (2) onto Tooling (A). Remove bolts (1). Illustration 8 g01363590 3. Use Tooling (B) in order to remove cover assembly (3). https://127.0.0.1/sisweb/sisweb/techdoc/techdoc_print_page.jsp?returnurl=/sis... 2022/5/28
D3K2 XL & LGP Track Type Tractor KLL00001-UP (MACHINE) POWERED BY C... 8/22 Illustration 9 g01363593 4. Remove plug (4). Illustration 10 g01363600 5. Remove spacer (5). Illustration 11 g01363616 6. Use Tooling (C) in order to remove sun gear (6). Use two people to remove planetary carrier (7). The weight of planetary carrier (7) is approximately 23 kg (50 lb). https://127.0.0.1/sisweb/sisweb/techdoc/techdoc_print_page.jsp?returnurl=/sis... 2022/5/28
D3K2 XL & LGP Track Type Tractor KLL00001-UP (MACHINE) POWERED BY C... 9/22 Illustration 12 g01363628 7. Disassemble planetary carrier (7), as follows: a. Use a suitable driver to drive spring pin (9) into planetary shaft (8). Illustration 13 g01363653 b. Remove planetary shaft (8) with spring pin (9) from the carrier assembly. c. Remove spring pin (9) from planetary shaft (8) with a suitable driver. Illustration 14 g01363638 d. Remove thrust washers (10) and planetary gear (12) from the carrier assembly. https://127.0.0.1/sisweb/sisweb/techdoc/techdoc_print_page.jsp?returnurl=/sis... 2022/5/28
D3K2 XL & LGP Track Type Tractor KLL00001-UP (MACHINE) POWERED BY... 10/22 e. Remove bearing (11) from the planetary gear (12). 8. Repeat Steps 7a through 7e in order to remove the remaining planetary gears from the carrier assembly. Illustration 15 g01363665 9. Remove sun gear (13). Illustration 16 g01363672 10. Remove spacer (14). Illustration 17 g01363675 https://127.0.0.1/sisweb/sisweb/techdoc/techdoc_print_page.jsp?returnurl=/sis... 2022/5/28
D3K2 XL & LGP Track Type Tractor KLL00001-UP (MACHINE) POWERED BY... 11/22 11. Attach Tooling (D) and a suitable lifting device to ring gear (15). The weight of ring gear (15) is approximately 50 kg (110 lb). 12. Remove ring gear (15). Illustration 18 g01363693 13. Attach Tooling (D) and a suitable lifting device to planetary carrier (16). The weight of planetary carrier (16) is approximately 45 kg (100 lb). 14. Remove planetary carrier (16). Illustration 19 g01363760 15. Disassemble planetary carrier (16), as follows: a. Use a suitable driver to drive spring pin (18) into planetary shaft (17). https://127.0.0.1/sisweb/sisweb/techdoc/techdoc_print_page.jsp?returnurl=/sis... 2022/5/28
D3K2 XL & LGP Track Type Tractor KLL00001-UP (MACHINE) POWERED BY... 12/22 Illustration 20 g01363774 b. Remove planetary shaft (17) with spring pin (18) from planetary carrier (16). c. Remove spring pin (18) from planetary shaft (17) with a suitable driver. Illustration 21 g01363777 d. Remove thrust washers (19) and planetary gear (19) from planetary carrier (16). e. Remove bearings (20) from the planetary gear (21). 16. Repeat Steps 15a through 15e in order to remove the remaining planetary gears from the carrier assembly. Illustration 22 g01363784 https://127.0.0.1/sisweb/sisweb/techdoc/techdoc_print_page.jsp?returnurl=/sis... 2022/5/28
D3K2 XL & LGP Track Type Tractor KLL00001-UP (MACHINE) POWERED BY... 13/22 17. Remove bolts (22). Remove retainer (23). 18. Remove coupling gear (24). Remove O-ring (25) from the housing. Illustration 23 g01363792 19. Use Tooling (E) in order to separate hub assembly (27) from spindle assembly (26). Illustration 24 g01363801 20. Attach Tooling (F) and a suitable lifting device to hub assembly (27). Remove hub assembly (27). The weight of the hub assembly (27) is approximately 113 kg (250 lb). 21. Remove bearing cone (28). Illustration 25 g01363819 https://127.0.0.1/sisweb/sisweb/techdoc/techdoc_print_page.jsp?returnurl=/sis... 2022/5/28
D3K2 XL & LGP Track Type Tractor KLL00001-UP (MACHINE) POWERED BY... 14/22 22. Remove Duo-Cone seal (29). Remove bearing cups (30). Illustration 26 g01363824 23. Remove Duo-Cone seal (31) from spindle assembly (26). Remove bearing cone (32). Illustration 27 g01363829 24. Use a suitable lifting device in order to reposition spindle assembly (26). The weight of spindle assembly (26) is approximately 57 kg (125 lb). 25. Remove studs (33). Assembly Procedure Table 6 Required Tools Tool Part Number Part Description Qty A 1P-2420 Transmission Repair Stand 1 C 4C-8358 Eyebolt 1 D 138-7575 Link Bracket 3 E 138-7574 Link Bracket 2 G 8C-8422 Sealant https://127.0.0.1/sisweb/sisweb/techdoc/techdoc_print_page.jsp?returnurl=/sis... 2022/5/28
D3K2 XL & LGP Track Type Tractor KLL00001-UP (MACHINE) POWERED BY... 15/22 H 1U-6437 Duo-Cone Seal Installer As Note: Cleanliness is an important factor. Before assembly, thoroughly clean all parts in cleaning fluid. Allow the parts to air dry. Do not use wiping cloths or rags to dry parts. Lint may be deposited on the parts which may cause trouble. Inspect all parts. If any parts are worn or damaged, use new parts for replacement. Dirt and other contaminants can damage the precision component. Perform assembly procedures on a clean work surface. Keep components covered and protected at all times. Note: Apply a light film of hydraulic oil to all components before assembly. Note: The rubber seals and all surfaces that make contact with the seals must be clean and dry. After installation of the seals, put clean SAE 30 oil on the contact surfaces of the metal seals. Illustration 28 g01363829 1. Install studs (33). Tighten studs (33) to a torque of 110 20 N m (81 15 lb ft). 2. Use a suitable lifting device in order to reposition spindle assembly (26). The weight of spindle assembly (26) is approximately 57 kg (125 lb). Illustration 29 g01363824 3. Raise the temperature of bearing cone (32) for installation. Install bearing cone (32). Note: Do not heat the bearing cone over 120 F. Do not heat the bearing cone for more than eight hours. https://127.0.0.1/sisweb/sisweb/techdoc/techdoc_print_page.jsp?returnurl=/sis... 2022/5/28
D3K2 XL & LGP Track Type Tractor KLL00001-UP (MACHINE) POWERED BY... 16/22 4. Install Duo-Cone seal (31) onto spindle (26). Refer to Disassembly and Assembly, "Duo-Cone Conventional Seals - Install". Illustration 30 g01363819 5. Lower the temperature of bearing cup (30) for installation. Install bearing cups (30). 6. Install Duo-Cone seal (29). Refer to Disassembly and Assembly, "Duo-Cone Conventional Seals - Install". Illustration 31 g01364058 7. Attach Tooling (E) and a suitable lifting device to hub assembly (27). Install hub assembly (27). The weight of hub assembly (27) is approximately 113 kg (250 lb). 8. Raise the temperature of bearing cone (28) for installation. Install bearing cone (28). Note: Do not heat the bearing cone over 120 F. Do not heat the bearing cone for more than eight hours. https://127.0.0.1/sisweb/sisweb/techdoc/techdoc_print_page.jsp?returnurl=/sis... 2022/5/28
D3K2 XL & LGP Track Type Tractor KLL00001-UP (MACHINE) POWERED BY... 17/22 Illustration 32 g01363784 9. Install O-ring seal (25) onto the housing. Remove coupling gear (24). 10. Install retainer (23). Install bolts (22). Tighten bolts (22) to a torque of 120 20 N m (89 15 lb ft). Illustration 33 g01363777 Illustration 34 g01363760 11. Assemble planetary carrier (16), as follows: a. Install bearings (20) into planetary gear (21). b. Install thrust washers (19) and planetary gear (21) into the carrier assembly. https://127.0.0.1/sisweb/sisweb/techdoc/techdoc_print_page.jsp?returnurl=/sis... 2022/5/28
D3K2 XL & LGP Track Type Tractor KLL00001-UP (MACHINE) POWERED BY... 18/22 c. Use a deburring tool in order to remove the metal burr from the openings in the carrier assembly. Install planetary shaft (17) into the carrier assembly. d. Use a suitable driver to drive spring pin (18) into planetary shaft (17). Stake the hole for spring pin (18) in order to retain spring pin (18). 12. Repeat Steps 11a through 11d for the remaining planetary gears. Illustration 35 g01363693 13. Attach Tooling (D) and a suitable lifting device to planetary carrier (16). The weight of planetary carrier (16) is approximately 45 kg (100 lb). 14. Position planetary carrier (16) onto the spindle. Illustration 36 g01363675 15. Attach Tooling (D) and a suitable lifting device to ring gear (15). The weight of ring gear (15) is approximately 50 kg (110 lb). 16. Install ring gear (15). https://127.0.0.1/sisweb/sisweb/techdoc/techdoc_print_page.jsp?returnurl=/sis... 2022/5/28
D3K2 XL & LGP Track Type Tractor KLL00001-UP (MACHINE) POWERED BY... 19/22 Illustration 37 g01363672 17. Install spacer (14). Illustration 38 g01363665 18. Install sun gear (13). Illustration 39 g01363638 https://127.0.0.1/sisweb/sisweb/techdoc/techdoc_print_page.jsp?returnurl=/sis... 2022/5/28
Suggest: For more complete manuals. Please go to the home page. https://www.ebooklibonline.com If the above button click is invalid. Please download this document first, and then click the above link to download the complete manual. Thank you so much for reading
D3K2 XL & LGP Track Type Tractor KLL00001-UP (MACHINE) POWERED BY... 20/22 Illustration 40 g01363628 19. Assemble planetary carrier (7), as follows: a. Install bearing (11) into planetary gear (12). b. Install thrust washers (10) and planetary gear (12) into the carrier assembly. c. Use a deburring tool in order to remove the metal burr from the openings in the carrier assembly. d. Install planetary shaft (8) into the carrier assembly. e. Use a suitable driver to drive spring pin (9) into planetary shaft (8). Stake the hole for spring pin (9) in order to retain spring pin (9). 20. Repeat Steps 19a through 19e for the remaining planetary gears. Illustration 41 g01363616 21. Use two people to install planetary carrier (7). The weight of planetary carrier (7) is approximately 23 kg (50 lb). 22. Use Tooling (C) in order to install sun gear (6). https://127.0.0.1/sisweb/sisweb/techdoc/techdoc_print_page.jsp?returnurl=/sis... 2022/5/28
D3K2 XL & LGP Track Type Tractor KLL00001-UP (MACHINE) POWERED BY... 21/22 Illustration 42 g01363600 23. Install spacer (5). Illustration 43 g01363593 24. Install new plug (4). Illustration 44 g01364179 25. Apply Tooling (G) to the mounting flange of cover assembly (3) prior to installation. 26. Install cover assembly (3). 27. Install bolts (1). Tighten bolts (1) to a torque of 530 70 N m (391 52 lb ft). https://127.0.0.1/sisweb/sisweb/techdoc/techdoc_print_page.jsp?returnurl=/sis... 2022/5/28
https://www.ebooklibonline.com Hello dear friend! Thank you very much for reading. Enter the link into your browser. The full manual is available for immediate download. https://www.ebooklibonline.com
")
")
")

")
")
")
")
")
")
")
")
")
")
")
")
")
")
")
")

")
")