Step-by-Step Guide to Setting up Different Types of Outputs in Knowledge Training Lesson 2

Learn how to add a cell phone, email address, phone number, pager, and radio channel in Working Knowledge Training Lesson 2. Explore setting up and editing routes of escalations for efficient communication. Understand the configuration, properties, availability options, and saving procedures for each output type. Enhance your knowledge and skills with this detailed training lesson.

Download Presentation

Please find below an Image/Link to download the presentation.
The content on the website is provided AS IS for your information and personal use only. It may not be sold, licensed, or shared on other websites without obtaining consent from the author. Download presentation by click this link. If you encounter any issues during the download, it is possible that the publisher has removed the file from their server.
E N D
Presentation Transcript
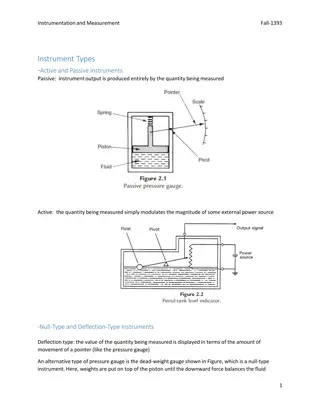
Working Knowledge Training Lesson 2
Overview Overview Setting up/Editing different types of Outputs How to add a cell phone How to add an email address How to add a phone number How to add a pager How to add a radio channel Setting up/Editing a route of escalations
Outputs Outputs Text Message (Cell Phone) Text Message (Cell Phone) 1. Select Configuration select Outputs 2. Select the Cell Phone icon from the Add list or select an existing cell phone select the Edit button 3. Cell Phone Properties Output Name enter a name for the phone will appear on the Output list Phone Number enter the phone number of the phone no spaces or dashes Provider select the provider from the list
Outputs Outputs Text Message (Cell Phone) Text Message (Cell Phone) 4. Availability Not Available cell phone will not receive text messages Always cell phone will receive text messages 24 hours a day 7 days a week Specific Shifts select the schedule & shift(s) the cell phone is to receive text messages 5. Select Save & Add New to setup multiple cell phones in one session only available when adding a New cell phone. Select Save & Exit to save this Cell phone or Discard & Exit to delete the New Cell Phone or changes made to an Existing Cell Phone.
Outputs Outputs Email Address Email Address 1. Select Configuration select Outputs 2. Select the Email icon from the Add list or select an existing Email select the Edit button 3. Email Properties Output Name enter a name for the email will appear on the Output list To Address enter the complete email address Include Tagline select to include Date & Time on on the email message
Outputs Outputs Email Address Email Address 4. Availability Not Available address will Not receive emails Always address will receive emails 24 hours a day 7 days a week Specific Shifts select the schedule & shift(s) the address will receive emails 5. Select Save & Add New to setup multiple Emails in one session only available when adding a New Email. Select Save & Exit to save this Email or Discard & Exit to delete the New Email or changes made to an Existing Email.
Outputs Outputs On On- -Site Pager Site Pager 1. Select Configuration select Outputs 2. Select the Pager icon from the Add list or select an existing Pager select the Edit button 3. Pager Properties Output Name enter a name for the pager will appear on the Output list Capcode enter the Capcode for the pager Numeric select to only send numbers in messages
Outputs Outputs On On- -Site Pager Site Pager 4. Availability Not Available pager will Not receive messages Always pager will receive messages 24 hours a day 7 days a week Specific Shifts select the schedule & shift(s) the pager will receive messages 5. Select Save & Add New to setup multiple Pagers in one session only available when adding a New Pager. Select Save & Exit to save this Pager or Discard & Exit to delete the New Pager or changes made to an Existing Pager.
Outputs Outputs Phone Number (Audio Message) Phone Number (Audio Message) 1. Select Configuration select Outputs 2. Select the Phone icon from the Add list or select an existing Phone select the Edit button 3. Phone Properties Output Name enter a name for the phone will appear on the Output list Classification Standard (normal phone dialing) for other types of calling contact VersaCall Support Phone Number enter the phone number of the phone no spaces or dashes
Outputs Outputs Phone Number (Audio Message) Phone Number (Audio Message) 4. Availability Not Available phone will Not receive messages Always phone will receive messages 24 hours a day 7 days a week Specific Shifts select the schedule & shift(s) the phone will receive messages 5. Select Save & Add New to setup multiple Phones in one session only available when adding a New Phone. Select Save & Exit to save this Phone or Discard & Exit to delete the New Phone or changes made to an Existing Phone.
Outputs Outputs Radio Channel Radio Channel 1. Select Configuration select Outputs 2. Select the Radio Channel icon from the Add list or select an existing Channel select the Edit button 3. Channel Properties Output Name enter a name for the channel will appear on the Output list Channel Number enter radio channel number Number of Times to Replay enter number of replays for the message. Include Escalation select to have the escalation level number stated on the message
Outputs Outputs Radio Channel Radio Channel 4. Availability Not Available channel will Not receive messages Always channel will receive messages 24 hours a day 7 days a week Specific Shifts select the schedule & shift(s) the channel will receive messages 5. Select Save & Exit to save this Channel or Discard & Exit to delete the New Channel or changes made to an Existing Channel.
Routing Routing Properties Properties 1. Select Configuration select Routing 2. Select the Add button to set up a new route or select an existing Route select the Edit button 3. Properties Tab Route Name enter a name for the route will appear on the Routing list Repeat Last Escalation select to repeat the message continuously on the last escalation level until the call is acknowledged
Routing Routing Escalations Escalations 1. Select Escalations Tab select Add icon 2. A new Escalation properties menu will appear Duration enter the amount of seconds you want to elapse before the next escalation message is started Description (Optional) enter a description for the escalation level if needed 3. Available Select select an output from a list of all outputs Search select an output by searching for a specific output name
Routing Routing Escalations Escalations 4. Select all outputs to be added to the escalation hold CTRL key and click on outputs to select multiples 5. Select the Add button to place the selected outputs in this escalation 6. Included all the outputs placed on the escalation will appear in the list
Routing Routing Editing Escalations Editing Escalations 4. Select Add icon to add a new level to the escalation 5. To enable all editing icons select a level from the list 6. Icon functionality Paste the level from the clipboard Remove the selected level Move the level down in the order Duplicate the selected level Move the level up in the order Copy the selected level to the clipboard
Routing Routing Editing Escalations Editing Escalations 7. Select a Level from the list 8. The Duration & Description can be edited 9. Outputs can be removed from the level by selecting the from the Included list and selecting the Remove button. Outputs can also be added by using the steps learned earlier in this presentation.
Summary Summary Outputs Adding or Editing a Cell Phone for Text Messaging Adding or Editing an Email Address for Messaging Adding or Editing an On-Site Pager for Messaging Adding or Editing a Phone Number for Audio Messaging Adding or Editing a Radio Channel for Audio Messaging Availability Select when the Output is to receive Messages Not Available Always Available Available for specific shifts Routing Adding or Editing a Route Escalations Adding a Level Adding Outputs to a Level Editing Levels Removing a Level Duplicate a Level Copy a Level to the Clipboard Paste a Level from the Clipboard Move a Level up or down in the order Removing Outputs from a Level Changing the Level Duration
Practical Application Practical Application Outputs add an output that applies to your configuration Add a Cell Phone Add an Email Address Add an On-Site Pager Add a Phone Number Add a Radio Channel Routing Add a Test Route Escalations Add a Level to the Test Route Add Outputs to the Level Editing Levels Remove a Level Duplicate a Level Copy a Level to the Clipboard Paste a Level from the Clipboard Move a Level up or down in the order Remove Outputs from a Level Change the Level Duration
Additional Information Additional Information VersaCall VT3000 Wikipedia page a manual that mirrors the software http://support.versacall.com/index.php?title=VT3000_Core Overview Pages Outputs http://support.versacall.com/index.php?title=VT3000_Outputs Routing http://support.versacall.com/index.php?title=VT3000_Routing How To Guides step by step instructions on specific tasks Add a Cell Phone (Text Messaging) http://support.versacall.com/index.php?title=VT3000_-_Add_Cell_Phone_(Text_Message) Add an Email Address http://support.versacall.com/index.php?title=VT3000_-_Add_Email Add an On-Site Pager http://support.versacall.com/index.php?title=VT3000_-_Add_Pager Add a Radio Channel http://support.versacall.com/index.php?title=VT3000_-_Add_Radio_Channel Add a Route http://support.versacall.com/index.php?title=VT3000_-_Add_Route