VOLVO SD200DX SINGLE-DRUM ROLLER Service Repair Manual Instant Download
Please open the website below to get the complete manualnn//
Download Presentation

Please find below an Image/Link to download the presentation.
The content on the website is provided AS IS for your information and personal use only. It may not be sold, licensed, or shared on other websites without obtaining consent from the author. Download presentation by click this link. If you encounter any issues during the download, it is possible that the publisher has removed the file from their server.
E N D
Presentation Transcript
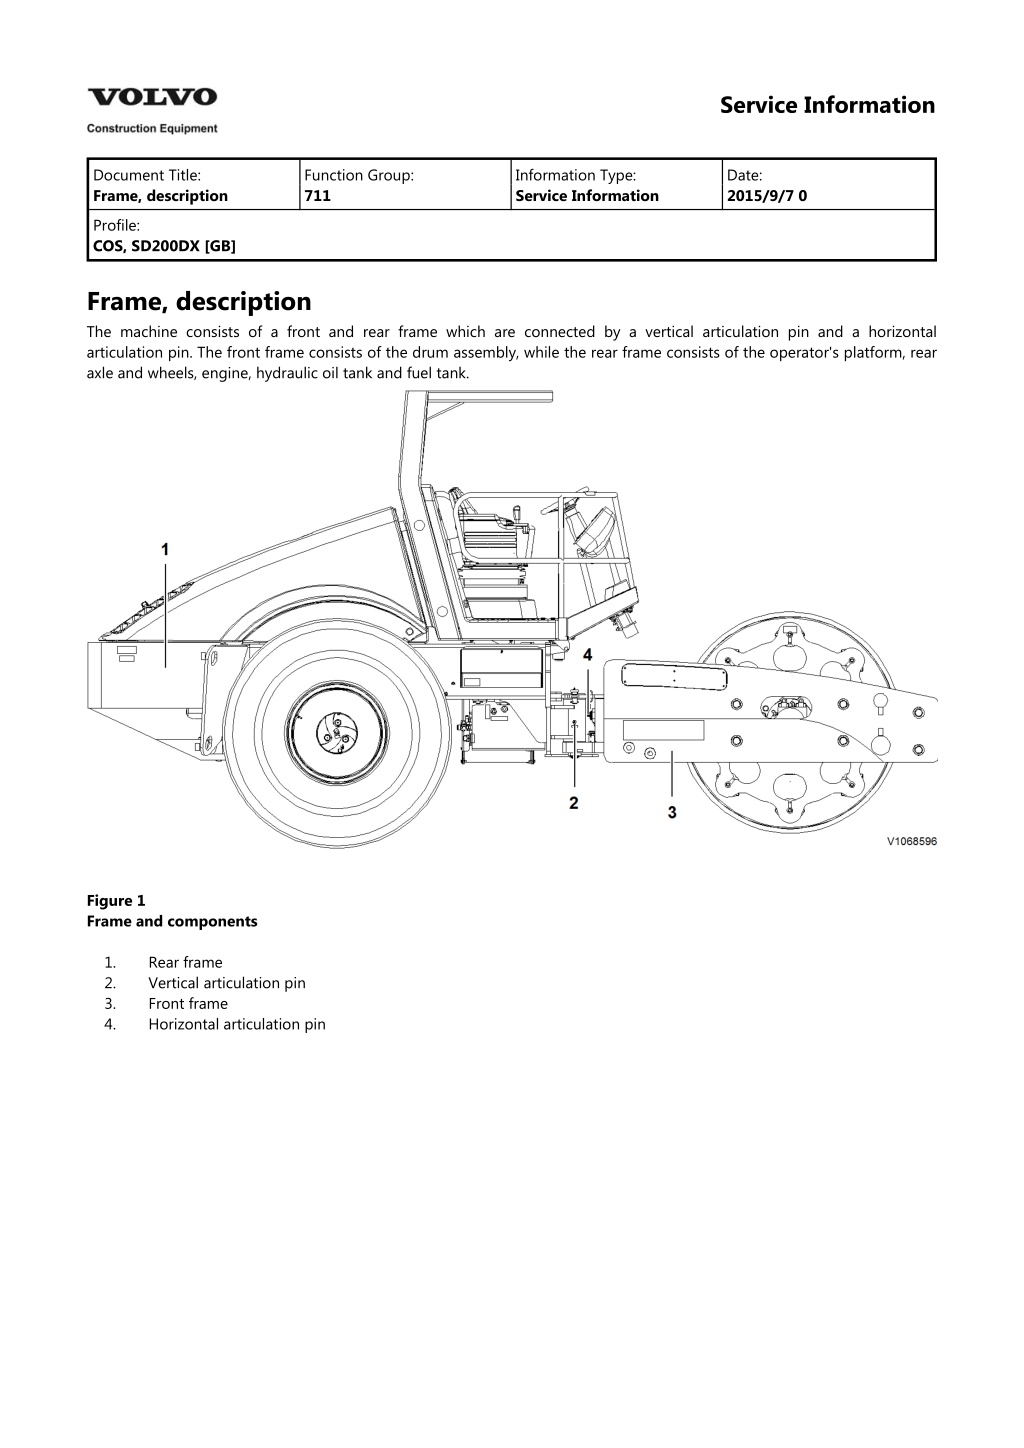
Service Information Document Title: Frame, description Function Group: 711 Information Type: Service Information Date: 2015/9/7 0 Profile: COS, SD200DX [GB] Frame, description The machine consists of a front and rear frame which are connected by a vertical articulation pin and a horizontal articulation pin. The front frame consists of the drum assembly, while the rear frame consists of the operator's platform, rear axle and wheels, engine, hydraulic oil tank and fuel tank. Figure 1 Frame and components 1. 2. 3. 4. Rear frame Vertical articulation pin Front frame Horizontal articulation pin
Service Information Document Title: Power Propulsion Function Group: 777 Information Type: Service Information Date: 2015/9/7 0 Transmission, Profile: COS, SD200DX [GB] Power Transmission, Propulsion Variable displacement hydrostatic propulsion pump The hydrostatic propulsion pump is a variable displacement axial piston pump with a tilt swashplate. Reversing the direction of the tilt of the swashplate reverses the flow of oil from the pump, which reverses the direction of rotation of the motor output. Two multi function valves are designed in the pump. These multi function valves incorporate a check valve, pressure limiter, high pressure relief valve and a bypass function. Charge oil pressure is directed to the displacement control valve internally in the pump. A travel lever is mechanically connected to the control lever on the pump, which is connected to the displacement control valve. As the operator moves the travel lever, the displacement control valve will move, directing charge oil pressure to the appropriate end of the servo control cylinder. The servo control cylinder is connected to the pump swashplate, therefore movement of the servo cylinder will tilt the pump swashplate, changing the pump displacement. The position of the propulsion control lever to the S (Stop) position, acts as a dynamic brake. Basic closed circuit The main ports of the pump are connected by hydraulic lines to the main ports of the motor. Hydraulic fluid flows in either direction from the pump to the motor, then back to the pump in this closed circuit. Either of the hydraulic lines can be under high pressure. In pumping mode, the position of the pump swashplate determines which line contains high pressure as well as the direction of hydraulic fluid flow. Charge pump The hydrostatic pump contains an integral gerotor type, fixed displacement charge pump that is driven off the main pump shaft. The charge pump supplies cool, filtered oil to the hydrostatic circuit and keeps the circuit charged under low pressure to prevent cavitation. A charge pressure filter is remotely mounted inside the battery box compartment. The charge pump also makes up for leakage in the hydraulic components necessary for cooling and lubrication. Charge pressure is also used to operate the pump control system, the brakes and the two speed function. The flow of charge oil from the pump to the charge filter is as follows. The filtered oil returns back to the pump to charge the closed loop. Charge pressure when the machine is stationary is limited by the charge relief valve located in the hydrostatic pump body. NOTE! Incorrect charge pressure settings may result in an inability to build required system pressure and/or inadequate loop flushing flows. Correct charge pressure must be maintained under all conditions of operation to maintain pump control performance and prevent damage to the components. Case drain The hydrostatic pump and motors have controlled internal leakage for lubrication purposes and to remove hot oil from the system. Case drain lines are required to direct this oil back to the hydraulic oil tank. These lines should be drained from the topmost drain port to ensure that the case remains full of oil. These lines must be unrestricted to prevent pressure build up in the housing. Drum drive motor The drum drive motor is a variable displacement bi-directional cartridge motor with a minimum and maximum displacement setting. The motor has a hydraulically activated spool control which selects minimum or maximum swashplate angle for high and low speed. Low speed = maximum displacement (maximum swashplate angle); High speed = minimum displacement (minimum swashplate angle). Rear axle drive motor The rear axle drive motor is a variable displacement bi-directional cartridge motor with a minimum and maximum displacement setting. The motor has a two position electro hydraulic control which selects minimum or maximum swashplate angle for high and low speed. Low speed = maximum displacement (maximum swashplate angle); High speed = minimum displacement (minimum swashplate angle).
Loop flushing valve The loop flushing valve is located on the inside frame rail on the right side of the machine under the operator's platform on the DX and F models equipped with the Traction Enhancement System. For models without the Traction Enhancement System, the loop flushing valve is located in the axle motor. A loop flushing valve protects the system components by removing a controlled amount of hot oil and any contaminants from the hydrostatic closed loop. The loop flushing valve consists of a shuttle valve and a relief valve. Oil from the hydrostatic pump in either forward or reverse mode will exert pressure against the shuttle valve. This high pressure oil will shift the shuttle valve cartridge spool so that a small percentage of the loop return oil will flow through the shuttle cartridge to the relief valve. The relief valve is set lower than the charge relief valve in the pump; therefore, the relief valve will open and direct a small percentage of the return loop to flow through the hydraulic oil cooler to the hydraulic oil tank. Charge pressure will be limited by the relief valve in the pump when the machine is not in motion. When the machine is in motion, charge pressure will be limited by the relief valve in the loop flushing valve. Brake system The machine is equipped with multi disc brakes. The rear axle has two multi disc brake units mounted internally on the output shafts. The drum drive torque hub has a multi disc brake system mounted internally on the input shaft. The brakes (rear and front) are spring applied and released by oil pressure (which must be sufficient enough to overcome spring pressure). Charge pressure from the main hydrostatic pump is used to release the brakes. Loss of engine power or loss of hydraulic pressure to the brake circuit, will allow the spring applied brakes to apply. Hydraulic oil cooler The oil cooler is located on the front of the engine radiator. The engine fan draws air through the hydraulic oil cooler then through the engine radiator. The hot oil flows through the many tubes inside the oil cooler and loses heat to the air flowing around the tubes. The cooled oil flows out of the oil cooler and back to the hydraulic oil tank. Thermal bypass valve The thermal bypass valve is controlled both by temperature and pressure. It is used in the system to control the proper operating temperature of the oil and to prevent damage to the hydraulic oil cooler. If the temperature is below 60 C (140 F), the bypass valve will send the oil directly to the hydraulic oil tank. Between 60 C (140 F) and 74 C (165 F), some oil is directed to the hydraulic oil tank and some through the oil cooler. At temperatures of 74 C (165 F) and higher, the bypass valve directs the oil to flow through the oil cooler and back to the hydraulic oil tank. If a pressure spike of 2 bar (25 psi) occurs in the return circuit, the bypass valve will open allowing the high pressure oil to flow to the hydraulic oil tank in order to prevent damage to the oil cooler. Traction Enhancement System (DX and F Models) The Traction Enhancement System is standard on both the DX and F Models. The purpose of this system, is to limit the amount of slip between the front and rear drive motors. The speed of each motor is transmitted to a micro processor which continuously compares the speed of each motor to the other. If one motor begins to over speed (drum or wheel slip), the micro processor directs a proportional valve to reduce the flow (depending on the direction of travel) either to or from that motor. This reduction in flow to or from the spinning motor increases the relative traction effort of the end of the roller (drum or tyres) that is not slipping or spinning. The major components of the Traction Enhancement System are as follows: A micro processor labelled SX Traction Control located in the battery compartment Two speed sensors; one located on the drum drive motor and one located on the axle drive motor A traction control valve located on the inside of the main frame on the right side under the operator's platform A remote loop flushing valve located on the inside of the main frame on the left side NOTE! The Traction Enhancement System only functions in the compaction or low travel speed setting. Combination Valve (Pump De-stroke, Two Speed and Brake Release Valve) Pump de-stroke valve and solenoid The de-stroke solenoid valve ensures that the machine will not travel with the brakes applied. The combination valve which incorporates the de-stroke valve, two speed valve and brake release valve is located on the left inside frame rail underneath the operator's platform (the solenoids and valves can be serviced by opening the battery box access door). The parking brake switch in the instrument panel provides power for both the de-stroke solenoid valve and brake release solenoid valve. When the parking brake switch is in the ON or applied position, the de-stroke solenoid is not energized and the valve (spool) stays in the normally open position. In this open position, the hydrostatic drive pump servo control pressure is equal on both sides of the control pistons (open loop), so the pump cannot be stroked and therefore, the swashplate will remain in neutral. The brake release solenoid is also not energized and the valve remains in the normally closed position. The valve blocks charge pressure oil from releasing the spring applied brake units in the axle and drum torque hub.
https://www.ebooklibonline.com Hello dear friend! Thank you very much for reading. Enter the link into your browser. The full manual is available for immediate download. https://www.ebooklibonline.com
When the brake switch is in the OFF or released position, the de-stroke solenoid is energized and the valve (spool) moves to the closed position. In this position (now closed loop), the servo pressure is directed to one of the two servo cylinders in the pump when the operator moves the control lever. When the brake switch is in the OFF or released position, the brake solenoid is energized and the valve (spool) moves to the open position allowing charge pressure to enter the brake units and overcome spring pressure. This releases the brakes in the axle and drum torque hub. Two speed valve and solenoid The two speed solenoid is activated by a high/low switch in the instrument panel. When activated, the solenoid moves the valve (spool) to an open position, which allows charge pressure oil to flow to the drum drive motor and shift a valve (spool). The shifting of this spool sends charge oil pressure to the servo piston, which in turn decreases the swashplate angle, thus increasing motor speed. The axle motor shifts at the same time, by means of an electrical solenoid mounted in the motor assembly. When activated, the solenoid shifts a valve (spool). The shifting of this spool sends charge oil pressure to the servo piston, which in turn decreases the swashplate angle, thus increasing motor speed. Brake release valve and solenoid The parking brake switch in the instrument panel provides power for both the de-stroke solenoid valve and the brake release solenoid valve. When the brake switch is ON or applied, there is no current to the solenoid. The brake release solenoid is also not energized and the valve remains in the normally closed position. The valve blocks charge pressure oil from releasing the spring applied brake units in the axle and drum torque hub. When the brake switch is in the OFF or released position, the brake solenoid is energized and the valve (spool) moves to the open position. This allows charge pressure to enter the brake units and overcome spring pressure, which releases the brakes in the axle and drum torque hub. Vibration Circuit Vibration hydraulic circuit The closed loop, dual amplitude, vibration circuit uses a variable displacement axial piston pump and a fixed displacement motor. Variable frequency vibration option The variable frequency vibration option controls the speed and direction of rotation of the eccentric weight. There are five VPM (vibrations per minute) set points for the high amplitude range and five VPM set points for the low amplitude range. The purpose of this system is to maintain the selected VPM during natural fluctuations in machine performance. This is achieved by supplying a signal from a speed sensor at the eccentric motor to a micro processor. This micro processor then regulates the output of the vibration pump to maintain the selected VPM. The major components of the variable vibration control are as follows: A micro processor labelled SX C Loop Vibration Control located in the battery compartment A speed sensor located on the vibration motor A five position selector switch located on the instrument panel The electronic displacement control located on the vibration pump Closed loop circuit The main ports of the pump are connected by hydraulic hoses to the main ports of the motor. Fluid flows in either direction from the pump to the motor then back to the pump in this closed circuit. Either of the hydraulic hoses can be under high pressure. The direction and speed of fluid flow and (the motor output shaft rotation) depends on the position of the pump swashplate. The system pressure is determined by the load. Charge system and filter A gerotor type, fixed displacement charge pump is located in the vibration pump. The charge pump supplies cool filtered oil to the system and keeps the closed loop charged to prevent contamination. A charge pressure filter is remotely mounted in the battery box compartment. The charge pump also makes up for oil leakage in the hydraulic components necessary for cooling and lubrication. Charge pressure flows from the pump through the charge pressure filter and returns to the vibration pump to charge the closed loop circuit. NOTE! Incorrect charge pressure settings may result in an inability to build required system pressure and/or inadequate loop flushing flows. Correct charge pressure must be maintained under all conditions of operation to maintain pump control performance and prevent damage to the components. Check/high pressure relief valves Circuit pressure is maintained by the combination charge check valve and high pressure relief valve. The check valve allows charge flow to replenish the low side of the working loop. The high pressure relief valve provides pressure protection to the high pressure side of the working loop. There are two cartridge style valves to handle each side of the working loop. Vibration pump - dual amplitude
The vibration pump is a variable displacement, axial piston pump mounted to the back of the main propulsion pump. It is controlled by an EDC (Electrical Displacement Control) mounted on the top of the pump. It is activated by the vibration switch in the forward-stop-reverse handle. The EDC has three positions: OFF, High Amplitude and Low Amplitude. The amplitude range is controlled by a rocker switch in the instrument panel. This control has three positions: OFF, High Amplitude (lower portion of the switch pushed in), Low Amplitude (upper portion of the switch pushed in). When the vibration system is turned ON by the vibration switch in the control panel to the High Amplitude position, the high amplitude solenoid on the vibration pump is activated. The control module allows the swashplate to tilt to a preset angle and provide oil flow out of port A of the pump to port A of the vibration motor, which turns it in a clockwise direction. The vibration motor is coupled directly to the eccentric shaft in the drum assembly, turning it clockwise as well. When the vibration system is turned ON by the vibration switch in the control panel to the Low Amplitude position, the low amplitude solenoid on the vibration pump is activated. The control module allows the swashplate to tilt to a preset angle and provide oil flow out of port B of the pump to port B of the vibration motor, which turns it in a counter clockwise direction. The vibration motor is coupled directly to the eccentric shaft in the drum assembly, turning it counter clockwise as well. Vibration motor The vibration motor is a fixed displacement axial piston motor. Oil pressure from the vibration pump enters port A and turns the motor shaft in a clockwise direction. Oil pressure from the vibration pump enters port B and turns the motor shaft in a counter clockwise direction. A small amount of oil is used in the motor for lubrication and cooling and is directed to the hydraulic oil tank by a case drain line. Case drain The propulsion pump and motors have controlled internal leakage for lubrication purposes and to remove hot oil from the system. Case drain lines are required to direct this oil back to the hydraulic oil tank. These lines should be drained from the topmost drain port to ensure that the case remains full of oil. These lines must be unrestricted to prevent pressure build up in the housing.
Service Information Document Title: Drum, description Function Group: 777 Information Type: Service Information Date: 2015/9/7 0 Profile: COS, SD200DX [GB] Drum, description The compactor is equipped with either a smooth drum or a pad foot drum. Smooth drums are used for granular (non cohesive) soils and pad foot drums for clay (cohesive) soils. The smooth drum is scraped clean by means of scraper blades which are held close to the drum at the front and back (optional). The pad foot drum is cleaned by means of adjustable and replaceable steel teeth, bolted to the drum frame. These pass between the moving pads and dislodge any material stuck to the drum. The drum contains an eccentric weight that can be made to rotate at one of two speeds. This provides the vibrating motion that improves the compaction ability of the compactor. A bolt on conversion kit is also available to convert a smooth drum to a pad foot drum.
Figure 1 Drum, description 1. 2. 3. 4. Drum Drum frame Pad foot drum (option) Scraper blade
Service Information Document Title: Drum eccentric, description 777 Function Group: Information Type: Service Information Date: 2015/9/7 0 Profile: COS, SD200DX [GB] Drum eccentric, description The drum is equipped with an eccentric weight, mounted internally which acts in a centrifugal manner. The purpose of the eccentric is to provide vibration to the drum, which aids in the compaction of the soil. The eccentric can be set to either high or low amplitude by activating the switch in the cab, depending on the conditions of the soil.
Figure 1 Drum eccentric and components 1. 2. 3. 4. 5. Drum drive side journal Eccentric weight - outer Eccentric weight - inner Vibration drive side journal Bearing
6. 7. 8. 9. Splined coupling Washer Hexagon screw Hexagon screw Pin 10.
Service Information Document Title: Drum bolt-on shell option, installing Function Group: 777 Information Type: Service Information Date: 2015/9/7 0 Profile: COS, SD200DX [GB] Drum bolt-on shell option, installing
Figure 1 Pad foot drum shell option 1. 2. 3. 4. Smooth Drum Drum frame Pad food drum shell kit (option) Scraper assembly
WARNING The work involves handling heavy components - failure to stay alert may result in severe crushing injuries. Op nbr 777-020 1. Park the machine on a firm level surface, apply the parking brake and shut down the engine. 2. Remove smooth drum scrapers, (if equipped). 3. The mating surfaces of the drum and bolt-on shells must be clean and dry before installation to ensure a flush fit and prevent corrosion build up between the bolt-on shell and drum surfaces. 4. Attach a suitable lifting device to the lifting lugs on one of the bolt-on shell half sections and carefully lift the half shell into position on top of the drum. Figure 2 Lifting pad foot drum shell Ensure the shell fits flush and is centred on the drum. Weight of bolt-on drum shell (half section); 715 kg (1576 lb). 5. Clamp the half shell section to the drum on both sides of the machine. Figure 3 Clamping pad foot shell to drum 6. Start the machine when it is safe to do so. Slowly move the machine forward, or (if the front of the machine is raised and supported on stands), rotate the drum until the half shell is rotated 180 to the bottom side of the drum. NOTE! Watch carefully as the drum is turning and immediately stop the machine to reposition or tighten the clamps as required. 7. Stop the machine and shut down the engine.
Suggest: For more complete manuals. Please go to the home page. https://www.ebooklibonline.com If the above button click is invalid. Please download this document first, and then click the above link to download the complete manual. Thank you so much for reading
8. Attach a suitable lifting device to the lifting lugs on the second bolt-on shell half section. Carefully lift the half shell into position on top of the drum in the correct orientation, so the top shell plate will mate with the bottom and the holes in the mounting pad lugs are aligned. Figure 4 Drum shell lifting and installation 1. 2. Drum shell top half lifted into position Drum shell bottom half Weight of bolt-on drum shell (half section); 715 kg (1576 lb). 9. Secure the shell half plates together with the mounting bolts, washers and nuts. Apply high strength thread locking compound to the threads. Tighten the nuts evenly to maintain even spacing and tension between the shells and torque the nuts to specification. Figure 5 Drum shell assembly 1. 2. 3. Mounting hardware (Bolt, washers, nut), 8 places Top pad foot shell clamping lug Bottom pad foot shell clamping lug NOTE! Tighten evenly to keep even spacing between plates
10. Install and adjust scrapers, (if equipped). 11. Start the machine and move it to a suitable location for testing the vibration system. 12. Test run the machine and check for proper operation, (check scraper clearance adjustment, if equipped). Recheck torque of drum shell mounting bolts and nuts and optional scraper fasteners as required.
https://www.ebooklibonline.com Hello dear friend! Thank you very much for reading. Enter the link into your browser. The full manual is available for immediate download. https://www.ebooklibonline.com

