The Proper Use and Care of a Compound Microscope

undefined
 
Proper use and care of microscope
 
The Compound Microscope
 
Parts of the Microscope
 
 
A.  
Eyepiece
 
B.  
Body Tube
 
C.  
Coarse Adjustment
 
D.  
Fine Adjustment
 
E.  
Arm
 
F.  
Revolving Nosepiece
 
G.  
High Power Objective
 
H.  
Low Power Objective
 
I.  
 Stage Clips
 
J.  
Stage
 
K.  
Diaphragm
 
L.  
Light Source (Lamp)
 
M.  
Base
A
E
J
C
D
M
B
F
H
Medium
(10x)
G
I
K
L
 
A
 
C
o
m
p
o
u
n
d
 
M
i
c
r
o
s
c
o
p
e
 
A
 
c
o
m
p
o
u
n
d
 
l
i
g
h
t
 
m
i
c
r
o
s
c
o
p
e
 
u
s
e
s
 
t
w
o
 
l
e
n
s
e
s
 
t
o
m
a
k
e
 
a
n
 
i
m
a
g
e
 
l
o
o
k
 
b
i
g
g
e
r
.
O
n
e
 
i
s
 
t
h
e
 
e
y
e
p
i
e
c
e
 
l
e
n
s
 
a
n
d
 
t
h
e
 
o
t
h
e
r
 
i
s
 
t
h
e
 
o
b
j
e
c
t
i
v
e
l
e
n
s
.
E
a
c
h
 
l
e
n
s
 
b
e
n
d
s
 
t
h
e
 
l
i
g
h
t
 
m
a
k
i
n
g
 
t
h
e
 
i
m
a
g
e
 
l
o
o
k
 
l
a
r
g
e
r
.
 
W
h
a
t
 
i
s
 
t
h
e
 
m
a
g
n
i
f
i
c
a
t
i
o
n
 
n
u
m
b
e
r
 
o
n
 
t
h
e
 
e
y
e
p
i
e
c
e
?
1
0
x
 
W
h
a
t
 
i
s
 
t
h
e
 
m
a
g
n
i
f
i
c
a
t
i
o
n
 
n
u
m
b
e
r
 
w
r
i
t
t
e
n
 
o
n
 
e
a
c
h
o
b
j
e
c
t
i
v
e
 
l
e
n
s
?
 
l
o
w
 
p
o
w
e
r
:
 
4
x
m
e
d
i
u
m
 
p
o
w
e
r
:
 
1
0
x
h
i
g
h
 
p
o
w
e
r
:
 
4
0
x
 
C
a
l
c
u
l
a
t
i
n
g
 
T
o
t
a
l
 
M
a
g
n
i
f
i
c
a
t
i
o
n
 
T
o
 
f
i
g
u
r
e
 
o
u
t
 
t
h
e
 
t
o
t
a
l
 
m
a
g
n
i
f
i
c
a
t
i
o
n
 
u
s
e
 
t
h
i
s
 
e
q
u
a
t
i
o
n
:
T
o
t
a
l
 
M
a
g
n
i
f
i
c
a
t
i
o
n
 
(
x
)
 
=
 
E
y
e
p
i
e
c
e
 
x
 
O
b
j
e
c
t
i
v
e
 
U
s
e
 
t
h
e
 
e
q
u
a
t
i
o
n
 
a
b
o
v
e
 
t
o
 
c
a
l
c
u
l
a
t
e
 
t
o
t
a
l
 
m
a
g
n
i
f
i
c
a
t
i
o
n
.
 
T
o
t
a
l
 
M
a
g
n
i
f
i
c
a
t
i
o
n
 
u
n
d
e
r
 
L
o
w
 
p
o
w
e
r
=
1
0
 
x
 
4
 
=
 
4
0
x
 
T
o
t
a
l
 
M
a
g
n
i
f
i
c
a
t
i
o
n
 
u
n
d
e
r
 
M
e
d
i
u
m
 
P
o
w
e
r
 
=
o
1
0
 
x
 
1
0
 
=
 
1
0
0
x
 
T
o
t
a
l
 
M
a
g
n
i
f
i
c
a
t
i
o
n
 
u
n
d
e
r
 
H
i
g
h
 
P
o
w
e
r
 
=
o
1
0
 
x
 
4
0
 
=
 
4
0
0
x
 
Magnification
 
Your microscope has 
3 magnifications: Low
,
Medium and High
. Each objective will have written
the magnification. In addition to this, the ocular
lens (eyepiece) has a magnification. The 
total
magnification 
is the 
ocular x (times) objective


O
b
j
e
c
t
i
v
e
s
 
r
o
t
a
t
e
 
i
n
 
n
o
s
e
p
i
e
c
e


O
c
u
l
a
r
 
r
e
m
a
i
n
s
 
t
h
e


s
a
m
e
 
(
1
0
X
)
C
h
a
n
g
i
n
g
 
o
b
j
e
c
t
i
v
e
s
 
c
h
a
n
g
e
s
t
o
t
a
l
 
m
a
g
n
i
f
i
c
a
t
i
o
n
General Procedures
 
1. 
Make sure all books, etc., are out of the aisles and
off desks.
2. Plug your microscope into the extension cords. Each
group of desks uses the same cord.
3. Always 
start and end 
with 
the 
Low
 Power 
Objective.
Do not remove slides 
with the 
high
 
power
objective in place - this will scratch the lens!
Microscopes should be stored with the low power
objective in place.
4. Always wrap 
electric cords 
and 
cover
 microscopes
before returning them to the cabinet.
 
5. Always carry microscopes holding
the 
Arm 
and 
Base
 and set them 
flat
on your desk.
 
.
 
A
l
w
a
y
s
 
u
s
e
 
l
e
n
s
p
a
p
e
r
 
t
o
 
c
l
e
a
n
 
s
l
i
d
e
s
a
n
d
 
l
e
n
s
e
s
.
 
undefined
 
Proper use and care of microscope
 
The Compound Microscope
Focusing Specimens
 
1.
Always start with the 
Low Power objective
.
2.
Use the 
Coarse Adjustment 
to focus initially.
3.
Image may be small at this magnification, but you
won't be able to find it on the higher power
 
without
this first step.
4.
Do not use stage clips, try moving the slide around
until you find something.
5.
A
L
W
A
Y
S
 
L
O
O
K
 
F
R
O
M
 
S
I
D
E
 
W
H
E
N
 
C
L
I
C
K
I
N
G
O
B
J
E
C
T
I
V
E
S
 
I
N
 
P
L
A
C
E
 
 
2. 
Once you've focused on 
Low
, switch to 
Medium
Power
. Use the Coarse Knob to refocus. Again, if you
haven't focused on this level, you will not be able to move
to the next level.
 
3. 
Now switch to 
High 
Power
. (If you have a thick slide,
or a slide without a cover, do NOT use the high power
objective).
At this point, 
ONLY
 use the 
Fine Adjustment 
to focus
specimens
.
 Only use fine adjustment to focus on
high power.
 
4. If the specimen is too light or too dark, try adjusting the
diaphragm.
 
5. If you see 
a 
line
 
in your viewing field, try twisting the
eyepiece, the line should move. That's because its a
pointer,
 
and is useful for pointing out things to your lab
partner or teacher.
Troubleshooting
 
 
O
c
c
a
s
i
o
n
a
l
l
y
 
y
o
u
 
m
a
y
 
h
a
v
e
 
t
r
o
u
b
l
e
 
w
i
t
h
 
w
o
r
k
i
n
g
 
y
o
u
r
m
i
c
r
o
s
c
o
p
e
.
 
H
e
r
e
 
a
r
e
 
s
o
m
e
 
c
o
m
m
o
n
 
p
r
o
b
l
e
m
s
 
a
n
d
s
o
l
u
t
i
o
n
s
.
1.
I
m
a
g
e
 
i
s
 
t
o
o
 
d
a
r
k
!
Adjust the diaphragm, make sure your light is on.
 
2
.
 
T
h
e
r
e
'
s
 
a
 
s
p
o
t
 
i
n
 
m
y
 
v
i
e
w
i
n
g
 
f
i
e
l
d
,
 
e
v
e
n
 
w
h
e
n
 
I
m
o
v
e
 
t
h
e
 
s
l
i
d
e
 
t
h
e
 
s
p
o
t
 
s
t
a
y
s
 
i
n
 
t
h
e
 
s
a
m
e
 
p
l
a
c
e
!
 
Your lens is dirty. Use lens paper, and only lens paper
to carefully clean the objective and ocular lens. The
ocular lens can be removed to clean the inside.
 
3. I can't see anything under high power!
 
Remember the steps, if you can't focus under low and
then medium power, you won't be able to focus
anything under high power
. 
You need to return to the
previous power and try refocusing.


D
r
a
w
i
n
g
 
S
p
e
c
i
m
e
n
s
1.
Use pencil 
- you can erase and shade areas
 
2. All drawings should include clear and proper 
labels 
(and be
large enough to view details).
Drawings should be labeled with the specimen 
name and
magnification
.
3
. Labels 
should be written on the 
outside
 of the circle. Make
lines using a 
ruler
.
T
h
e
 
c
i
r
c
l
e
 
i
n
d
i
c
a
t
e
s
 
t
h
e
 
v
i
e
w
i
n
g
 
f
i
e
l
d
 
a
s
 
s
e
e
n
 
t
h
r
o
u
g
h
t
h
e
 
e
y
e
p
i
e
c
e
,
 
s
p
e
c
i
m
e
n
s
 
s
h
o
u
l
d
 
b
e
 
d
r
a
w
n
 
t
o
 
s
c
a
l
e
 
(
e
x
.
 
i
f
y
o
u
r
 
s
p
e
c
i
m
e
n
 
t
a
k
e
s
 
u
p
 
t
h
e
 
w
h
o
l
e
 
v
i
e
w
i
n
g
 
f
i
e
l
d
,
 
m
a
k
e
s
u
r
e
 
y
o
u
r
 
d
r
a
w
i
n
g
 
r
e
f
l
e
c
t
s
 
t
h
a
t
.
 
)
 
M
a
k
i
n
g
 
a
 
W
e
t
 
M
o
u
n
t
1.
Gather a 
thin slice/piece 
of whatever your specimen is.
If your specimen is 
too thick
, then the 
coverslip will
wobble
 on top of the sample like a see-saw, and you
will not be able to view it under High Power.
 
2. Place 
ONE drop of water 
directly over the specimen.
If you put too much water, then the coverslip will
float on top of the water, making it hard to draw the
specimen, because they might actually float away.
(Plus too much water is messy)
 
 
3. Place the coverslip at a 
45 degree angle 
(approximately)
with one edge touching the water drop and then gently let
go.
P
e
r
f
o
r
m
e
d
 
c
o
r
r
e
c
t
l
y
 
t
h
e
 
c
o
v
e
r
s
l
i
p
 
w
i
l
l
 
p
e
r
f
e
c
t
l
y
 
f
a
l
l
o
v
e
r
 
t
h
e
 
s
p
e
c
i
m
e
n
.
T
a
p
 
o
n
 
c
o
v
e
r
s
l
i
p
 
w
i
t
h
 
e
r
a
s
e
r
 
t
o
 
g
e
t
r
i
d
 
o
f
 
a
i
r
 
b
u
b
b
l
e
s
 
(
u
s
e
 
p
a
p
e
r
 
t
o
w
e
l
s
t
o
 
r
e
m
o
v
e
 
e
x
c
e
s
s
 
w
a
t
e
r
 
f
r
o
m
 
s
l
i
d
e
 
How to Stain a Slide
 
1.
Place 
one drop of stain 
(iodine, methylene blue..there are many
kinds) on the edge of the coverslip.
 
2.
Place 
paper towel 
on the opposite 
side of the coverslip,. The
paper towel will draw the water out from under the coverslip,
and the cohesion of water will draw the stain under the slide.
 
3.
As soon as the stain has covered the area containing the
specimen, you are finished. The stain does not need to be under
the entire coverslip. If the stain does not cover as needed, get a
new piece of paper towel and add more stain until it does.
 
4.
B
e
 
s
u
r
e
 
t
o
 
w
i
p
e
 
o
f
f
 
t
h
e
 
e
x
c
e
s
s
 
s
t
a
i
n
 
w
i
t
h
 
a
 
p
a
p
e
r
 
t
o
w
e
l
.
 
 
CLEAN UP!
 
1.
Store microscopes with the 
low objective 
in
place.
2.
Wrap cords 
and cover microscopes.
3.
Wash slides 
in the sinks and dry them, placing
them back in the slide boxes to be used later.
4.
Throw coverslips away
.
Slide Note
Embed
Share

Explore the proper use and care of a compound microscope, including the different parts of the microscope, magnification calculations, general procedures for handling the microscope, and more. Learn about objectives, eyepiece magnification, total magnification, and essential maintenance tips to ensure accurate observations.

  • Microscope
  • Magnification
  • Care
  • Maintenance
  • Procedures

Uploaded on Sep 10, 2024 | 0 Views


Download Presentation

Please find below an Image/Link to download the presentation.

The content on the website is provided AS IS for your information and personal use only. It may not be sold, licensed, or shared on other websites without obtaining consent from the author. Download presentation by click this link. If you encounter any issues during the download, it is possible that the publisher has removed the file from their server.

E N D

Presentation Transcript


  1. The Compound Microscope Proper use and care of microscope

  2. Parts of the Microscope

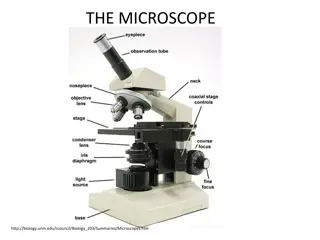
  3. A A. Eyepiece B B. Body Tube C. Coarse Adjustment F H D. Fine Adjustment E E. Arm F. Revolving Nosepiece Medium (10x) G I K L J G. High Power Objective H. Low Power Objective C D I. Stage Clips J. Stage K. Diaphragm M L. Light Source (Lamp) M. Base

  4. A Compound Microscope A compound light microscope uses two lenses to make an image look bigger. One is the eyepiece lens and the other is the objective lens. Each lens bends the light making the image look larger. What is the magnification number on the eyepiece? 10x What is the magnification number written on each objective lens? low power: 4x medium power: 10x high power: 40x

  5. Calculating Total Magnification To figure out the total magnification use this equation: Total Magnification (x) = Eyepiece x Objective Use the equation above to calculate total magnification. Total Magnification under Low power= 10 x 4 = 40x Total Magnification under Medium Power = o 10 x 10 = 100x Total Magnification under High Power = o 10 x 40 = 400x

  6. Magnification Your microscope has 3 magnifications: Low, Medium and High. Each objective will have written the magnification. In addition to this, the ocular lens (eyepiece) has a magnification. The total magnification is the ocular x (times) objective Magnification Ocular Lens Total Magnification Low power/ scanning 4x 10x 40x Medium power 10x 10x 100x High power 40x 10x 400x

  7. Objectives rotate in nosepiece Ocular remains the same (10X) Changing objectives changes total magnification

  8. General Procedures 1. Make sure all books, etc., are out of the aisles and off desks. 2. Plug your microscope into the extension cords. Each group of desks uses the same cord. 3. Always start and end with the Low Power Objective. Do not remove slides with the high power objective in place - this will scratch the lens! Microscopes should be stored with the low power objective in place. 4. Always wrap electric cords and cover microscopes before returning them to the cabinet.

  9. 5. Always carry microscopes holding the Arm and Base and set them flat on your desk.

  10. . Always use lens paper to clean slides and lenses.

  11. The Compound Microscope Proper use and care of microscope

  12. Focusing Specimens 1. Always start with the Low Power objective. 2. Use the Coarse Adjustment to focus initially. 3. Image may be small at this magnification, but you won't be able to find it on the higher power without this first step. 4. Do not use stage clips, try moving the slide around until you find something. 5. ALWAYS LOOK FROM SIDE WHEN CLICKING OBJECTIVES IN PLACE

  13. 2. Once you've focused on Low, switch to Medium Power. Use the Coarse Knob to refocus. Again, if you haven't focused on this level, you will not be able to move to the next level. 3. Now switch to High Power. (If you have a thick slide, or a slide without a cover, do NOT use the high power objective). At this point, ONLY use the Fine Adjustment to focus specimens. Only use fine adjustment to focus on high power. 4. If the specimen is too light or too dark, try adjusting the diaphragm. 5. If you see a line in your viewing field, try twisting the eyepiece, the line should move. That's because its a pointer, and is useful for pointing out things to your lab partner or teacher.

  14. Troubleshooting Occasionally you may have trouble with working your microscope. Here are some common problems and solutions. 1. Image is too dark! Adjust the diaphragm, make sure your light is on. 2. There's a spot in my viewing field, even when I move the slide the spot stays in the same place! Your lens is dirty. Use lens paper, and only lens paper to carefully clean the objective and ocular lens. The ocular lens can be removed to clean the inside. 3. I can't see anything under high power! Remember the steps, if you can't focus under low and then medium power, you won't be able to focus anything under high power. You need to return to the previous power and try refocusing.

  15. Drawing Specimens 1. Use pencil - you can erase and shade areas 2. All drawings should include clear and proper labels (and be large enough to view details). Drawings should be labeled with the specimen name and magnification. 3. Labels should be written on the outside of the circle. Make lines using a ruler. The circle indicates the viewing field as seen through the eyepiece, specimens should be drawn to scale (ex. if your specimen takes up the whole viewing field, make sure your drawing reflects that. )

  16. Making a Wet Mount 1. Gather a thin slice/piece of whatever your specimen is. If your specimen is too thick, then the coverslip will wobble on top of the sample like a see-saw, and you will not be able to view it under High Power. 2. Place ONE drop of water directly over the specimen. If you put too much water, then the coverslip will float on top of the water, making it hard to draw the specimen, because they might actually float away. (Plus too much water is messy) 3. Place the coverslip at a 45 degree angle (approximately) with one edge touching the water drop and then gently let go. Performed correctly the coverslip will perfectly fall over the specimen. Tap on coverslip with eraser to get rid of air bubbles (use paper towels to remove excess water from slide

  17. How to Stain a Slide 1. Place one drop of stain (iodine, methylene blue..there are many kinds) on the edge of the coverslip. 2. Place paper towel on the opposite side of the coverslip,. The paper towel will draw the water out from under the coverslip, and the cohesion of water will draw the stain under the slide. 3. As soon as the stain has covered the area containing the specimen, you are finished. The stain does not need to be under the entire coverslip. If the stain does not cover as needed, get a new piece of paper towel and add more stain until it does. 4. Be sure to wipe off the excess stain with a paper towel.

  18. CLEAN UP! 1. Store microscopes with the low objective in place. 2. Wrap cords and cover microscopes. 3. Wash slides in the sinks and dry them, placing them back in the slide boxes to be used later. 4. Throw coverslips away.

More Related Content

giItT1WQy@!-/#giItT1WQy@!-/#giItT1WQy@!-/#giItT1WQy@!-/#giItT1WQy@!-/#giItT1WQy@!-/#giItT1WQy@!-/#giItT1WQy@!-/#giItT1WQy@!-/#giItT1WQy@!-/#giItT1WQy@!-/#giItT1WQy@!-/#giItT1WQy@!-/#