Sewing Techniques for Collars
Explore different sewing techniques for collars including collar with a facing and shirt collar construction. Learn how to apply interlining, stitch collars together, join collar to bodice, and more. Detailed step-by-step instructions with accompanying images provided for each technique.
Download Presentation

Please find below an Image/Link to download the presentation.
The content on the website is provided AS IS for your information and personal use only. It may not be sold, licensed, or shared on other websites without obtaining consent from the author.If you encounter any issues during the download, it is possible that the publisher has removed the file from their server.
You are allowed to download the files provided on this website for personal or commercial use, subject to the condition that they are used lawfully. All files are the property of their respective owners.
The content on the website is provided AS IS for your information and personal use only. It may not be sold, licensed, or shared on other websites without obtaining consent from the author.
E N D
Presentation Transcript
COLLARS (SEWING TECHNIQUES)
COLLARS (1) (1) (3) (3) Cross reference can Cross reference can be made to be made to Collar (Patterns) Collar (Patterns) Photo(s) is/are provided by HKDI
APPLIED COLLAR Photo(s) is/are provided by HKDI
01. COLLAR WITH A FACING The pieces required are 1. Collar 2. Facing 3. Collar interlining
01. COLLAR WITH A FACING 1. Apply the interlining to the collar.
01. COLLAR WITH A FACING 2. Stitch the collars together.
01. COLLAR WITH A FACING 3. Turn the collar through and press. 4. Stitch the neck edges of the collars together before joining to bodice.
01. COLLAR WITH A FACING 5. Find the centre point of both bodice and collar. 6. Stitch on the collar taking 1cm seam allowance.
01. COLLAR WITH A FACING 7. Stitch the facing and bodice together.
01. COLLAR WITH A FACING 8. Stitch the facing to the seam allowance of the collar and garment.
01. COLLAR WITH A FACING 9. Snip the seam allowance of the neckline. 10.Join CF to the facing. 11.Turn through to the right side.
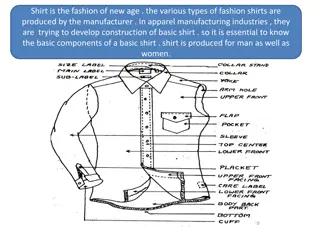
02. SHIRT COLLAR Front Back
02. SHIRT COLLAR The pieces required are 1. Collars 2. Collar interlining 3. Collar stands 4. Stand interlining
02. SHIRT COLLAR Stitch the collars together 1. Apply the interlining to the collars. Stitch the collars together. Turn through and press.
02. SHIRT COLLAR 2. Stitch the neck edges of the collar together.
02. SHIRT COLLAR 3. Apply the interlining on the edge of the stand.
02. SHIRT COLLAR 4. Place the WS of the collar to the RS of the stand. Stitch them together with 1cm seam allowance.
02. SHIRT COLLAR 5. Join the stand with its RS placed against the collar.
02. SHIRT COLLAR 6. Turn through to the RS and press.
02. SHIRT COLLAR 7. Place the stand to the WS of the bodice. Stitch the stand to the bodice.
02. SHIRT COLLAR 8. Press the seam allowances upward on the stand.
02. SHIRT COLLAR 9. Top stitch along the edge of the stand.
DEMONSTRATION VIDEO Shirt Collar
GROWN ON COLLAR Photo(s) is/are provided by HKDI
05. SHAWL COLLAR Photo(s) is/are provided by HKDI
DEMONSTRATION VIDEO Shawl Collar
COLLAR AND LAPEL Collection by HO Sik Yuen, HD in Fashion Design, Hong Kong Design Institute) Photo(s) is/are provided by HKDI
DEMONSTRATION VIDEOS 1. Collar and Lapel 2. Collar Seams
C H A P T E R AC T I V I T Y S E W I N G P R AC T I C E 1. Collar with a facing 2. Shirt collar 3. Shawl collar 4. Collar and lapel Photo(s) is/are provided by HKDI


