Masonry Work and Tools: A Comprehensive Guide
Introduction to masonry work including types of masonry, tools used (like trowel and spirit level), and binding materials. Learn about laying techniques, straightening tools, and important guidelines for brick and stone masonry construction. Enhance your knowledge in the field of construction with this insightful lecture.

Download Presentation

Please find below an Image/Link to download the presentation.
The content on the website is provided AS IS for your information and personal use only. It may not be sold, licensed, or shared on other websites without obtaining consent from the author.If you encounter any issues during the download, it is possible that the publisher has removed the file from their server.
You are allowed to download the files provided on this website for personal or commercial use, subject to the condition that they are used lawfully. All files are the property of their respective owners.
The content on the website is provided AS IS for your information and personal use only. It may not be sold, licensed, or shared on other websites without obtaining consent from the author.
E N D
Presentation Transcript
Lecture 4. Masonry Work By: Dinaol 4/28/2020 1
In this Lecture: Introduction about Masonry work Different tools used in masonry works and Types of masonry work (bricks and stone masonry) Binding materials: mortar and concrete 4/28/2020 2
4.1. Introduction about masonry Masonry means construction of stone (brick) joined with or without mortar (i.e., dry stone wall or open joints). N.B. Dear students read about the definitions of masonry work online in google or other search engines and attempt all questions at the end of the lecture note. 4/28/2020 3
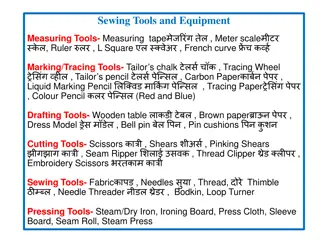
4.2. Masonry hand tools 4.2.1 Laying Tools The trowel: Of the tools that a block layer uses, the brick trowel is by far the most important one, for it is almost continuously needed during the building construction. Its main function is to pick up the mortar and to spread to an even thickness in preparation for laying the blocks or bricks. And it is also needed for trimming of bricks or blocks and for any work where mortar or concrete is worked up. 4/28/2020 4
4.2.1. Laying Tools The trowel: The long narrow bladed trowel is very popular and it is most frequently used for laying blocks and troweling floor screeds. This trowel consists of a wooden handle connected by a ferrule to the shank which joins the steel blade. The size of the blade ranges from 23 to 36 cm in length, while the width varies from 9 13 cm. The extended axle line of the handle should line up with the tip of the blade in order to provide the best handle. When you buy a trowel, make sure that the blade is of good quality steel. 4/28/2020 5
4.2.2. Straightening Tools These are spirit level, plumb bob, mason line, and straight edge. 1) Spirit level: These are wooden or metal straight edge specially fitted with plastic tubes containing spirit and a bubble of air. These tubes are set into the right edge so that when it is placed across two points which are level to each other, the air bubble will be exactly in the center of the tube. This position is clearly marked with lines inside the tube (figures 1.2 & 1.3). In similar way, a tube is set in the straight edge to read with level held vertically, which enables you to plumb members over short distances. 4/28/2020 6
4.2.2. Straightening Tools 1) Spirit level: To level a longer horizontal distance you cannot use a straight edge with a level. Instead you have to use a water level, which will be explained later. To level a vertical distance, which is longer than your straight edge, you can use your plumb bob. 4/28/2020 7
4.2.2. Straightening Tools 2) Plumb bob: This tool consists of a solid brass or metal cylinder with a pointed end, which is attached to a suspended line so that its tip is always pointing vertically down. The main use of the plumb bob is as a more accurate replacement for vertical spirit level and also to transfer down vertically in marking. 4/28/2020 8
4.2.2. Straightening Tools 3) Mason line: When building up walls between two quoins we employ the mason line, which is approximately 30 meters ling, to ensure that the course are straight and at the correct height. The line is tightened between two nails driven into the bed joints. Mason lines are also used for setting out buildings, lining out frames for doors and windows and many other purposes where a straight line is needed for a guide over longer distances. Instead of nails, so called line bobbins may be used. The line is stretched between opposite quoins, passed through the saw cut of each bobbin and wrapped around the projecting screws. Line bobbins are preferred to nails, as they are easily adjusted to the required level and no holes needed to be made in the bed joints. 4/28/2020 9
4.2.2. Straightening Tools 3) Mason line: In addition to the mason line, a tingle plate must be used if the distance between the quoins becomes too great and the line starts to sag. A tingle plate is made from thin metal and it is used to support the line in the middle to prevent sagging. The tingle plate must be set at the correct height (fig 1.6). A tingle plate can easily be made from a piece of roofing sheet or any other sheet metal. Sometimes a piece of stiff paper is used for this purpose. If the line breaks, it should be spliced and not tied with a knot, because a line full of knots will not be straight. 4/28/2020 10
4.2.2. Straightening Tools 4) Straight edge: This is a planned piece of wood which should be well seasoned and dry to prevent it from bending and twisting. The dimensions of a straight edge are usually 2 to 2.50 m long, 7.5 cm wide and 2.5 cm thick; both edges must be perfectly straight and parallel. The straight edge is employed for testing masonry work either alone or in conjunction with the spirit level. Some straight edges are marked off with saw cuts to the required gauge; that is one division is equal to the height of a block (brick) plus the joint. Don t allow a straight edge to dry out in the sun or to be soaked in water as this may cause it to bend or twist. When you are finished using it, hang the straight edge in a protected place to keep it straight. 4/28/2020 11
4.2.3. Measuring and Marking Tools 1) Folding rule: The four fold rule shown in fig 1.11 is made of four wooden, plastic or metal pieces which are held together by special hinges. It is one meter long and used on both sides into millimeters and centimeters. It is used to find and check measurements as well as to mark out the work. To make the rule operate more smoothly and last longer, put a drop of machine oil in the joints. 4/28/2020 12
4.2.3. Measuring and Marking Tools 2) Zig zag rule A zig zag rule is similar to a folding rule. It is made out of the same materials but from pieces which are 20 cm long. As the hinges are different from those of the folding rule, be careful not to break it when opening and closing it. They come in lengths of 100 200 cm. When measuring with the folding or the zig zag rule, one must make sure that the rule is completely opened and straight. It is then hold parallel to an edged, or at right angles to a face. If this is not done, the measurements you get will always be a little different from the correct ones. 4/28/2020 13
4.2.3. Measuring and Marking Tools 3) Pencils: For marking on wood, a hard lead pencil (H or 2H) is best. The point should always be kept sharp, because using a blunt pencil can result in an accuracy of up to 2 mm. 4/28/2020 14
4.2.3. Measuring and Marking Tools 4) The mason square: The mason square is made from steel. Measured along the out edge, the short blade is 33 cm long and the long blade is 60 cm long. The blades are sometimes marked with mm, cm, and decimeter. The mason square is used for setting out right angles as at quoins, and for testing corners during plastering when using the square, held it either horizontally or vertically (not at an angle) to be sure of getting the correct angles. 4/28/2020 15
4.2.3. Measuring and Marking Tools 5) The large square: This square is made entirely from wood. To construct this large square which is made at the building site, use the 3 4 5 method and nail the boards together securely. A brace over the two legs ensures that the square remains at the correct angle. The square is used to test larger right angles. 4/28/2020 16
4.2.4. Cutting Tools 1) The block scotch: This tool consists of a hard steel blade with two cutting edges, welded to the handle which is made of iron pipe. It is used for cutting all sorts of blocks and dressing out surfaces. 4/28/2020 17
4.2.4. Cutting Tools 2) The pointed chisel (cold chisel): This is a forged steel rod with a gardened cutting tip and striking end. Cold chisels are available in different sizes and are used together with a club hammer. Always wear your safety goggles when you use the chisel. They are used to cut iron rods, pipes, metal sheets, stones, bricks etc. The club hammer has a heavy steel head with slightly rounded striking faces and it is used to strike cold chisels and to break stones into smaller size 4/28/2020 18
4.2.5. Finishing Tools 1) The big wood float: This tool has a blade made of a soft wood. It is approximately 40 cm long and 25 cm wide. A handle made from hard wood is fixed to it with screws so that the blade can be replaced when necessary. Its main functions are to distribute an even thickness of mortar during plastering and to flatten concrete surfaces during floor construction. 4/28/2020 19
4.2.5. Finishing Tools 2) The small wood float: It is constructed in the same way as the big one but with smaller dimensions, being approximately 25 cm in length and 15 cm in width. It is used mainly to give the plaster and floor surfaces a smoother finish 4/28/2020 20
4.2.6. Site Tools 1. Cutlass: The cutlass is used for clearing the site and other general cutting work. 2. Hoe: This farming tool is often used to excavate top soil 4/28/2020 21
4.2.6. Site Tools 3. Shovel: There are various types of shovel like tools. The most common type is the one with a round nosed steel blade of about 25 by 30 cm, connected to a short wooden shaft that has a D or Y shaped handle at the end. Whether the shovel has a short or a long handle is a matter of personal preferences or local custom. The short handled is more suitable for filling and moving purposes of light soil, while the long handled is also better for loading and for mixing. 4/28/2020 22
4.2.6. Site Tools 4. Pick-axe: This digging tool consists of heavy steel with one pointed end with a chisel edge. The head is constructed to a wooden shaft. The pick-axe is used during excavation to bread up hard rocky soils or loosen laterite etc. 5. Rammer: Are either made entirely out of wood or they have a wooden handle attached to a metal or concrete head. They are used to compact soil or concrete. 4/28/2020 23
4.2.6. Site Tools 6. Hacksaw: Is a hand saw used for cutting metals like iron rods, pipes, binding wires, etc. it consists of a steel blade tightly stretched in a metal frame. The blade is removable and other blades can be fixed in the frame for cutting materials 4/28/2020 24
4.2.7. Site Equipment 1) Screen: is a rectangular frame with a wire mesh built into it for separating impurities or stones from sand. A well equipped building site will have two different screens; a larger mesh to separate to stones of convenient size and a smaller one of sieve sand that will be used for plastering. 4/28/2020 25
4.2.7. Site Equipment 2) Bucket: are open containers that can be made from different materials like rubber, plastic, or galvanized iron. The average bucket (size no. 28) has a volume of 10 liters and is used mainly for carrying water. 3) Rope: used on the building site are usually made from hemp or nylon. Nylon ropes have a tendency to stretch when they are under strain, and this must be taken into consideration when you use this kind of rope during construction work. 4/28/2020 26
4.2.7. Site Equipment 4) Wheelbarrow: is steel or wooden container with single steel or rubber typed wheel in front. It is lifted and pushed forward by means of two handholds attached to the frame. The bending b arc is used to do the actual bending. This is a key shaped tool with a slot in one side into which the rod fits. Each different diameter of rod needs its own bending bar. If a suitable bending bar is not available, a pipe can be used to do the job 4/28/2020 27
4.2.7. Site Equipment 5) Water level: used for setting out levels on the site as well as to transfer and control levels over large distances. It consists of a transparent plastic tube filled with water. The level of the water at one end of the tube will be at exactly the same height as the level at the other end, provided that there is no air bubble in the tube and it is not buckled. The water level enables us to level over large distances with a high degree of accuracy. If there is no transparent plastic tube available and some rubber hose can found, the rural builder can take two glass bottles, knock out the bottoms and fit the bottle necks to each end of the hose. This apparatus is then filled with water until the water is seen the bottles. Levels can be read as easily with this device as with any other water level 4/28/2020 28
4.2.7. Site Equipment 6) Strike board: is made from well seasoned wood. They are similar to straight edges except that they are usually longer. A strike board is used to level off the screed on floors, or in the case of notched strike boards to level off concrete before the screed is laid. 4/28/2020 29
4.2.7. Site Equipment 7) The try square: is used for marking timber, and for testing right angles to make sure that they are correct. Its parts are; the stock, the blade and the stock face. The stock can be all metal or it can be made of hard wood with a brass stock face. The blade is made of steel. The angle between the stock face and blade is exactly 90 degrees. 4/28/2020 30
4.2.8.Tools for measuring and Mitering Angles 1) The meter square: used to mark and test angles of 45 and 135 degrees. The blade is fixed at 45 degrees to the stock. 2) The try and meter square: Combination of a try square and a meter square. The end of the stock where it meets the blade is cut at 45 degree, so that square can be used for setting out and testing angles of 45 and 135, as well as 90 degrees. 4/28/2020 31
4.2.8.Tools for measuring and Mitering Angles 3) The sliding bevel: This is an adjustable square for marking out, testing and duplicating angles from 0 to 180 degrees. It has a stock and as slotted blade which can be adjusted to any angle and is held in place by a screw or a wiring nut. A simple sliding bevel can be made by fixing two pieces of wood together with a nail or screw. Another method is to use the first section of a folding rule. 4/28/2020 32
End of this sub-portion 4/28/2020 33
4.3. Types of Masonry work 4.3.1. Stone Masonry Several kinds of stone, both natural and artificial, are used in structures such as buildings, walls, foundations, etc. Natural stones used for construction include, sand stone, lime stone, granite, basalt, etc. Artificial lime stone is available in many areas. 4/28/2020 34
4.3.1. Stone Masonry I. A. Rubble stone masonry: - This is the most common type of masonry used in many parts of the world. The stones are roughly shaped by the masons, and the resulting wall is laid in regular courses or at random with mortar joints. The mortar used may be mud mortar, cement mortar or lime mortar. For estimate purposes, this type of masonry is approximately 35% mortar and 65% stone. Types of stone masonry 4/28/2020 35
I. Types of stone masonry B. Dressed-stone masonry: Also known as ashlarmasonry . In this type of masonry, the stones are carefully cut to rectangular dimensions, making stonebricks . Such masonry requires skilled masons, and much time and labor. Ashlar masonry is approximately 30% mortar and 70% stone. There are four different types of ashlar masonry, depending on how much dressing is done and how the stones are put together. 4/28/2020 36
B. Dressed-stone masonry: These are: Rough stone masonry, Hammer-dressed ashlar masonry, Broken range masonry & Range masonry. These are listed according to the increasing amounts of stone dressing and stone arrangement required for each method. For example, rough stone masonry consists of natural stones which are shaped only slightly along their bed faces, or not shaped at all. As in rubble masonry, regular stones are not seen here in rough stone masonry because of the irregularly shaped stones. Where as in range masonry; the accurately squared stones are laid in courses, and each course is uniformly thick throughout its length. However, the courses are not all necessarily all the same thickness 4/28/2020 37
4.3.1. Stone Masonry II. Thickness of stone wall The thickness of the wall depends to a large extent on the material and masonry technique (i.e., either rubble or dressed stone masonry). When using easily worked material the thickness may be less. Local masons can usually build walls in stone masonry to 30-50 cm thick. In any case, if the height of the wall is 3 m or more, a wall thickness of 45-50 cm is quite common. 4/28/2020 38
4.3.1. Stone Masonry III. Stone preferences Basalt stone is used mainly for walls which are exposed to moisture, for example foundation walls, lining (casing in) of wells, pit latrines, septic tanks, soak away pits, cesspools, etc. While the more easily worked trachete stone is employed for all kinds of walls above ground, level (i.e., elevation walls). Other types of stones suitable for wall masonry are sand stone, granite, lime stones, slate. Stones should have faces for construction. 4/28/2020 39
4.3.1. Stone Masonry Stones at the middle of the wall should have three faces: The side face to be seen straight The bottom face to rest leveled on the other stone and the top face to be convenient for the course Corner stones (quoins), which give strength to the wall, must have four faces Amorphous stones can be in between to fill gaps. Wall should be filled properly without vacancy. Stones for construction must properly over-lap i.e., the half body of one stone on the half body of another stone (see at coursed rubble and coursed ashlar bonds). 4/28/2020 40
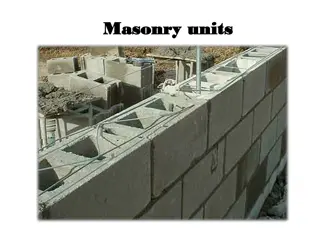
4.3.2. Brick masonry Bricks are usually locally manufactured, and are of various shapes and quality. The exact dimensions of local bricks should be obtained for making the estimated requirements. The total volume of brick masonry is approximately 25% mortar and 75% brick. The actual size of standard modular brick is 19 cm x 9 cm x 9 cm and its nominal size is 20 cm x 10 cm x 10 cm. Actual thickness of wall with 1 cm mortar joint are 9 cm for brick, 19 cm for 1 brick, 29 cm for 1 brick, 39 cm for 2 bricks and so on. But the thickness of wall is taken as multiple of 10 as given in the above table irrespective of the actual thickness for estimating number of bricks required for a given volume or area of wall. 4/28/2020 41
4.3.2. Brick masonry When the thickness of a wall is said to be brick, it means that the wall is made of a single brick. As for example, the length of the modular brick is 20 cm; half of its length is 10 cm. Therefore a thickness of brick wall means half the length of full brick (or the width of a single brick). Similarly, when the thickness of a wall said to be 1 brick, is that two bricks are laid side by side each 10 cm wide that make up 20 cm wide wall (10 cm + 10 cm = 20 cm), which is equal to the length of one full brick. The actual size of traditional brick is 22.9 cm x 11.2 cm x 7 cm and its nominal size is 22.9 cm x 11.4 cm x 7.6 cm. 4/28/2020 42
4.3.2. Brick masonry I) Thickness of brick wall In general for one story residential building one brick, (i.e., 20 cm if with a modular brick and if traditional brick is used, the thickness in 22.9) thick wall is sufficient. If for example the brick size in your locality is 22.9 cm x 11.4 cm x 7.6 cm, and if you decide to build a wall of one brick thick, it means that the thickness of your wall is 22.9 cm, which means two bricks each 11.4 cm wide are laid side by side with 0.1 cm apart. Walls longer than for meter length (span) should be thicker than one brick. Partition walls may be half brick thick (i.e., single brick either of 10 cm, or 11.4 cm wide or depending on the brick size locally available. Minimum thickness of stone masonry wall may be 30 cm. 4/28/2020 43
4.3.2. Brick masonry II) Technical terms used in brick work Course: This is the term applied to each layer or row of bricks (blocks), with the bed joint included fig.3.6, next page. The thickness of each course is one brick plus one joint of mortar. Quoin: The quoin is outside corner of a wall or the external angle on the face side of the wall (fig 3.6). Joint: The horizontal joints between the bricks are bed joints and the vertical joints are called cross joint. Bed is the under surface of a brick (block) or the mortar on which the brick is laid. 4/28/2020 44
4.3.2. Brick masonry II) Technical terms used in brick work Stretcher: if the bigger face of a brick is exposed i.e., when a brick is laid showing its long side i.e., 22.9 cm, the brick is called a stretcher. This is the way most bricks are laid in rural building, and we say that the brick is laid edge wise. If a brick is laid flat wise, so it is actually showing the top face, it is also called a stretcher. Header: A brick is known as header when it is placed in a wall so that its smallest face (i.e., 11.4 cm) is exposed. Bats: are pieces of bricks, and are generally known as or bats, according to their fraction of a whole brick. The cut is made along the width, not along the length. A special brick (block) gauge may be used for marking off the different sizes. 4/28/2020 45
4.3.2. Brick masonry II) Technical terms used in brick work Queen closers: Is half the width but the same length and thickness of an ordinary (whole) brick. The cut is made along the length not along the width. They are placed next to the quoin header to obtain the lap. King closers: are bricks which are cut obliquely so that one end is half the width. Angle brick: this is the brick, which actually forms the corner in each course. Toothed end: The form produced at the end of a wall by recessing every other course by half brick (block) in order that the wall may be extended later using the same bond. 4/28/2020 46
4.3.2. Brick masonry II) Technical terms used in brick work Racking back: as and alternative to toothing; the end of a wall may be set back half a block (brick) at each course. This is also done so that the wall may be extended using the same bond. Foundation: the base, usually concrete (or stone, block, brick), on which the building rests. It is usually set below ground level, and is the only part of the building in direct contact with ground. Footings: the courses laid directly on top of the foundation Plinth course: the edge wise course laid on top of footing Rising wall: the edge wise course which build up the rest of the wall 4/28/2020 47
4.3.2. Brick masonry III) Bond It is a system of laying bricks (blocks), one upon another, so that the pressure of the weigh is equalized. The practice of brick laying (block laying) requires a complete understanding of the correct arrangement of the bricks (blocks) forming a wall. This correct arrangement of bricks regardless of the methods is known as bonding. The bricks are placed so that they overlap each other and care must be taken to ensure that as for as possible no vertical joint is immediately above another vertical joint in the course below. The simplest form of bonding is that where all the bricks (blocks) are laid down as stretchers, each brick overlapping the one below by half its length. This form of bonding is only suitable where a two-brick thickness of the wall is sufficient. 4/28/2020 48
III) Bond Methods of bonding In brick (block) construction, there are a number of recognized methods of bonding: English bond, Flemish bond, stretcher bond, header bond, English garden wall bond, and Flemish garden bond. While the chief bonds used in house construction are English, Flemish and garden- wall bond. Stretcher bond: the bricks in all courses are as stretchers, i.e., the brick is laid with its length laying along the length of the wall. It is suitable for use in small houses or as a partition walls and half timbered work. Header bond: is the usually used for footings, cornices and for rounding curves (arcs). A header is a brick with its width running in to the all. 4/28/2020 49
III) Bond English bond: this bond consists of alternative courses of headers and stretchers. The center of any stretcher is in line with the center of the header in the courses above and below. Headers are laid above and below the middle of each stretcher, and to always to form these particular vertical joints on the wall face in their correct order a smaller brick, called a quoin closer, is inserted next to the quoin header, so as to start the regular strongest of all bonds, because there are no straight joints, except the width of about 3/8 of an inch, the vertical joints intersect. Flemish bond: this bond consists of alternative headers and stretchers in the same course. The center of any stretcher is in line with the center of the header in the course above and below. 4/28/2020 50


 Bond …")
 Bond …")