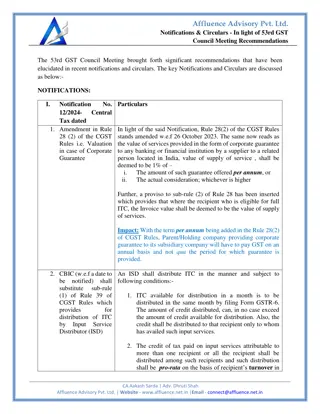
How to Submit and File GSTR1 on GST Portal

How to submit and file
GSTR1?
D
irectly on the GST Portal


Step 1
A) Upload all the GSTR1 data using Smile and File GST software.
B) You may view the individual sections (B2B, B2CL, CDN, CDNUR, EXP, B2CS, NIL, AT, TXPD, No of
Invoices and HSN Summary) for which data has been uploaded and verify the correctness.
C) Get the GSTR1 Summary and view it.
D) Verify whether the summary shows all the sections filled up with the correct data.

Step 2
A) Log in to www.gst.gov.in.
B) Submit the GSTR1. [snapshots given in next slides]
C) File the GSTR1. [snapshots given in next slides]
D) This completes your GSTR1 filing.
Log in to the GST Portal
You are logged in. Select “Return Dashboard”
Select File returns and Prepare online
in the outward supplies
View the data uploaded and verify
each section.
Select the submit option
If you are sure, accept the warning !
Having Submitted, you need to File.
You will again get a warning as follows !
Use your digital signature to file the GSTR1.
Signing with DSC (continued)
You have filed your GSTR1
Some Tips
•
Be patient with the GSTN portal. It is still in its infancy.
•
If things are not happening or throwing up some errors, logout and
login again after some time.
•
Don’t do the next step unless the earlier step is completed properly
and you can see the confirmation on the screen.
•
Use Internet Explorer 11 to sign with DSC.
•
If you have any problems please contact us.
•
Don’t miss the next slide….
Done with GSTR1
•
Start preparing for GSTR2
•
Thankyou……..
Learn the steps to upload, verify, and file your GSTR1 directly on the GST portal, including logging in, submitting, and using digital signature for filing. Detailed instructions and visual aids provided.

Download Presentation

Please find below an Image/Link to download the presentation.
The content on the website is provided AS IS for your information and personal use only. It may not be sold, licensed, or shared on other websites without obtaining consent from the author. Download presentation by click this link. If you encounter any issues during the download, it is possible that the publisher has removed the file from their server.
E N D
Presentation Transcript
How to submit and file GSTR1? Directly on the GST Portal
Step 1 A) Upload all the GSTR1 data using Smile and File GST software. B) You may view the individual sections (B2B, B2CL, CDN, CDNUR, EXP, B2CS, NIL, AT, TXPD, No of Invoices and HSN Summary) for which data has been uploaded and verify the correctness. C) Get the GSTR1 Summary and view it. D) Verify whether the summary shows all the sections filled up with the correct data.
Step 2 A) Log in to www.gst.gov.in. B) Submit the GSTR1. [snapshots given in next slides] C) File the GSTR1. [snapshots given in next slides] D) This completes your GSTR1 filing.
Select File returns and Prepare online in the outward supplies
View the data uploaded and verify each section.
Having Submitted, you need to File. You will again get a warning as follows !
Some Tips Be patient with the GSTN portal. It is still in its infancy. If things are not happening or throwing up some errors, logout and login again after some time. Don t do the next step unless the earlier step is completed properly and you can see the confirmation on the screen. Use Internet Explorer 11 to sign with DSC. If you have any problems please contact us. Don t miss the next slide .
Done with GSTR1 Start preparing for GSTR2 Thankyou ..


")