HIV Rapid Test Procedures and Instructions
This content provides detailed instructions for conducting HIV rapid tests using three different kits: Determine HIV-1/2 Rapid Test, Uni-Gold HIV-1/2 Rapid Test, and Bioline HIV-1/2 Rapid Test. The instructions include steps such as specimen collection, test device preparation, result interpretation, and handling invalid results. Each kit has specific guidelines for sample collection and result interpretation, emphasizing the importance of following safety precautions and ensuring kit integrity. Images of the test kits are also included for visual reference.

Download Presentation

Please find below an Image/Link to download the presentation.
The content on the website is provided AS IS for your information and personal use only. It may not be sold, licensed, or shared on other websites without obtaining consent from the author.If you encounter any issues during the download, it is possible that the publisher has removed the file from their server.
You are allowed to download the files provided on this website for personal or commercial use, subject to the condition that they are used lawfully. All files are the property of their respective owners.
The content on the website is provided AS IS for your information and personal use only. It may not be sold, licensed, or shared on other websites without obtaining consent from the author.
E N D
Presentation Transcript
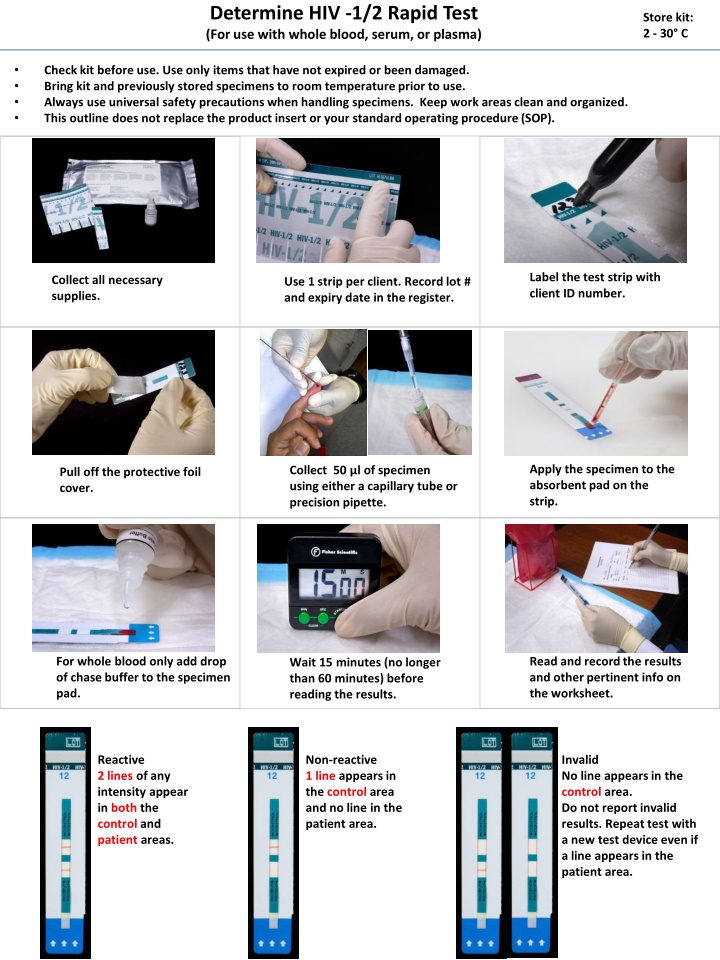
Determine HIV -1/2 Rapid Test (For use with whole blood, serum, or plasma) Store kit: 2 - 30 C Check kit before use. Use only items that have not expired or been damaged. Bring kit and previously stored specimens to room temperature prior to use. Always use universal safety precautions when handling specimens. Keep work areas clean and organized. This outline does not replace the product insert or your standard operating procedure (SOP). Label the test strip with client ID number. Collect all necessary supplies. Use 1 strip per client. Record lot # and expiry date in the register. http://i1.ytimg.com/vi/wwcx2DVXHFM/hqdefault.jpg http://www.alere.co.uk/images/product/thumbs/1_prod_43ebe78a7aed2dfb478c3674bf662a3c.jpg Apply the specimen to the absorbent pad on the strip. Collect 50 l of specimen using either a capillary tube or precision pipette. Pull off the protective foil cover. For whole blood only add drop of chase buffer to the specimen pad. Read and record the results and other pertinent info on the worksheet. Wait 15 minutes (no longer than 60 minutes) before reading the results. Reactive 2 lines of any intensity appear in both the control and patient areas. Non-reactive 1 line appears in the control area and no line in the patient area. Invalid No line appears in the control area. Do not report invalid results. Repeat test with a new test device even if a line appears in the patient area.
Uni-Gold HIV -1/2 Rapid Test (For use with whole blood, serum, or plasma) Store kit: 2 - 30 C Check kit before use. Use only items that have not expired or been damaged. Bring kit and previously stored specimens to room temperature prior to use. Always use universal safety precautions when handling specimens. Keep work areas clean and organized. This outline does not replace the product insert or your standard operating procedure (SOP). Collect test items and other necessary lab supplies. Remove device from package and label device with client identification number. Collect specimen (blood or plasma or serum using the disposable pipette. Add 2 drops (approx. 60 l) of the appropriate wash reagent to sample port. Wait for 10 minutes (no longer than 20 min) before reading the results. Add 2 drops (approx. 60 l) of specimen to the sample port in the device. Read and record the results and other pertinent info on the worksheet. Invalid No line appears in the control area. Do not report invalid results. Repeat test with a new test device even if a line appears in the test area. Reactive 2 lines of any intensity appear in both the control and test areas. Non-reactive 1 line appears in the control area and no line in the test area. C C T
Bioline HIV -1/2 Rapid Test (For use with whole blood, serum, or plasma) Store kit: 1 - 30 C Check kit before use. Use only items that have not expired or been damaged. Bring kit and previously stored specimens to room temperature prior to use. Always use universal safety precautions when handling specimens. Keep work areas clean and organized. This outline does not replace the product insert or your standard operating procedure (SOP). Collect test items and other necessary lab supplies. Remove device from package and label device with client identification number. Use a precision pipette to collect 10 L of serum or plasma Apply the serum, plasma or whole blood specimen to the sample well of the test device. Add 4 drops of the Assay diluent to the sample well. Use a disposable capillary pipette to draw 20 L of whole blood up to fill line Start timer and read the test results within 10 to 20 minutes. Don t read test results after 20 minutes. Read and record the results and other pertinent info on the worksheet. HIV1 HIV 2 HIV 1/2 Reactive Presence of 2 ( C , 1 and 2 ) or more lines within the Result window. Non-reactive 1 line appears in the control ( C ) area and no line in the Test area. Invalid No line appears in the control ( C ) area. Do not report invalid results. Repeat test with a new test device even if a line appears in the client area.
Finger Prick JOB AID Ask client to rub/massage hands together. Ensure the clients hands are warm to touch. Position hand palm-side up. Choose least calloused finger (either middle or ring finger) Apply intermittent pressure to help the blood flow Hold the finger and firmly place a new sterile lancet off-center on the fingertip Firmly press the lancet to puncture the fingertip Disinfect fingertip. Start in the middle and work outward to avoid contamination. Allow to dry Wipe away the 1st drop of blood with a sterile gauze pad or cotton ball If necessary, apply intermittent pressure on opposite side of finger for blood to flow Apply a gauze pad or cotton ball to the puncture site until the bleeding stops Properly dispose of all contaminated supplies. Do not retrieve anything from the waste containers.
DRIED TUBE SPECIMEN (DTS) JOB AID Examine tube. Make sure the green colored dried specimen is present and sits at the bottom of the tube. If not, tap the tube until the specimen is visible at the bottom. Collect all necessary lab supplies. 2 3 1 Cap the tubes. Open the tubes only when the specimen appears at the bottom. Using a disposable pipette, add 5 drops (~200 L) of PT buffer to the dried tube specimen. 5 6 4 The next day, tap tubes to mix and test according to testing procedures and algorithm. Tap the tubes to mix well. Leave tubes standing upright at room temperature overnight. 7 8 9 Note: Reconstitute only when you are ready to test the DTS panel the next day. Record the results on the Results submission form and send to the reference lab. Module 7. Proficiency Testing Programs Handout # 7.1H1


 – JOB AID")