Guide on Replacing Faucet with Easy Steps
Learn how to replace a faucet with step-by-step instructions including removing panels, silicone tubing, and the faucet itself. Follow the process to reinstall the new faucet properly for a functional sink.

Download Presentation

Please find below an Image/Link to download the presentation.
The content on the website is provided AS IS for your information and personal use only. It may not be sold, licensed, or shared on other websites without obtaining consent from the author. If you encounter any issues during the download, it is possible that the publisher has removed the file from their server.
You are allowed to download the files provided on this website for personal or commercial use, subject to the condition that they are used lawfully. All files are the property of their respective owners.
The content on the website is provided AS IS for your information and personal use only. It may not be sold, licensed, or shared on other websites without obtaining consent from the author.
E N D
Presentation Transcript
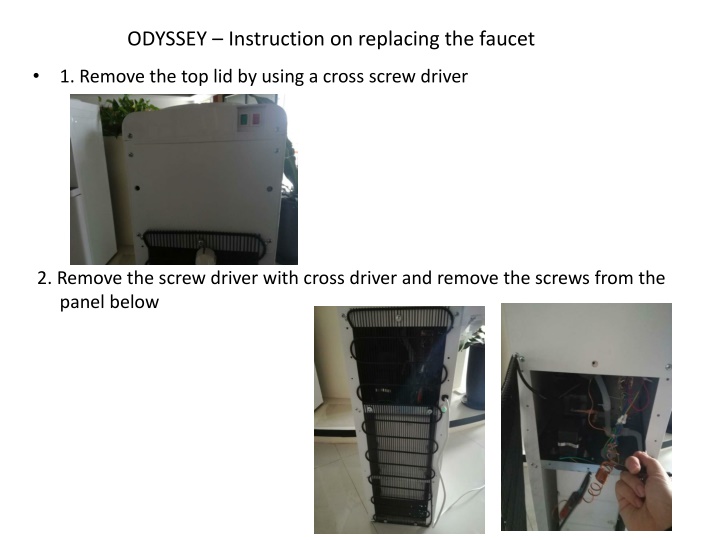
ODYSSEY Instruction on replacing the faucet 1. Remove the top lid by using a cross screw driver 2. Remove the screw driver with cross driver and remove the screws from the panel below
ODYSSEY Instruction on replacing the faucet 3. Remove the panels below 4.Remove the silicone tubing from the faucet and the front panel
ODYSSEY Instruction on replacing the faucet 5.Remove below panels 6.Lift the faucet pedal and remove the cover
ODYSSEY Instruction on replacing the faucet 7.Twist the faucet and remove the faucet 8. The faucet joint needs to be re-wounded with the raw material belt, re-rotate the new faucet, reinstall it in the order of disassembly, and replace the faucet. need new belt material