Embedded Systems Lab 10: Task Scheduling with Sensors, Buzzer, and LCD Display

This lab introduces task scheduling on Arduino using sensors, buzzer, and LCD display. It covers topics like generating tones with a buzzer, interfacing with an LCD display module, and examples of sample code for practical implementation. The focus is on understanding how embedded systems can manage multiple tasks effectively.

Download Presentation

Please find below an Image/Link to download the presentation.
The content on the website is provided AS IS for your information and personal use only. It may not be sold, licensed, or shared on other websites without obtaining consent from the author.If you encounter any issues during the download, it is possible that the publisher has removed the file from their server.
You are allowed to download the files provided on this website for personal or commercial use, subject to the condition that they are used lawfully. All files are the property of their respective owners.
The content on the website is provided AS IS for your information and personal use only. It may not be sold, licensed, or shared on other websites without obtaining consent from the author.
E N D
Presentation Transcript
CS4101 Introduction to Embedded Systems Lab 10: Tasks and Scheduling Prof. Chung-Ta King Department of Computer Science National Tsing Hua University, Taiwan National Tsing Hua University
Introduction In this lab, we will learn More sensors Buzzer, LCD display, hex keypad How to do task scheduling on Arduino? 1 National Tsing Hua University
Buzzer Piezoelectric buzzer: Contains a metal disc that deforms under a current By applying an alternating current at a high enough frequency, the disc will move fast to create a sound wave You have two buzzers; use left one Side view Bottom view 2 National Tsing Hua University
Playing a Tone tone(pin, frequency) tone(pin, frequency, duration) Generates a square wave of the specified frequency (and 50% duty cycle) on a pin A duration can be specified, otherwise the wave continues until a call to noTone() Only one tone can be generated at a time. If the tone is playing on the same pin, the call will set its frequency. For Uno: min frequency 31 Hz; max frequency 65535 Hz 3 National Tsing Hua University
Sample Code for Buzzer int buzzer = 10; int i = 0; void setup() { pinMode(buzzer, OUTPUT); } void loop() { for(i=0; i<10; i++) { // imitate sound of ambulance if(i%2 == 0) tone(buzzer,698); else tone(buzzer, 523); delay(500); } noTone(buzzer); // turn off the buzzer delay(2000); } 4 National Tsing Hua University
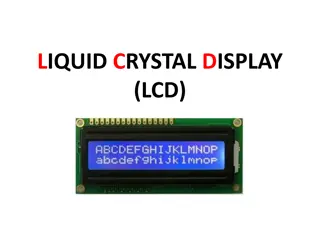
LCD Display Liquid crystal displays (LCDs) are commonly used to display data in devices such as calculators and many other electronic devices. They may support message scrolling, cursor displaying, and LED backlight Most commonly used LCD display is 16 2 LCD Module, which can display 32 ASCII characters in 2 lines (16 characters in 1 line) LCM1602 IIC V1 5 National Tsing Hua University
1620 IIC LCD GND (ground) VCC (power supply 5V) SDA (i2c data line) SCL (i2c clock) A4 A5 6 National Tsing Hua University
LCD Library Please download the library to support 1602 IIC LCD from this website: https://bitbucket.org/fmalpartida/new-liquidcrystal/downloads Please download the newest version Remove the original LiquidCrystal folder under arduino- 1.6.12\libraries 7 National Tsing Hua University
LCD Library Unzip the file under arduino-1.6.12\libraries 8 National Tsing Hua University
Sample Code for LCD #include <Wire.h> #include <LiquidCrystal_I2C.h> // Set the pins on the I2C chip used for LCD connections: // addr, en,rw,rs,d4,d5,d6,d7,bl,blpol LiquidCrystal_I2C lcd(0x3F, 2, 1, 0, 4, 5, 6, 7, 3, POSITIVE); void setup() { lcd.begin(16, 2); lcd.backlight(); lcd.setCursor(0, 0); lcd.print("Hello, world!"); delay(1000); lcd.clear(); lcd.setCursor(0, 1); lcd.print("Type to display"); } void loop() { } // initialize LCD // open LCD backlight // setting cursor 9 National Tsing Hua University
Hex Keypad Use column scanning to identify the pressed key http://www.circuitstoday.com/interfacing-hex-keypad-to-arduino 10 National Tsing Hua University
Hex Keypad Library Please download the library from this website: http://playground.arduino.cc/uploads/Code/keypad.zip Unzip the file under arduino-1.6.12\libraries 11 National Tsing Hua University
Sample Code for Hex Keypad #include <Keypad.h> #define KEY_ROWS 4 #define KEY_COLS 4 char keymap[KEY_ROWS][KEY_COLS] = { {'1', '2', '3', 'A'}, {'4', '5', '6', 'B'}, {'7', '8', '9', 'C'}, {'*', '0', '#', 'D'} }; // Column pin 1~4 byte colPins[KEY_COLS] = {9, 8, 7, 6}; // Column pin 1~4 byte rowPins[KEY_ROWS] = {13, 12, 11, 10}; 12 National Tsing Hua University
Sample Code for Hex Keypad // initialize keypad Keypad myKeypad = Keypad(makeKeymap(keymap), rowPins, colPins, KEY_ROWS, KEY_COLS); void setup(){ Serial.begin(9600); } void loop(){ char key = myKeypad.getKey(); if (key) Serial.println(key); } 13 National Tsing Hua University
Lab 10 Basic 1: Implement a traffic light The traffic light will set the green LED on for 4 sec, then the yellow LED on for 2 sec, and the red LED on for 6 sec, and repeat. The traffic light will change to the green light when there is an ambulance passing, which is represented by a buzzer The buzzer will be turned on for 4 sec at 2 Hz (0.5 sec on and 0.5 sec off), indicating that the ambulance will need 4 sec to pass the cross road The starting time is set randomly between 7 and 12 sec. During the 4 sec that the buzzer sounds, the traffic light will be turned to the green LED. After the 4 sec, the traffic light returns to normal. 14 National Tsing Hua University
Lab 10 Basic 1 (cont.) Set the priority of the tasks properly. Show the current state and duration of the state on the LCD. For example: if the green light is on for three seconds, then show the string green light and the number 3 on the LCD. 15 National Tsing Hua University
Lab 10 Basic 2: Implement a simple Screensaver Silent mode: The backlight is off. If the input from the hex keypad is * , then go to the unlock mode. Unlock mode: Turn on the backlight and print Enter password: If the user enters the correct password (at least 3 characters), then go back to the silent mode. Otherwise, stay in the unlock mode. 16 National Tsing Hua University