Diffusion Weighted Imaging (DWI) in Neuroimaging Research
This content delves into the significance of Diffusion Weighted Imaging (DWI) in studying the motion of water molecules in brain tissue. It explains how water diffusion varies in different brain matter types and explores techniques like Diffusion Tensor Imaging (DTI). The impact factors on diffusion image quality, important terms in DWI scans, and an overview of the TOPUP and EDDY processes are also discussed, shedding light on how susceptibility distortions, eddy currents, and subject motion can affect image quality and how these issues can be addressed. Overall, this content provides valuable insights into the realm of neuroimaging research with a focus on DWI.

Download Presentation

Please find below an Image/Link to download the presentation.
The content on the website is provided AS IS for your information and personal use only. It may not be sold, licensed, or shared on other websites without obtaining consent from the author.If you encounter any issues during the download, it is possible that the publisher has removed the file from their server.
You are allowed to download the files provided on this website for personal or commercial use, subject to the condition that they are used lawfully. All files are the property of their respective owners.
The content on the website is provided AS IS for your information and personal use only. It may not be sold, licensed, or shared on other websites without obtaining consent from the author.
E N D
Presentation Transcript
Diffusion Preprocessing Brown University Clinical Neuroimaging Research Core Version Date: 4/13/2023
What is Diffusion Weighted Imaging (DWI)? Measures the motion of water molecules within a voxel of tissue How water diffuses through brain tissue Water moves differently through different types of brain matter Term encompases multiple diffusion imaging techniques Diffusion Tensor Imaging (DTI) How water moves through white matter tracts
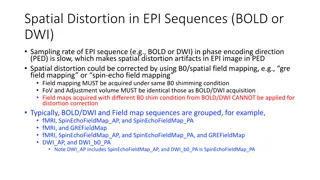
What impacts diffusion image quality? Diffusion images are sensitive to non-zero off-resonance fields caused by the susceptibility distortions of the subjects head, eddy currents from switching of diffusion weighting gradients, and subject motion. Susceptibility induced distortions Susceptibility induced distortions Eddy currents and movement Eddy currents and movement The FSL tool topup topup is used to estimate the The FSL tool eddy eddy is used to correct eddy susceptibility induced distortions currents and movement
Important Terms b0 Image A non-diffusion weighted image taken at the beginning of a dwi scan Can also use SE Fieldmap images as b0 image Total Read Out Time Found in the acq_param file (and .json file) The time between echoes in K space Phase Encoding Direction Data is collected in one direction (A P) and to correct for distortion a second image is taken in the opposite direction (P A) A P - Anterior to posterior P A - Posterior to anterior Bval File Has a number per volume which shows how large of a diffusion gradient was applied Bvec File Has triplet of numbers per volume showing what directions the gradients are in
TOPUP / EDDY Overview TOPUP - estimates susceptibility induced distortions EDDY - corrects for eddy current-induced distortions and subject movement Input: File of images with different phase-encoding parameters Merged AP/PA B0 images, EPI fieldmaps Acquisition parameters file - describes how the B0/fieldmap volumes were acquired First three columns specify phase encoding direction, last column is total readout time Configuration file Text file containing parameters that are specific for topup. FSL provides these files Input: Diffusion image(s), bval & bvec files If collected in multiple phase-encoding directions, merge files Brain mask (created from 1st volume of topup output) Topup output root filename Additional files: acquisition parameters, index file Describes how diffusion data was collected Output: Output: Eddy-corrected image (.nii) File containing spline coefficients encoding the field (_fieldcoef.nii) Movement parameters text file (_movpar.txt) File estimating the field in Hz
Steps in Pre-Processing Create two b0 images in opposing phase-encoding directions (AP, PA). Create acquisition parameters text file that indicates the phase encoding direction and total readout time of the b0 images. Combine the two b0 images together to create a two-volume, AP_PA_b0 image using fslmerge. fsl topup These can be b0 images separately scanned, or extracted images from the first volume of the diffusion or SE fieldmap sequence using fslroi. Output: corrected image and quality metrics for each diffusion sequence Create files/variables needed for eddy: Index, brain mask, merged diffusion files (if applicable), bvals and bvecs, etc. fsl eddy & fsl eddyquad Note: These steps may differ depending on your study s diffusion acquisition
Data Organization Data should be organized following BIDS convention: Raw unconverted data (e.g., DICOMs, E- Prime event logs). For archival purposes, not tested for BIDS compliance. /gpfs/data/<PIname>/<project>/sourcedata sourcedata /rawdata rawdata Minimally processed data e.g., converted files (.nii, .csv, etc.) and metadata files (.json sidecars) stored according to BIDS, tested for compliance. /derivatives derivatives /code code Output from processing and analysis pipelines (e.g., preprocessing, fmri_univariate, eeg_model1). Not tested for compliance. Create a folder within derivatives for the diffusion pre- processing: </gpfs/data/<PIname>/<project>/derivatives/dwiprepro> Code repository. All elements needed for independent replication from raw data. Where scripts are stored.
Subject Text File Create a text file with subject IDs for the SLURM array to loop through. Store the text file in your /code directory The ID in the text file should be whatever follows sub-<ID> in the subject s files.
Requesting Resources SBATCH This script is run using sbatch configuration. The first step is to request the appropriate SLURM resources to run the script. #!/bin/bash #SBATCH -N 1 #SBATCH -n 2 #SBATCH -p gpu --gres=gpu:1 #SBATCH --mem=40G #SBATCH --time 10:00:00 #SBATCH -J dwi_prepro #SBATCH --output /gpfs/scratch/%u/dwi_prepro-log%A_%a.txt #SBATCH --mail-type=ALL #SBATCH --mail-user=your_email_address@brown.edu #SBATCH --array=1 Be sure to update the email address so you get updates about your script. Note: This is an approximation of time. If you have a large amount of diffusion runs, you may need to request more time.
Configure Modules The next step is to configure FSL version 6.0.5.2 in your batch script environment. ###### CONFIGURE MODULES ####### module load fsl/6.0.5.2 module load cuda/10.3 cudnn/8.2.0 # This script is built on FSL and is adapted from the HCP-A processing scripts and assumes BIDS organization. # It can be run on dwi collected on a sphere and requires a merged file of b0 images for eddy correction. # This preprocessing approach is not appropriate for grid dwi acquisitions.
Manual User Input ### - IMPORTANT MANUAL USER INPUT - ### # The topup function needs an acquisition parameters text file describing your spin echo field maps (e.g. b0_AP and b0_PA). # Examples can be found at: https://fsl.fmrib.ox.ac.uk/fsl/fslwiki/topup/TopupUsersGuide#A--datain # The first three numbers in each row describe how image was phase encoded (x-, y-, z-dimensions; 'blip up, blip down')). # The last number describe the read-out time, in milliseconds. # Extract this from the TotalReadOutTime field of the b0 .json file. # You should have one row for each volume in your merged file. Next, find and enter the TotalReadOutTime from your b0_AP and b0_PA images. The b0 images will be images with a b-value of 0. Sometimes these will be separate b0 sequences or spin echo fieldmaps (SE fieldmaps). If you do not have separate b0 images or SE fieldmaps, you can create a b0 image by using the first volume of your diffusion data as the first volume will have a b-value of 0. readout_AP=0.0334748 readout_PA=0.0345046 (< fslroi diffusionscan_AP_dwi.nii.gz AP_b0.nii.gz 0 1 >) The TotalReadOutTime can be found in the JSON file of each b0 image.
Define Variables and Paths Next, you are going to define variables, paths, and create text files. ### - Define variables and paths - ### ses=01 codedir=/gpfs/data/jbarredo/diffusion/code #path to code directory rawdir=/gpfs/data/jbarredo/diffusion/rawdata #path to rawdata directory derivdir=/gpfs/data/jbarredo/diffusion/derivatives #path to derivatives directory outdir=$derivdir/dwi_prepro #path to dmri directory subjects="`sed -n ${SLURM_ARRAY_TASK_ID}p dmri_subjects.txt`" shells=(b1500) #array for shells (1000 2000) We will process subjects in a SLURM array, setting the task id to the variable subjects. Fill in shells with shells collected (e.g. 1000, 2500, b1500) - match the BIDS naming convention of your scans (e.g. sub-##_ses-##_acq-b1500_dir-ap_dwi.nii.gz).
Initiate Subject Loop & Create Relevant Files for s in $subjects #loop through subjects array do rawdata=${rawdir}/sub-${s}/ses-${ses} mkdir ${outdir}/sub-${s} mkdir ${outdir}/sub-${s}/ses-${ses} suboutdir=${outdir}/sub-${s}/ses-${ses} This part of the script will first initiate the subject loop and create relevant files needed to run TOPUP. ### Prepare files needed for topup ### ### Topup is not shell-dependent so it can be run in the subject loop to speed up processing ### The red arrows point to where you will need to change the paths/file names in the script to match your study-specific paths/file names. ## PATH TO FIELDMAP/B0 FILES ## fieldmapfile_AP=${rawdata}/fmap/sub-${s}_ses-${ses}_acq-diffSE_dir-ap_epi.nii.gz fieldmapfile_PA=${rawdata}/fmap/sub-${s}_ses-${ses}_acq-diffSE_dir-pa_epi.nii.gz ## Create acquisition parameter and other files ## # Merge fieldmap/b0 files using < fslmerge -t outputfilename fieldmapfile_AP fieldmapfile_PA > fslmerge -t ${suboutdir}/AP_PA_b0 $fieldmapfile_AP $fieldmapfile_PA ## create acq_params text file for AP_PA_b0 file ## This acq_params file is used during topup ## This file should have a line for each volume in AP_PA_b0 but with respect to phase encoding direction and readout time. ## the acq_params text file is the same for each participant - so we will place it in the outdir If [ ! -f ${outdir}/acq_params.txt ]; then echo .................................................. echo Creating acq_params text file for topup echo ................................................. touch ${outdir}/acq_params.txt # number of volumes in fieldmap_AP ap_vols=$(fslinfo $fieldmapfile_AP | grep -m 1 dim4 | awk '{print $2}') pa_vols=$(fslinfo $fieldmapfile_PA | grep -m 1 dim4 | awk '{print $2}') for ((i=0; i<$ap_vols; i++)); do echo 0 1 0 ${readout_AP} >> ${outdir}/acq_params.txt; done for ((i=0; i<$pa_vols; i++)); do echo 0 -1 0 ${readout_PA} >> ${outdir}/acq_params.txt; done else echo .............................................. echo acq_params text file for topup already exists! echo ............................................... fi
Run TOPUP ########################### TOPUP ##################################### ## Change into subject's directory in output dir ## cd $suboutdir Run TOPUP. TOPUP will create files needed for EDDY. # Run topup # Output is AP_PA_topup_fieldcoef.nii.gz & AP_PA_topup_movpar.txt - files are only for subject/session not for each diffusion shell # fieldcoef are the inhomogeneity estimations # create additional output for brain mask Additionally, create a brainmask needed for EDDY. echo .............................................. echo Running topup! echo ............................................... topup --imain=AP_PA_b0.nii.gz --datain=${suboutdir}/acq_params.txt --config=b02b0.cnf --out=sub-${s}_ses-${ses}_AP_PA_topup --fout=sub- ${s}_ses-${ses}_AP_PA_topup_HZ --iout=sub-${s}_ses-${ses}_acq-${shell}_topup_image echo .............................................. echo topup has completed for sub-$s echo ............................................... # Create a brain mask based on the first image from each topup -iout outup echo "................................................................" echo "Creating brain mask for sub-$s" echo "................................................................" fslroi sub-${s}_ses-${ses}_topup_image.nii.gz sub-${s}_ses-${ses}_firstvol.nii.gz 0 1 bet sub-${s}_ses-${ses}_firstvol.nii.gz sub-${s}_ses-${ses}_brain.nii.gz -m -f 0.2
Initiate Shell Loop ### - Start shell loop - ### for shell in "${shells[@]}" do This part of the script will first initiate the shell loop and set variables needed for EDDY and EDDYQAUD. echo "............................................................" echo "Defining variables for sub-${s} and ${shell} needed for eddy" echo "............................................................" ## PATH TO DIFFUSION FILES ## diff_AP=${rawdata}/dwi/sub-${s}_ses-${ses}_acq-${shell}_dir-ap_dwi.nii.gz diff_PA=${rawdata}/dwi/sub-${s}_ses-${ses}_acq-${shell}_dir-pa_dwi.nii.gz The red arrows point to where you will need to change the paths/file names in the script to match your study-specific paths/file names. # path to a json file - eddy will extract the slice times from the json file. Only one json file is needed so either ap/pa will work # diff_json=${rawdata}/dwi/sub-${s}_ses-${ses}_acq-${shell}_dir-ap_dwi.json ## Set bvecs and bvals variables ## bvecs_AP=${rawdata}/dwi/sub-${s}_ses-${ses}_acq-${shell}_dir-ap_dwi.bvec bvals_AP=${rawdata}/dwi/sub-${s}_ses-${ses}_acq-${shell}_dir-ap_dwi.bval bvecs_PA=${rawdata}/dwi/sub-${s}_ses-${ses}_acq-${shell}_dir-pa_dwi.bvec bvals_PA=${rawdata}/dwi/sub-${s}_ses-${ses}_acq-${shell}_dir-pa_dwi.bval
Prepare Files for EDDY if [ ! -f "${outdir}/${shell}_acq_params.txt" ]; then echo "..............................................." echo "Creating ${shell}_acq_params text file for eddy" echo "..............................................." ## Create acq_params file - only needs to be two lines for eddy ## touch ${outdir}/${shell}_acq_params.txt echo 0 1 0 ${readout_AP} > ${outdir}/${shell}_acq_params.txt echo 0 -1 0 ${readout_PA} >> ${outdir}/${shell}_acq_params.txt else echo "............................................" echo "${shell}_acq_params text file already exists!" echo "............................................" fi To run EDDY, you will merge the AP and PA diffusion files for each shell (e.g. 1500_AP and 1500_PA merged into 1500_dwi). You will also merge the bvecs and bvals files. The acquisition parameters file is used to inform EDDY what direction the distortion are likely to go in. Each row has 3 values that specify the phase- encoding axis (e.g. AP = 0 1 0 and PA = 0 -1 0), and the 4th value is the total readout time defined earlier in the script. if [ ! -f "${outdir}/${shell}_index.txt" ]; then echo "..............................................." echo "Creating ${shell}_index text file for eddy" echo "..............................................." ## Number of volumes in each diffusion scan ## volumes_AP=$(fslinfo $diff_AP | grep -m 1 dim4 | awk '{print $2}') volumes_PA=$(fslinfo $diff_PA | grep -m 1 dim4 | awk '{print $2}') The index.txt file specifies the relationship between the images in --imain (diffusion files) and the information in --acqp (acquisition parameters file). # Write the index file of the diffusion - needs to be a ROW for i in $(eval echo "{1..$volumes_AP}"); do echo "1" >> ${outdir}/${shell}_column.txt; done for i in $(eval echo "{1..$volumes_PA}"); do echo "2" >> ${outdir}/${shell}_column.txt; done echo $(cat ${outdir}/${shell}_column.txt) | sed '/^$/d' > ${outdir}/${shell}_index.txt The index file is a single row of 1s or 2s for each volume in each diffusion file input into EDDY. Volumes will have an index of 1 if they were collected in the AP direction (and therefore correspond to the first line of the acquisition parameters file), and volumes collected in the PA direction will have an index of 2. else echo "............................................" echo "${shell}_index text file already exists!" echo "............................................" fi echo "................................................................" echo "Merging AP and PA diffusion, bvec, and bvals for sub-${s} ${shell}" echo "................................................................" For more information, see: https://fsl.fmrib.ox.ac.uk/fsl/fslwiki/eddy/UsersGuide#A--index # Merge AP and PA diffusion files # fslmerge -t ${suboutdir}/sub-${s}_ses-${ses}_acq-${shell}_combined_dwi $diff_AP $diff_PA # Combine AP and PA bvecs and bvals files # paste $bvecs_AP $bvecs_PA > ${suboutdir}/bvecs_acq-${shell}.bvec paste $bvals_AP $bvals_PA > ${suboutdir}/bvals_acq-${shell}.bval # For eddy options and directions for formatting sliceinfo.txt see: # https://fsl.fmrib.ox.ac.uk/fsl/fslwiki/eddy/UsersGuide#A--index
echo "................................................................" echo "Running eddy for sub-${s} ${shell}" echo "................................................................" EDDY eddy_cuda10.2 --imain=${suboutdir}/sub-${s}_ses-${ses}_acq- ${shell}_combined_dwi.nii.gz \ --mask=sub-${s}_ses-${ses}_brain_mask.nii.gz \ --index=${outdir}/${shell}_index.txt \ --acqp=${outdir}/${shell}_acq_params.txt \ --bvecs=${suboutdir}/bvecs_acq-${shell}.bvec \ --bvals=${suboutdir}/bvals_acq-${shell}.bval \ --fwhm=2,1,0,0,0 \ --topup=sub-${s}_ses-${ses}_AP_PA_topup \ --out=sub-${s}_ses-${ses}_acq- Run EDDY and EDDY_QUAD, which will generate a single subject quality assessment report. ${shell}_eddycorrected \ --repol \ --mporder=6 \ --json=$diff_json \ --estimate_move_by_susceptibility \ --verbose echo "................................................................" echo "Eddy has completed for sub-${s} ${shell}" echo "................................................................" echo "................................................................" echo "Running eddy QA for sub-${s} ${shell}" echo "................................................................" eddy_quad sub-${s}_ses-${ses}_acq-${shell}_eddycorrected \ -idx ${outdir}/${shell}_index.txt \ -par ${outdir}/${shell}_acq_params.txt \ -m ${suboutdir}/sub-${s}_ses-${ses}_brain_mask.nii.gz \ -b ${suboutdir}/bvals_acq-${shell}.bval \ -f sub-${s}_ses-${ses}_AP_PA_topup_HZ \ -o ${suboutdir}/sub-${s}_ses-${ses}_acq- ${shell}_eddy_qc \ -v echo "................................................................" echo "Processing complete for sub-${s} ${shell}" echo "................................................................" done echo "................................................................" echo "Diffusion pre-processing complete for sub-${s}" echo "................................................................" done
What is DSI Studio? A tractography software tool used to visualize diffusion weighted imaging Maps brain connections in this case fiber tracking
Opening DSI Studio on Oscar Copy the following into the command line to load the DSI Singularity: module load dsi/chen-march2023 Next enter the following as one line to display the DSI GUI 1. 2. singularity exec -B /gpfs/data 3. /gpfs/runtime/opt/dsi/chen-march2023/dsistudio_chen-2023-03-07.sif dsi_studio 1. 2. 3. Execute as singularity Binds the singularity to gpfs/data Where the DSI singularity is located on Oscar
Step One Select Step T1: Open Source Images Select the eddy corrected file to create and SRC file for This should pop up a B-table that displays all the bval & bvec values If the DSI cannot find the bvec and bval files load them in from the Files button in the right hand corner Bvec and Bval files will be located in the rawdata folder Select OK when done, SRC file will be generated and output in the subject s derivatives folder Select the T1a: Quality Control Should already be in the subject s derivatives folder, hit OK
Step Two Select Step T2: Reconstruction Select the src file and hit Open Select reconstruction method in step T2b(1) Select Run Reconstruction Processing SRC files reconstruction box will pop up will take a few minutes to run When completed Fib file created will pop up Click OK
Step Three Select Step T3: Fiber Tracking & Visualization Select the .fib file that was created during the previous step Select Fiber Tracking An image like the one on the far right will pop up showing the fiber tracts
DSI Tips Recommend doing fiber tracking for both the raw dwi image and the preprocessed image to compare If the preprocessed image fiber tracts come out looking weird or worse than the original raw image you know something is off with how the image was preprocessed The image on the right was successfully preprocessed, the image on the left was not
Helpful Links Full script can be found at https://github.com/brown-bnc/dwi_preprocessing Andy s Brain Book Eddy User Page Topup User Page DSI Studio Info

?")