Caterpillar Cat 977K TRACK LOADER (Prefix 11K) Service Repair Manual Instant Download (11K00001-03918)
Please open the website below to get the complete manualnn//
Download Presentation

Please find below an Image/Link to download the presentation.
The content on the website is provided AS IS for your information and personal use only. It may not be sold, licensed, or shared on other websites without obtaining consent from the author. Download presentation by click this link. If you encounter any issues during the download, it is possible that the publisher has removed the file from their server.
E N D
Presentation Transcript
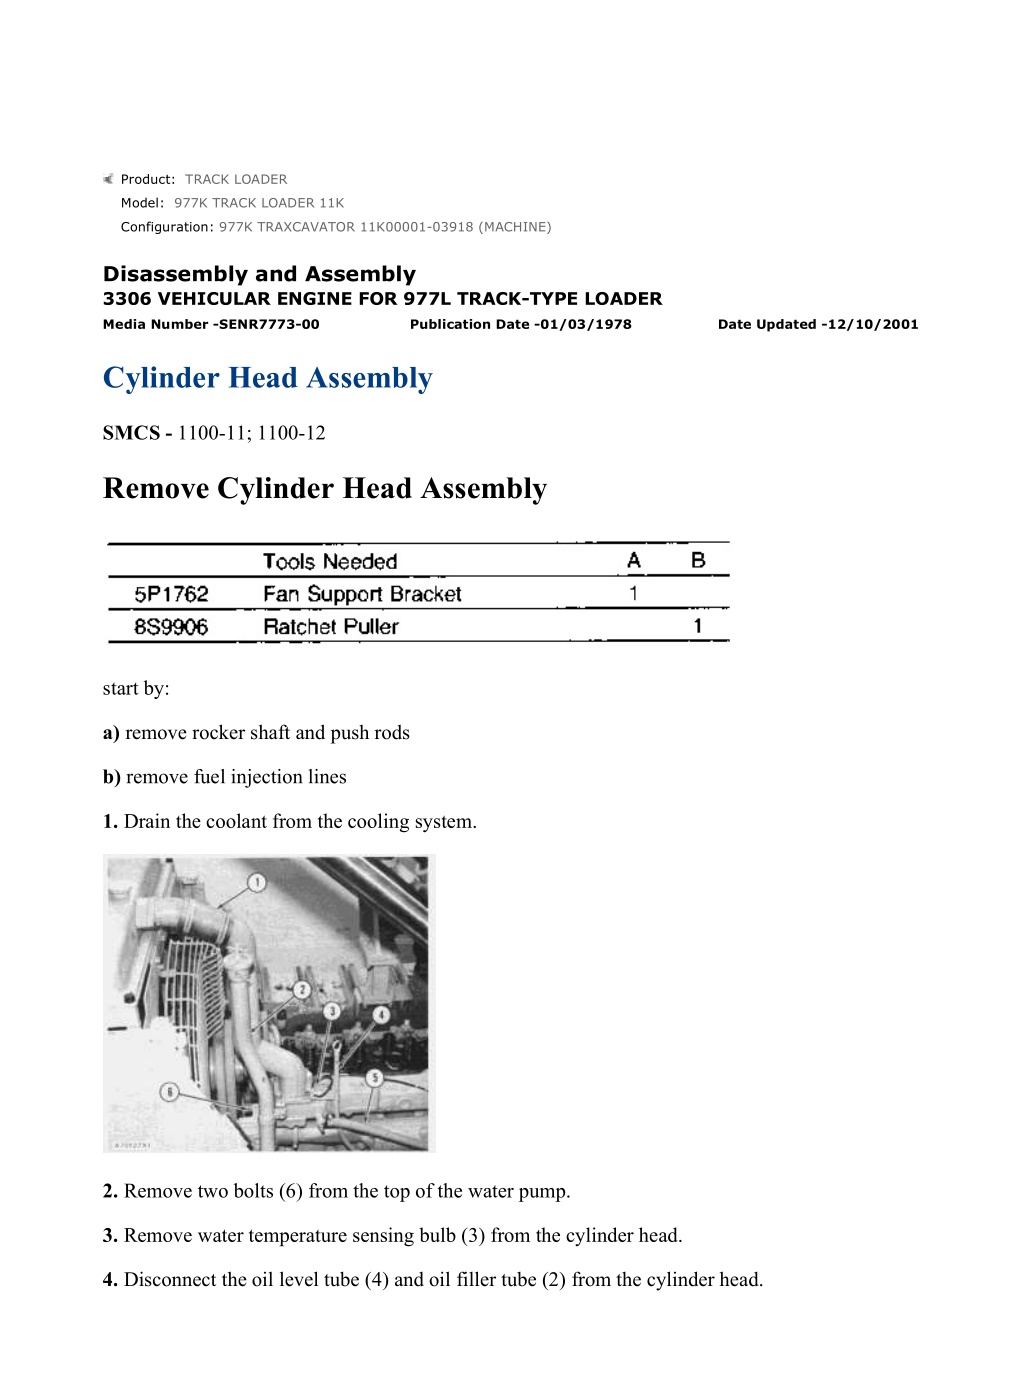
977K TRAXCAVATOR 11K00001-03918 (MACHINE)(UE070103 - 00) - Document... 1/7 Product: TRACK LOADER Model: 977K TRACK LOADER 11K Configuration: 977K TRAXCAVATOR 11K00001-03918 (MACHINE) Disassembly and Assembly 3306 VEHICULAR ENGINE FOR 977L TRACK-TYPE LOADER Media Number -SENR7773-00 Publication Date -01/03/1978 Date Updated -12/10/2001 Cylinder Head Assembly SMCS - 1100-11; 1100-12 Remove Cylinder Head Assembly start by: a) remove rocker shaft and push rods b) remove fuel injection lines 1. Drain the coolant from the cooling system. 2. Remove two bolts (6) from the top of the water pump. 3. Remove water temperature sensing bulb (3) from the cylinder head. 4. Disconnect the oil level tube (4) and oil filler tube (2) from the cylinder head. https://127.0.0.1/sisweb/sisweb/techdoc/techdoc_print_page.jsp?returnurl=/sis... 2021/10/22
977K TRAXCAVATOR 11K00001-03918 (MACHINE)(UE070103 - 00) - Document... 2/7 5. Disconnect heater hose (5). 6. Loosen one clamp, remove two bolts and remove hose and elbow (1) that is fastened to the radiator. Disconnect two clamps that hold the breather tube to the timing gear housing. 7. Loosen the tension in the vee belts for the fan and alternator. 8. Fasten a hoist to the fan and fan drive. Remove the four bolts that hold the fan drive to the cylinder head. Move the fan and fan drive toward the radiator core. 9. Install tool (A) in front of the cylinder block as shown. Fasten the fan drive to tool (A). Tool (A) will hold the fan and fan drive up when the cylinder head is removed. 10. Remove the inlet tube assembly (7) and the return tube assembly (8) from the turbocharger and cylinder block. 11. Disconnect two clips (9) that hold the fuel pressure tube to the cylinder head. 12. Remove the thirty-three bolts (10) that hold the cylinder head to the cylinder block. https://127.0.0.1/sisweb/sisweb/techdoc/techdoc_print_page.jsp?returnurl=/sis... 2021/10/22
977K TRAXCAVATOR 11K00001-03918 (MACHINE)(UE070103 - 00) - Document... 3/7 13. Fasten a hoist to the eyebolts in the cylinder head. Fasten tool (B) to the turbocharger and the hoist. Remove the cylinder head assembly (11). The weight of the cylinder head assembly is 350 lb. (159 kg). 14. Remove the cylinder head gasket. Install Cylinder Head Assembly 1. Clean the machine surfaces of the cylinder head and cylinder block that make contact with the cylinder head gasket. 2. Put a new cylinder head gasket (2) in position on the cylinder block. Make sure the holes in the cylinder head gasket are in alignment with the holes in the cylinder block. Fasten a hoist to the eyebolts in the cylinder head. Fasten tool (B) to the turbocharger and the hoist. Put the cylinder head (1) in position on the cylinder block. https://127.0.0.1/sisweb/sisweb/techdoc/techdoc_print_page.jsp?returnurl=/sis... 2021/10/22
https://www.ebooklibonline.com Hello dear friend! Thank you very much for reading. Enter the link into your browser. The full manual is available for immediate download. https://www.ebooklibonline.com
977K TRAXCAVATOR 11K00001-03918 (MACHINE)(UE070103 - 00) - Document... 4/7 3. Install push rods (3). Put rocker shaft (4) in position on the cylinder head. NOTICE Make sure the dowels in the rocker shaft assembly are in alignment with the holes in the cylinder head before the bolts are installed and tightened. 4. Put 9M3710 Anti-Seize Compound on the threads of the cylinder head bolts and rocker shaft bolts. Install the bolts and washers and tighten the bolts as follows: a) Tighten all the bolts in number sequence to a torque of 115 lb.ft. (155 N m). b) Tighten all bolts in number sequence to a torque of 175 5 lb.ft. (240 7 N m). c) Tighten all bolts in number sequence (hand turn only) to a torque of 175 5 lb.ft. (240 7 N m). The minimum amount of torque on these bolts after the engine is warm must be 150 lb.ft. (205 N m). d) Tighten all bolts in letter sequence to a torque of 22 lb.ft. (28 N m). e) Tighten all bolts in letter sequence to a torque of 32 5 lb.ft. (43 7 N m). f) Tighten all bolts in letter sequence (hand turn only) to a torque of 32 5 lb.ft. (43 7 N m). The minimum amount of torque on these bolts must be 27 lb.ft. (38 N m) after the engine is warm. https://127.0.0.1/sisweb/sisweb/techdoc/techdoc_print_page.jsp?returnurl=/sis... 2021/10/22
977K TRAXCAVATOR 11K00001-03918 (MACHINE)(UE070103 - 00) - Document... 5/7 5. Make adjustments until the intake valve clearance is .015 in. (0.38 mm) and the exhaust valve clearance is .025 in. (0.64 mm). See VALVE CLEARANCE SETTING in TESTING AND ADJUSTING. 6. Install the valve cover (5). See INSTALL VALVE COVER. 7. Fasten a hoist to the fan drive and remove it from tool (A). Remove tool (A) from the front of the cylinder block and fasten the fan drive to the cylinder head. Make an adjustment to the vee belt tension. See FAN AND ALTERNATOR BELTS in LUBRICATION AND MAINTENANCE GUIDE. 8. Connect the two clips (8) that hold the fuel pressure tube to the cylinder head. Install the inlet tube (6) and return tube (7) to the turbocharger and cylinder block. https://127.0.0.1/sisweb/sisweb/techdoc/techdoc_print_page.jsp?returnurl=/sis... 2021/10/22
977K TRAXCAVATOR 11K00001-03918 (MACHINE)(UE070103 - 00) - Document... 6/7 9. Connect the clamps that hold the breather tube to the timing gear cover. 10. Install the breather cap (10). 11. Put hose and elbow (9) in position. Install two bolts and tighten clamp to hold it. 12. Install the two bolts that hold the housing for the water pump to the cylinder head. 13. Install the water temperature sensing bulb (14) to the cylinder head. 14. Connect oil level tube (12) and oil filler tube (13) to the cylinder head. 15. Connect heater hose (15) to cylinder head and install glow plug wire harness (11). 16. Remove tool (C) and install the electric starting motor. See INSTALL ELECTRIC STARTING MOTOR. 17. Fill the cooling system with coolant to the correct level. See LUBRICATION AND MAINTENANCE GUIDE. end by: a) install fuel injection lines b) install air cleaner assembly https://127.0.0.1/sisweb/sisweb/techdoc/techdoc_print_page.jsp?returnurl=/sis... 2021/10/22
977K TRAXCAVATOR 11K00001-03918 (MACHINE)(UE070103 - 00) - Document... 1/3 Product: TRACK LOADER Model: 977K TRACK LOADER 11K Configuration: 977K TRAXCAVATOR 11K00001-03918 (MACHINE) Disassembly and Assembly 3306 VEHICULAR ENGINE FOR 977L TRACK-TYPE LOADER Media Number -SENR7773-00 Publication Date -01/03/1978 Date Updated -12/10/2001 Valves SMCS - 1105-11; 1105-12 Remove Valves start by: a) remove cylinder head b) remove precombustion chambers 1. Put compression on valve spring (2) with tool (A) and remove locks (1). 2. Remove tool (A), rotocoil, spring and valve. Put identification on valves with respect to their locations in the cylinder head. https://127.0.0.1/sisweb/sisweb/techdoc/techdoc_print_page.jsp?returnurl=/sis... 2021/10/22
977K TRAXCAVATOR 11K00001-03918 (MACHINE)(UE070103 - 00) - Document... 2/3 3. Check the spring force with tool (B). The spring force is 57.7 2.9 lb. (256.7 12.9 N). The length of spring under test force is 1.766 in. (44.86 mm). The free length after test is 2.05 in. (52.0 mm). 4. Do Steps 1 through 3 again for remainder of valves. Install Valves 1. Put clean engine oil on valve stems. Install valve, spring and rotocoil in the cylinder head. TYPICAL EXAMPLE 2. Put tool (B) in position on valve spring and install the locks (1) with tool (A). Locks can be thrown from valve when compressor is released, if they are not in their correct position on valve stem. https://127.0.0.1/sisweb/sisweb/techdoc/techdoc_print_page.jsp?returnurl=/sis... 2021/10/22
977K TRAXCAVATOR 11K00001-03918 (MACHINE)(UE070103 - 00) - Document... 3/3 3. Remove tool (B) and hit the top of valve with a plastic hammer to be sure the locks are in their correct position on valve. 4. Do Steps 1 through 3 again for remainder of valves. end by: a) install precombustion chambers b) install cylinder head https://127.0.0.1/sisweb/sisweb/techdoc/techdoc_print_page.jsp?returnurl=/sis... 2021/10/22
977K TRAXCAVATOR 11K00001-03918 (MACHINE)(UE070103 - 00) - Document... 1/2 Product: TRACK LOADER Model: 977K TRACK LOADER 11K Configuration: 977K TRAXCAVATOR 11K00001-03918 (MACHINE) Disassembly and Assembly 3306 VEHICULAR ENGINE FOR 977L TRACK-TYPE LOADER Media Number -SENR7773-00 Publication Date -01/03/1978 Date Updated -12/10/2001 Valve Seat Inserts SMCS - 1103-10 Remove And Install Valve Seat Inserts start by: a) remove valves 1. Remove valve seat insert with tool group (A). 2. Clean and remove burrs from the valve seat bore. https://127.0.0.1/sisweb/sisweb/techdoc/techdoc_print_page.jsp?returnurl=/sis... 2021/10/22
977K TRAXCAVATOR 11K00001-03918 (MACHINE)(UE070103 - 00) - Document... 2/2 3. Install the new valve seat insert with tool group (A). Do not increase diameter of extractor in valve seat insert when it is installed in the cylinder head. 4. Grind valve seat insert according to specifications given in SPECIFICATIONS SECTION. end by: a) install valves https://127.0.0.1/sisweb/sisweb/techdoc/techdoc_print_page.jsp?returnurl=/sis... 2021/10/22
977K TRAXCAVATOR 11K00001-03918 (MACHINE)(UE070103 - 00) - Document... 1/1 Product: TRACK LOADER Model: 977K TRACK LOADER 11K Configuration: 977K TRAXCAVATOR 11K00001-03918 (MACHINE) Disassembly and Assembly 3306 VEHICULAR ENGINE FOR 977L TRACK-TYPE LOADER Media Number -SENR7773-00 Publication Date -01/03/1978 Date Updated -12/10/2001 Water Directors SMCS - 1115-10 Remove And Install Water Directors start by: a) remove cylinder heads 1. Remove old water directors (1) from the cylinder head. 2. Clean the cylinder head. 3. Install new water directors in the cylinder head. Install the directors so the hole in directors is in alignment with the "V" mark on cylinder head. NOTE: For reconditioning of cylinder head see STMG FORM FEG02328. https://127.0.0.1/sisweb/sisweb/techdoc/techdoc_print_page.jsp?returnurl=/sis... 2021/10/22
977K TRAXCAVATOR 11K00001-03918 (MACHINE)(UE070103 - 00) - Document... 1/2 Product: TRACK LOADER Model: 977K TRACK LOADER 11K Configuration: 977K TRAXCAVATOR 11K00001-03918 (MACHINE) Disassembly and Assembly 3306 VEHICULAR ENGINE FOR 977L TRACK-TYPE LOADER Media Number -SENR7773-00 Publication Date -01/03/1978 Date Updated -12/10/2001 Valve Guides SMCS - 1104-10 Remove And Install Valve Guides start by: a) remove valves 1. Remove valve guides from the cylinder head with tool (A). 2. Put clean engine oil on outside diameter of guide. Install valve guide with tools (A) and (B). https://127.0.0.1/sisweb/sisweb/techdoc/techdoc_print_page.jsp?returnurl=/sis... 2021/10/22
977K TRAXCAVATOR 11K00001-03918 (MACHINE)(UE070103 - 00) - Document... 2/2 3. The inside diameter of valve guide after installation must be .3734 .0010 in. (9.484 0.025 mm) minimum. end by: a) install valves https://127.0.0.1/sisweb/sisweb/techdoc/techdoc_print_page.jsp?returnurl=/sis... 2021/10/22
977K TRAXCAVATOR 11K00001-03918 (MACHINE)(UE070103 - 00) - Document... 1/5 Product: TRACK LOADER Model: 977K TRACK LOADER 11K Configuration: 977K TRAXCAVATOR 11K00001-03918 (MACHINE) Disassembly and Assembly 3306 VEHICULAR ENGINE FOR 977L TRACK-TYPE LOADER Media Number -SENR7773-00 Publication Date -01/03/1978 Date Updated -12/10/2001 Pistons SMCS - 1214-11; 1214-12; 1214-15; 1214-16 Remove Pistons start by: a) remove cylinder head b) remove oil pan plate c) remove oil pump 1. Remove the ring of carbon from the inner surface of the cylinder liners. 2. Turn the crankshaft until two pistons are at bottom center. Remove connecting rod caps (1) from the two connecting rods. 3. Put rubber hose or tape over the threads of the connecting rod bolts. This will prevent damage to the crankshaft when the pistons are removed. NOTICE Do not let the connecting rods hit the bottom of the cylinder liners or crankshaft when the pistons are removed or installed. https://127.0.0.1/sisweb/sisweb/techdoc/techdoc_print_page.jsp?returnurl=/sis... 2021/10/22
977K TRAXCAVATOR 11K00001-03918 (MACHINE)(UE070103 - 00) - Document... 2/5 4. Push the piston and connecting rod away from the crankshaft until the piston rings are above the cylinder liner. Remove the two pistons (2) and connecting rods from the engine. 5. Keep each connecting rod cap with its respective connecting rod and piston. Put identification on each connecting rod as to its location in the engine. 6. Do Steps 2 through 5 for the removal of the other pistons. Install Pistons 1. Turn the crankshaft until the bearing journals for the pistons to be installed are at bottom center. 2. Put clean engine oil on the crankshaft journals and on the inside of the cylinder liners. Put clean engine oil on the piston rings and connecting rod bearings. 3. Move the piston rings on the piston until the ring openings are approximately 90 apart. https://127.0.0.1/sisweb/sisweb/techdoc/techdoc_print_page.jsp?returnurl=/sis... 2021/10/22
977K TRAXCAVATOR 11K00001-03918 (MACHINE)(UE070103 - 00) - Document... 3/5 NOTICE Never install tool (A) (the ring compressor) without the use of the cylinder liner as a guide. Damage to the piston rings can be the result. 4. Put tool (A) in position on the cylinder liner as shown. Put the connecting rod and piston in position in the same cylinder liner from which it was removed and into the ring compressor. Make sure the "V" mark on the piston is in alignment with the "V" mark on the cylinder block. 5. Push the piston into position while the connecting rod is put into position over the crankshaft. 6. Put clean engine oil on bearings, bolt threads and surfaces of the nuts that make contact with the connecting rod caps. Put caps (1) in position on the connecting rods and install the nuts. Tighten the nuts to a torque of 30 3 lb.ft. (40 N m). Put a mark on each nut and the end of each bolt. Tighten the nuts 90 more. NOTICE When the connecting rod caps are installed, make sure the number on the side of the cap is next to and respective with the number on the side of the connecting rod. 7. Follow Steps 1 through 6 for the installation of the other pistons. https://127.0.0.1/sisweb/sisweb/techdoc/techdoc_print_page.jsp?returnurl=/sis... 2021/10/22
977K TRAXCAVATOR 11K00001-03918 (MACHINE)(UE070103 - 00) - Document... 4/5 end by: a) install oil pump b) install oil pan plate c) install cylinder head Disassemble Pistons start by: a) remove pistons 1. Remove the rings from the piston with tool (A). 2. Remove snap ring (3), piston pin (1) and connecting rod (2) from the piston. 3. Remove the rod pin bearing from the connecting rod with a press and a drive plate and handle from tool group (B) that will fit the outside diameter of the bearing. 4. Clean the piston ring grooves on old piston with tool (C) before new rings are installed. Assemble Pistons 1. Install a new rod pin bearing in the connecting rod with a press and a driver plate and handle from tool group (B) that will fit the outside diameter of the bearing. Use a pin boring machine to make the bearing the correct size. The bore in the bearing (new) must be 1.5017 .0003 in. https://127.0.0.1/sisweb/sisweb/techdoc/techdoc_print_page.jsp?returnurl=/sis... 2021/10/22
977K TRAXCAVATOR 11K00001-03918 (MACHINE)(UE070103 - 00) - Document... 5/5 (38.143 0.008 mm). The maximum permissible clearance between the bearing and piston pin (worn) must not be more than .003 in. (0.08 mm). 2. Install the connecting rod with the bearing tab groove (2) and number identification on the same side as the "V" mark (1) on top of the piston. 3. Install the top piston ring that has the mark "UP-1" in the top groove of the piston with tool (A). Make sure the mark is toward the top of the piston. 4. Install the intermediate piston ring that has the mark "UP-2" in the middle groove of the piston with tool (A). Make sure the mark is toward the top of the piston. 5. Install the oil ring in the piston with tool (A). 6. Check the clearance between the piston ring grooves and the rings. The maximum permissible clearance between all of the rings and piston grooves must not be more than .006 in. (0.15 mm). The clearance between the top ring (new) and groove must be .0033 + .0005 to - .0013 in. (0.084 + 0.013 to - 0.033 mm). The clearance between the center ring (new) and groove must be .0028 + .0005 to - .0013 in. (2.375 + 0.013 to - 0.033 mm). The clearance between the oil ring (new) and groove must be .0025 .0010 in. (0.064 0.025 mm). Make sure all of the ring gaps are 90 apart before the pistons are installed. end by: a) install pistons https://127.0.0.1/sisweb/sisweb/techdoc/techdoc_print_page.jsp?returnurl=/sis... 2021/10/22
977K TRAXCAVATOR 11K00001-03918 (MACHINE)(UE070103 - 00) - Document... 1/4 Product: TRACK LOADER Model: 977K TRACK LOADER 11K Configuration: 977K TRAXCAVATOR 11K00001-03918 (MACHINE) Disassembly and Assembly 3306 VEHICULAR ENGINE FOR 977L TRACK-TYPE LOADER Media Number -SENR7773-00 Publication Date -01/03/1978 Date Updated -12/10/2001 Cylinder Liners SMCS - 1216-11; 1216-12 Remove Cylinder Liners start by: a) remove pistons 1. Check to be sure that all coolant has been removed from the cylinder block. 2. Put a cover over the crankshaft bearing journals before removing the cylinder liners. 3. Install tooling (A) and remove the cylinder liners. https://127.0.0.1/sisweb/sisweb/techdoc/techdoc_print_page.jsp?returnurl=/sis... 2021/10/22
977K TRAXCAVATOR 11K00001-03918 (MACHINE)(UE070103 - 00) - Document... 2/4 Install Cylinder Liners 1. Clean the cylinder liners and block. 2. Install the liners in the block without the O-ring seals. 3. Install tooling (A) and two 5/8"-11 NC bolts 41/2in. long. Tighten the bolts evenly to 50 lb.ft. (70 N m). 4. Check the liner projection with tool group (B) at four locations around the liner. The difference between the four measurements must not be more than .001 in. (0.03 mm). https://127.0.0.1/sisweb/sisweb/techdoc/techdoc_print_page.jsp?returnurl=/sis... 2021/10/22
Suggest: For more complete manuals. Please go to the home page. https://www.ebooklibonline.com If the above button click is invalid. Please download this document first, and then click the above link to download the complete manual. Thank you so much for reading
977K TRAXCAVATOR 11K00001-03918 (MACHINE)(UE070103 - 00) - Document... 3/4 5. The liner projection must be .0020 to .0056 in. (0.051 to 0.142 mm). The measurement between liners next to each other, must not be more than .001 in. (0.03 mm) difference. NOTE: The liner projection can change if the liner is turned in the bore. 6. If the liner projection is not .0020 to .0056 in. (0.051 to 0.142 mm), check the thickness of the liner flange (1) and depth of the liner bore in the block. The thickness of the liner flange must be .4048 .0008 in. (10.282 0.020 mm). 7. The depth of liner bore (2) in cylinder block (3) must be .401 .001 in. (10.19 0.03 mm). NOTE: If the liner bore in the block is worn and the measurement is not correct, the liner bore can be corrected with a cylinder block counterboring tool. See SPECIAL INSTRUCTIONS, FORM FM055228-03. 8. Put a mark on the liner and block so the liner can be installed in the same position from which it was removed. https://127.0.0.1/sisweb/sisweb/techdoc/techdoc_print_page.jsp?returnurl=/sis... 2021/10/22
977K TRAXCAVATOR 11K00001-03918 (MACHINE)(UE070103 - 00) - Document... 4/4 TYPICAL EXAMPLE 9. Install new seals (4) on the cylinder liners. Put liquid soap on the seals and in the bores in the cylinder block. NOTICE The liners must be installed in the cylinder block immediately after band (5) is installed. Make sure the marks on the liners and the cylinder block are in alignment when the cylinder liners are installed. 10. Put clean diesel fuel on band (5) and install it on the liner as shown. Put clean SAE 30 oil on the liner and install it immediately in the cylinder block with tool group (C). end by: a) install pistons https://127.0.0.1/sisweb/sisweb/techdoc/techdoc_print_page.jsp?returnurl=/sis... 2021/10/22
https://www.ebooklibonline.com Hello dear friend! Thank you very much for reading. Enter the link into your browser. The full manual is available for immediate download. https://www.ebooklibonline.com


