Basics of Metal Forming Processes
Metal forming processes play a crucial role in shaping products, with casting, machining, joining, and deformation being the primary methods. Each process has its advantages and limitations, catering to different needs for accuracy, material wastage, complexity, and production quantities. Understanding the fundamentals of metal deformation, formability of sheet metal, and the distinctions between cold and hot working of metals is essential for efficient manufacturing.
Download Presentation

Please find below an Image/Link to download the presentation.
The content on the website is provided AS IS for your information and personal use only. It may not be sold, licensed, or shared on other websites without obtaining consent from the author.If you encounter any issues during the download, it is possible that the publisher has removed the file from their server.
You are allowed to download the files provided on this website for personal or commercial use, subject to the condition that they are used lawfully. All files are the property of their respective owners.
The content on the website is provided AS IS for your information and personal use only. It may not be sold, licensed, or shared on other websites without obtaining consent from the author.
E N D
Presentation Transcript
FUNDAMENTALS OF METAL FORMING There are four basic production processes for producing desired shape of a product. These are casting, machining, joining (welding, mechanical fasteners, epoxy, etc.), and deformation processes. Casting process exploit the fluidity of a metal in liquid state as it takes shape and solidifies in a mold. Machining processes provide desired shape with good accuracy and precision but tend to waste material in the generation of removed portions. Joining processes permit complex shapes to be constructed from simpler components and have a wide domain of applications. Deformation processes exploit a remarkable property of metals, which is their ability to flow plastically in the solid state without deterioration of their properties. With the application of suitable pressures, the material is moved to obtain the desired shape with almost no wastage. The required pressures are generally high and the tools and equipment needed are quite expensive. Large production quantities are often necessary to justify the process
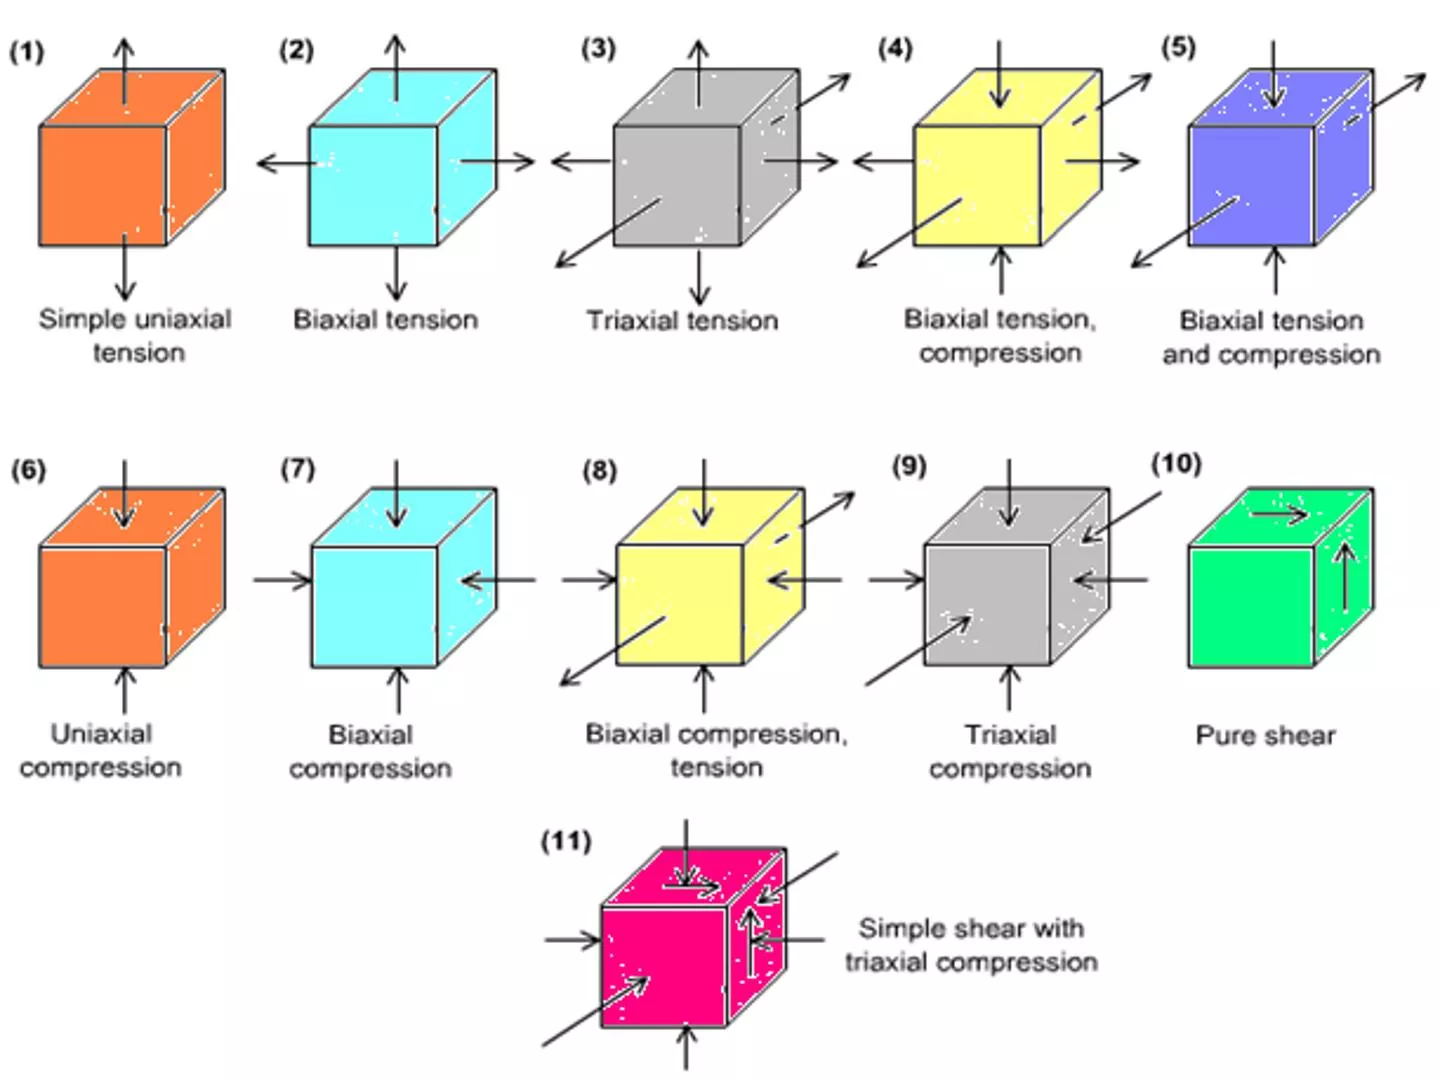
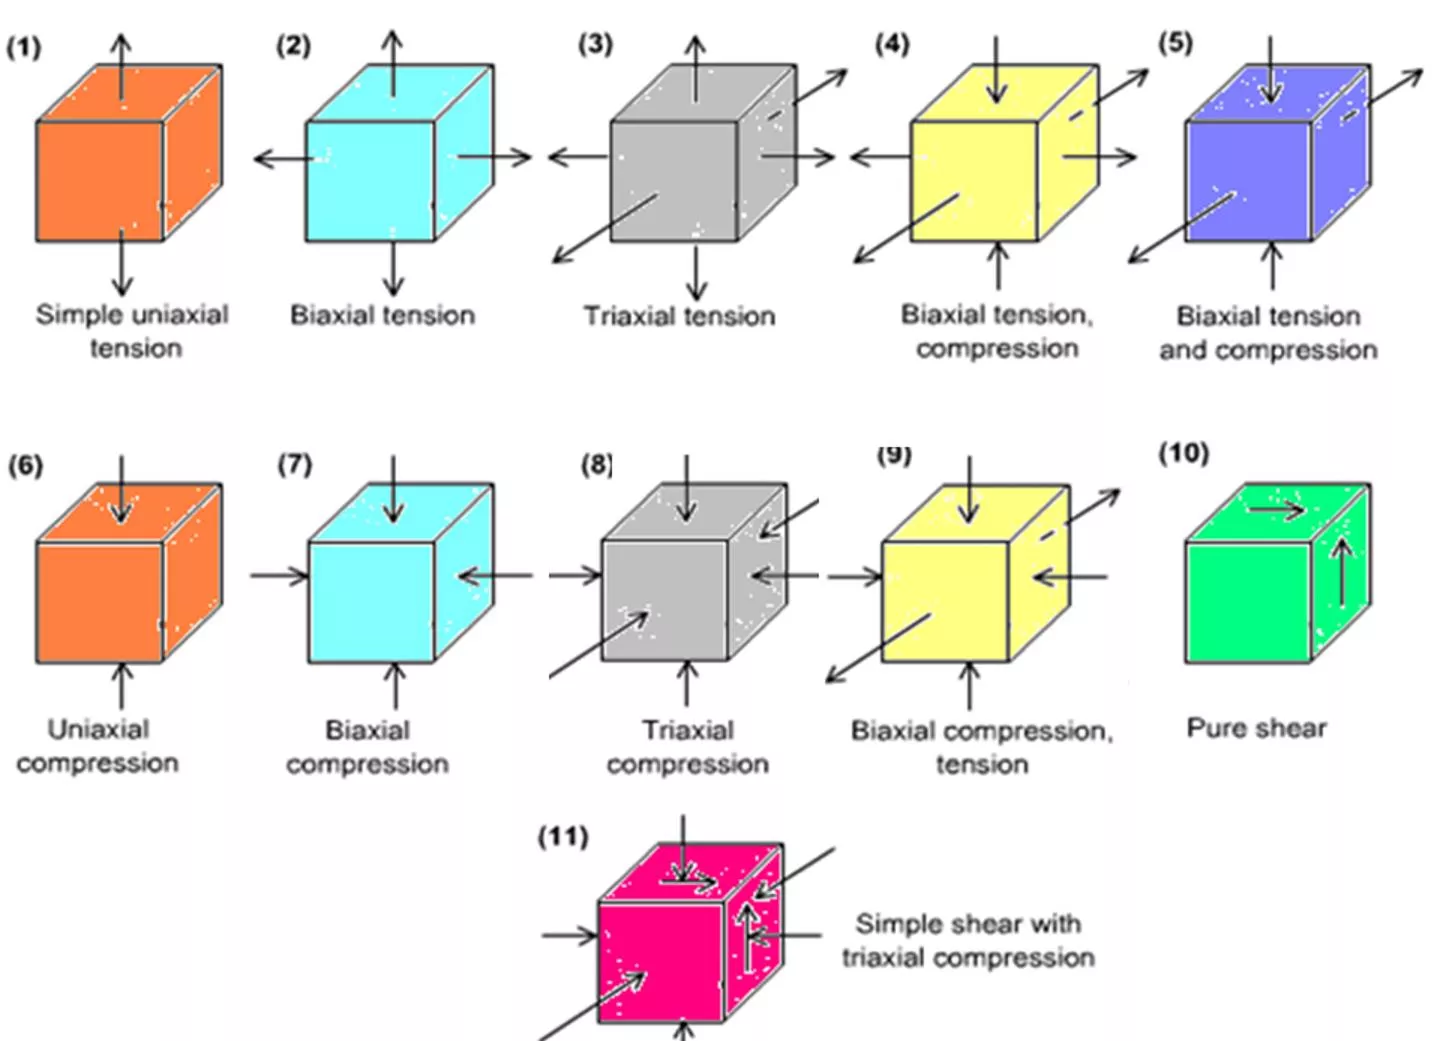
As a metal is deformed (or formed, as often called) into useful shape, it experiences stresses such as tension, compression, shear, or various combinations The amount of deformation that a metal can undergo at room temperature depends on its ductility. The higher the ductility of a metal, the more the deformation it can undergo. Pure metals can withstand greater amount of deformation than metals having alloying elements, since alloying increases the tendency and rapidity of strain hardening. Metals having large grains are more ductile than those having smaller grains. When metal is deformed in cold state, severe stresses known as residual stressesare set up in the material. These stresses are often undesirable, and to remove them the metal is heated to some temperature below the recrystalline range temperature. In this temperature range, the stresses are rendered ineffective without appreciable change in physical properties or grain structure.
FORMABILITY OF SHEET METAL Formability may be defined as the ease with which material may be forced into a permanent change of shape. The formability of a material depends onseveral factors. The important one concerns the properties of material like yield strength, strain hardening rate, and ductility. These are greatly temperature - dependent. As the temperature of material is increased, the yield strength and rate of strain hardening progressively reduce and ductility increases. The hot working of metal, therefore, permits relatively very large amount of deformation before cracking. There are several methods of predicting formability. A brief description of some important methods follows.
COLD AND HOT WORKING OF METALS Cold Working: Plastic deformation of metals below the recrystallization temperature is known as cold working. It is generally performed at room temperature. In some cases, slightly elevated temperatures may be used to provide increased ductility and reduced strength. Cold working offers a number of distinct advantages, and for this reason various cold-working processes have become extremely important. Significant advances in recent years have extended the use of cold forming, and the trend appears likely to continue.
In comparison with hot working, the advantages of cold working are 1. No heating is required 2. Better surface finish is obtained 3. Better dimensional control is achieved; therefore no secondary machining is generally needed. 4. Products possess better reproducibility and interchangeability. 5. Better strength, fatigue, and wear properties of material. 6. Directional properties can be imparted. 7. Contamination problems are almost negligible.
Some disadvantages associated with cold- working processes are: 1. Higher forces are required for deformation. 2. Heavier and more powerful equipment is required. 3. Less ductility is available. 4. Metal surfaces must be clean and scale-free. 5. Strain hardening occurs ( may require intermediate annealing ). 6. Undesirable residual stresses may be produced Cold forming processes, in general, are better suited to large-scale production of parts because of the cost of the required equipment and tooling.
Warm Working: Metal deformation carried out at temperatures intermediate to hot and cold forming is called Warm Forming Compared to cold forming, warm forming offers several advantages. These include: Lesser loads on tooling and equipment Greater metal ductility Fewer number of annealing operation (because of less strain hardening)
Compared to hot forming, warm forming offers the following advantages. Lesser amount of heat energy requirement Better precision of components Lesser scaling on parts Lesser decarburization of parts Better dimensional control Better surface finish Lesser thermal shock on tooling Lesser thermal fatigue to tooling, and so greater life of tooling.
Hot Working: Plastic deformation of metal carried out at temperature above the recrystallization temperature, is called hot working. Under the action of heat and force, when the atoms of metal reach a certain higher energy level, the new crystals start forming. This is called recrystallization. When this happens, the old grain structure deformed by previously carried out mechanical working no longer exist, instead new crystals which are strain-free are formed. In hot working, the temperature at which the working is completed is critical since any extra heat left in the material after working will promote grain growth, leading to poor mechanical properties of material.
In comparison with cold working, the advantages of hot working are 1-No strain hardening 2-Lesser forces are required for deformation 3-Greater ductility of material is available, and therefore more deformation is possible. 4-Favorable grain size is obtained leading to better mechanical properties of material 5-Equipment of lesser power is needed 6-No residual stresses in the material.
Some disadvantages associated in the hot-working of metals are: 1- Heat energy is needed 2- Poor surface finish of material due to scaling of surface 3- Poor accuracy and dimensional control of parts 4-Poor reproducibility and interchangeability of parts 5-Handling and maintaining of hot metal is difficult and troublesome 6-Lower life of tooling and equipment.
4- SHEARING Shearing is a cutting operation used to remove a blank of required dimensions from a large sheet. To understand the shearing mechanism, consider a metal being sheared between a punch and a die, Fig 5.1 Typical features of the sheet and the slug are also shown in this figure. A shearing can be seen that cut edges are neither smooth nor perpendicular to the plane of the sheet.
Shearing starts as the punch presses against the sheet metal. At first, cracks form in the sheet on both the top and bottom edges (marked T and T', in the figure). As the punch descends further, these cracks grow and eventually meet each other and the slug separates from the sheet. A close look at the fractured surfaces will revel that these are quite rough and shiny; rough because of the cracks formed earlier, and shiny because of the contact and rubbing of the sheared edge against the walls of the die.
The clearance between the punch and the die plays an important role in the determination of the shape and quality of the sheared edge. There is an optimum range for the clearance, which is 2 to 10% of the sheet thickness, for the best results. If the clearance increases beyond this, the material tends to be pulled into the die and the edges of the sheared zone become rougher. The ratio of the shining (burnished) area to the rough area on the sheared edge decreases with increasing clearance and sheet thickness. The quality of sheared edge is also affected by punch speed; greater the punch speed better the edge quality.
4-1 Shearing Operations For general purpose shearing work, straight line shears are used. as shown in Fig 5.2, small pieces (A, B, C, D .) may be cut from a large sheet. Shearing may also be done between a punch and die, as shown in Fig 5.1. The shearing operations make which use of a die, include punching, blanking, piercing, notching, trimming, and nibbling.
4-1-1 Punching/Blanking Punching or blanking is a process in which the punch removes a portion of material from the larger piece or a strip of sheet metal. If the small removed piece is discarded, the operation is called punching, whereas if the small removed piece is the useful part and the rest is scrap, the operation is called blanking, see Fig 5.3.
In punching, the metal inside the part is removed; in blanking, the metal around the part is removed. A typical setup used for blanking is shown in Fig 5.4.
The clearance between the die and punch can be determined as C = 0.003 t. where t is the sheet thickness and is the shear strength of sheet material. For blanking operation, die size = blank size, and the punch is made smaller, by considering the clearance. The maximum force, P required to be exerted by the punch to shear out a blank from the sheet can be estimated as P = t. L. where t is the sheet thickness, L is the total length sheared (such as the perimeter of hole), and is the shear strength of the sheet material. Stripping force. Two actions take place in the punching process punching and stripping. Stripping means extracting the punch. A stripping force develops due to the spring back (or resiliency) of the punched material that grips the punch. This force is generally expressed as a percentage of the force required to punch the hole, although it varies with the type of material being punched and the amount of clearance between the cutting edges. The following simple empirical relation can be used to find this force SF = 0.02 L.t where SF = stripping force, kN L = length of cut, mm t = thickness of material, mm
Example: A circular blank of 30 mm diameter is to be cut from 2 mm thick 0.1 C steel sheet. Determine the die and punch sizes. Also estimate the punch force and the stripping force needed. You may assume the following for the steel : Tensile strength: 410 MPa ; shear strength : 310 MPa Solution: - For cutting a blank, die size = blank size Die size = 30mm Clearance = 0.003 * t * = 0.003 * 2 * 310 = 1.86 mm Punch size = blank size 2 clearance = 30 2 * 1.86 = 26.28 mm Punch force needed = L. t. = * 30 * 2 * 310 = 58.5 KN Stripping force needed = 0.02 L.t = 0.02 * * 30 * 2 = 3.77 KN
4-1-2 Piercing: It is a process by which a hole is cut (or torn) in metal. It is different from punching in that piercing does not generate a slug. Instead, the metal is pushed back to form a jagged flange on the back side of the hole. A pierced hole looks some what like a bullet hole in a sheet of metal. 4-1-3 Trimming: When parts are produced by die casting or drop forging, a small amount of extra metal gets spread out at the parting plane. This extra metal, called flash, is cut off before the part is used, by an operation called trimming. The operation is very similar to blanking and the dies used are also similar to blanking dies. The presses used for trimming have, however, relatively larger table.
4-1-4 Notching: It is an operation in which a specified small amount of metal is cut from a blank. It is different from punching in the sense that in notching cutting line of the slug formed must touch one edge of the blank or strip. A notch can be made in any shape. The purpose of notching is generally to release metal for fitting up. 4-1-5 Nibbling: Nibbling is variation of notching, with overlapping notches being cut into the metal. The operation may be resorted to produce any desired shape, for example flanges, collars, etc. 4-1-6 Perforating: Perforating is an operation is which a number of uniformly spaced holes are punched in a sheet of metal. The holes may be of any size or shape. They usually cover the entire sheet of metal.
