Unique Animal Collage Art Project for Creative Expression
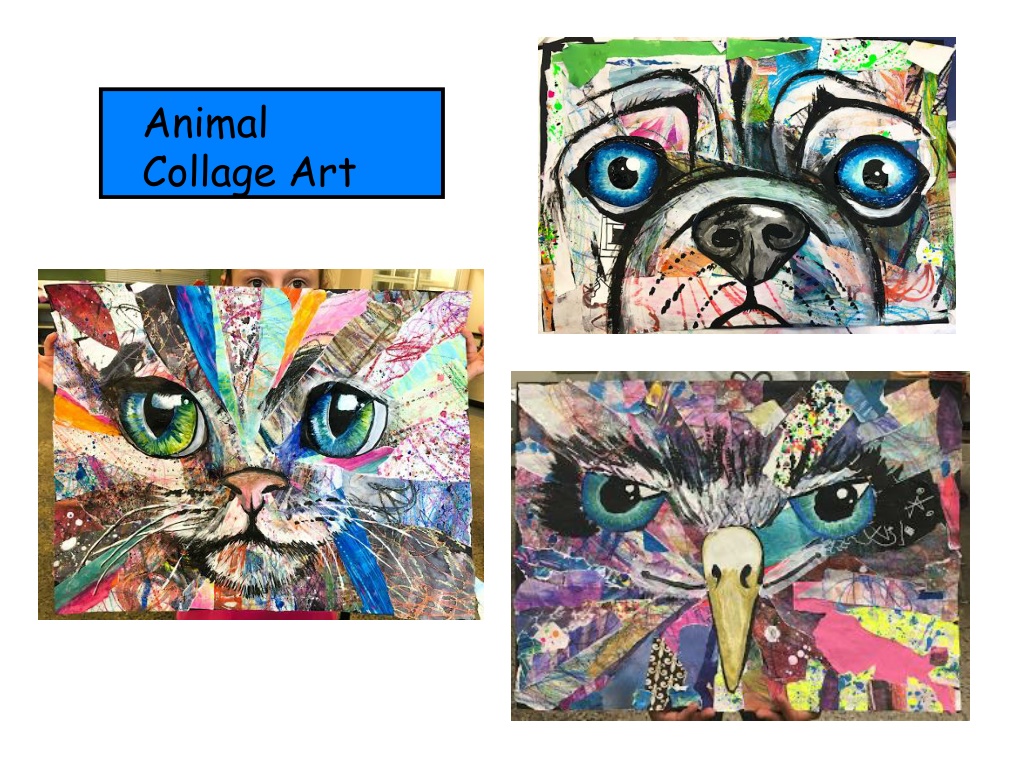
Embark on a creative journey to make a one-of-a-kind animal collage art piece with a colorful background, monochrome patterns, and ripped strips. Explore the combination of techniques involving oil pastels, watercolors, repetitive patterns, and careful lines to bring your favorite animal to life. Let your imagination run wild and enjoy the process of creating a captivating artwork full of textures and shapes.

Uploaded on Oct 03, 2024 | 0 Views
Download Presentation

Please find below an Image/Link to download the presentation.
The content on the website is provided AS IS for your information and personal use only. It may not be sold, licensed, or shared on other websites without obtaining consent from the author. Download presentation by click this link. If you encounter any issues during the download, it is possible that the publisher has removed the file from their server.
E N D
Presentation Transcript
Animal Collage Art
Part 1 https://www.youtube.com/watch?v=fz4MzJTeL0clist=RDEMdVnVIAwYlB4zIe31nRwa4Qstart_radio=1 https://www.youtube.com/watch ?v=fz4MzJTeL0c&list=RDEMdV nVIAwYlB4zIe31nRwa4Q&start_ radio=1 The first stage of this project is to create the background. Each of you will have a sheet of A3 paper and oil pastels to go crazy with! You can choose whatever colours you like and whatever shapes, lines and patterns. We will be listening to the Piano Guys music while we do this - just go with the flow, making big and small, long and short arm movements. Feel the music!
It doesn't have to be just squiggles. You can draw shapes, write words, create patterns... You can colour some in - or not! Remember to just enjoy it - there is no right or wrong!
Once this is done and your page is full of lines, squiggles and shapes, we are going to add watercolour! The colour choice is up to you. You can use black, which can be quite striking, or choose a different colour - or several colours.... What is happening when you paint over the oil pastels?
Part 2 Today we're going to be creating sheets or monochrome patterns as I think these look amazing mixed up with the coloured pieces.
Again, we can listen to some music to focus the mind. This is a much more controlled way of drawing - it requires repetitive patterns and careful lines. We'll use more A3 paper and use black or dark coloured felt tips. Divide your page into chunks of shapes and fill each one with lines and patterns. Do NOT use a ruler!
Now for the bit you'll either love or hate - ripping them into strips! No scissors allowed! We are going to tear both of your background pieces into strips. Let's think about the size of strips that we need as we need to plan the final piece. This does need to be done carefully and thoughtfully or the strips will not do their job. Keep your strips safe and away from other people s!
Part 3 Which animal will you create? We now need to think about your animal. You can choose to do a dog, cat or a bird (birds of prey look great!)
At this stage, decide on your animal. Decide on eye shape and colour.
You will need the right template for your eye shape and a piece of white card. Draw round the template with a pencil. Draw round it again to get a pair of eyes (birds angled eyes - you will need to flip the template) We will now watch the first part of the video to help you do the outline and the pupil (we're using paint rather than ink) https://www.youtube.com/watch?time_continue=7v=reCuvNjmKAgfeature=emb_title https://www.youtube.com/watch?time_contin ue=7&v=reCuvNjmKAg&feature=emb_title We will leave these to dry while we do noses. (watch until 2.05 when says let it dry)
https://www.youtube.com/watch?time_continue=2v=aZL4C6TH6-Yfeature=emb_titlehttps://www.youtube.com/watch?time_continue=2v=aZL4C6TH6-Yfeature=emb_title https://www.youtube.com/watch?ti me_continue=2&v=aZL4C6TH6- Y&feature=emb_title Noses. Choose your template - either cat, dog or beak! Watch video but ignore the part about painting it while its wet - we are colouring with pastels, you just need to watch the bits about the beak and the cat nose which are at the end. Outline your nose/ beak and add the line down the middle - just do the black bits you can see on these examples, then leave to dry for tomorrow.
Part 4 This lesson, we will be sticking the coloured strips onto your card to create your finished background. When I did mine, I positioned them so that they radiated from the centre but this doesn't have to be precise and you can fill in gaps any way you like (very effective for birds though!) Try not to put similar colours next to each other. Stick pieces all over your card - they can hang over the edge (this is particularly good for feather effect on the birds) or they can be trimmed when the whole piece is finished.
Now we need to leave the background to dry and colour in the eyes and nose. Let's watch the rest of the eye video - https://www.youtube.com/watch?time_continue=7v=reCuvNjmKAgfeature=emb_title https://www.youtube.com/watch?time_ continue=7&v=reCuvNjmKAg&feature =emb_title Your turn! Find the colours you need and get colouring! Take your time.......
Now for the noses! We'll watch the video again for ideas. For the dog, you will need black, grey and white Bird - white, yellow, gold, orange Cat - pink, grey, white (maybe!) https://www.youtube.com/watch?time_continue=2v=aZL4C6TH6-Yfeature=emb_title https://www.youtube.com/watch?ti me_continue=2&v=aZL4C6TH6- Y&feature=emb_title
You now need to stick these in position on your background. Place them on, check you are happy, then stick in place.
Last bit! We need to add fur / feathers / mouths etc in black paint. To get the hair effect, you can squash the brush in your fingers until the bristles fan out. Have a look at these for inspiration.