Learn Touch Typing Efficiently with Rapid Typing Tutor
Rapid Typing Tutor is a free and open-source software designed to improve typing skills efficiently on your computer. It offers typing games and exercises to enhance speed and accuracy through touch typing technique. The program guides users through learning the keyboard layout, mastering the home row, and progressing to typing actual text. The interactive interface includes tools like a virtual keyboard, status bar, and lesson editor to customize the learning experience. Start typing effortlessly by following touch typing rules and practicing regularly with Rapid Typing Tutor.

Download Presentation

Please find below an Image/Link to download the presentation.
The content on the website is provided AS IS for your information and personal use only. It may not be sold, licensed, or shared on other websites without obtaining consent from the author. Download presentation by click this link. If you encounter any issues during the download, it is possible that the publisher has removed the file from their server.
E N D
Presentation Transcript
CLASS- IX SUBJECT-INFORMATION TECHNOLOGY UNIT-II KEYBOARDING SKILL Rapid Typing Software
Introduction to Rapid Typing Tutor Introduction : Rapid Typing Tutor is a Free and Open Source Software (FOSS) designed to learn typing skills on the computer. It is free to use and share with others for free, but only by using the original distribution package. Learning to type is fun with the typing game included with Rapid Typing Tutor.
Touch Typing Technique Touch typing improves typing speed and accuracy. A touch typist never looks at the keyboard. The fingers hit the right keys by habit. The typist is entirely focused on the text being typed, reading the words and phrases as the fingers type the text reflexively. Touch typing can be learned by performing special exercises. .
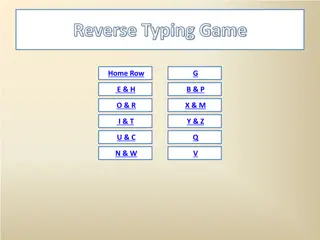
Touch Typing Technique Stage one : of the process begins with learning the Home Row of the keyboard (the row beginning with the Caps Lock key). Looking at the keyboard is strictly forbidden. This is followed by learning the lower and upper rows, the numbers row, uppercase letters and special symbols. Stage two : involves memorising frequently used syllables and typing words containing these syllables. Stage three : involves typing actual text to perfect the skills acquired.
Typing Tutor Interface After configuring settings in Wizard, Rapid Typing s main window will appear as shown in Figure
Typing Tutor Interface Title bar : It contains Program Modes , Option button and three control button. Toolbar : It contains Current Couse, Current lesson control. Text area : is the area where the text to be typed is displayed. You can easily edit it in Lesson Editor, if necessary. Status Bar: includes tips, progress bar and volume control. Virtual Keyboard : is the virtual keyboard that will help you to learn touch typing with all 10 fingers. You can customise its appearance in the 'Lesson' section.
Touch Typing Rules 1. The F, D, S, A, and J, K, L, ; keys (on a QWERTY keyboard) represent the base position. Keyboards usually have small protrusions on the F and J keys. They help your fingers locate the base position without looking at the keyboard. Try to return your fingers to the base position after each keystroke. 2. Colour coding shows which finger should press each key (see the picture above). The left index finger is reserved for all the red keys. The right index finger is reserved for green keys, and so forth. Use the thumb of whichever hand is more convenient for you to press the Space key.
Touch Typing Rules 3.The base position on the numeric pad is the number 5 key for the middle finger, 4 for the index finger, and 6 for the ring finger. The numeric pad simplifies and speeds up numerical data input. 4. Uppercase letters and symbols appearing on keys in the numbers row are typed by one hand with the little finger of the other hand holding down the SHIFT key. 5. Do not look at the keyboard. Try to locate the right key with your fingers.
Rapid Typing Courses S.No. Course Description The Introduction course covers all characters typed on your keyboard 1. Introduction Beginner course helps the user to learn the position of the keys on the keyboard. 2. Beginner The experienced course will help the user to improve the typing speed by memorising frequently used syllables and words. 3. Experienced The advanced course helps the user to improve their typing skill acquired by typing an actual text. 4. Advanced This course helps the user to measure his/her typing speed and accuracy with advanced typing test. 5. Testing
Viewing Statistics Interpreting the result on the completion of a course is an important task as it helps to know your overall performance. The result window is divided into two parts: Rating Pane and Three tab Next Step, Detailed Statistics, and Errors overview.
Viewing Statistics Next Steps : By clicking on the next steps tab, you can go to the next lesson if speed, accuracy and time-out are performed will or start the current lesson again to achieve a better score next time. Detailed Statistics :The Detailed statistics screen shows the lesson statistics, which displays the details like typing, speed errors and slowdown for each character/keystrokes. The colour indication is as follows: Green letters denote right inputs. Yellow letters stand for right inputs exceeding the acceptable timeframe. Red letters denote wrong inputs within the acceptable timeframe. Orange letters indicate wrong inputs that also exceed the acceptable timeframe (it's the worst result).
Viewing Statistics Error Overview : On the Error tab you can view your detailed statistics for the current lesson. This tab shows your errors and delays percentage both in the graphical and table view. This will help you to better understand which letters are still hard for you to type. You can switch between the Errors in percent chart (by clicking the button just below the tabs) and Delay in percent chart (by clicking the button).
View and analyse statistics To view the results of all the lessons that you have already completed: (i) Open the Statistics section, and (ii) choose the button in the top-left corner of the main window. The Statistics screen will open as shown in Figure . Here, you can review your overall statistics and progress both graphical and table view. in
Working with Lesson Editor Lesson Editor offers flexibility to the user to make all the lessons fully customised. You can add, insert, change and delete lessons, group them in course and review the corresponding metrics Using The Lesson Editor : To open lesson editor click on the lesson editor tab present in the top-left corner of the main window. The screen will Use the command button to create, add new course, modify existing courses and deleting a course or lesson. appear as shown in the picture
Interface of Lesson Editor Course and Lesson List Title Bar : It displays the lesson editor tab button along with the title and control buttons. Toolbar : It contains commands for adding, removing, inserting and saving the existing lessons and courses. Navigation tree : It shows a list of the current keyboard layout chosen, current course, section and lesson. Properties : It is the area which lets you modify the course, section and properties of the current lesson such as the lesson name along with section.
Creating a New Lesson To create a new lesson of your choice, use the following steps Click on Lesson Menu option from Rapid Typing Toolbar. Now select the course level in which you want to add a new lesson. In the next step, you can either choose Create new lesson option from the Lesson menu or right click on any course level and select the Create new lesson option from the pop up menu that appears. Now give a suitable name and title in the given box.
Deleting Lesson To Delete A Lesson : The user can remove the lesson from the Rapid Typing software by selecting it in the Navigation Tree and click on the Delete button on the Toolbar or by simply pressing the Delete key on the keyboard.
Creating A New Course We can add and delete a course in Rapid typing software through following steps Select the Lesson Editor option present on Title bar or Press (ctrl+3). Click on the Course menu button located on the toolbar. A drop down menu will appear. Now select the Create new course option. You will notice that anew course has been added in the Navigation tree. Type a name and title of your course and press enter. To Delete the newly created course, select the course and click on the delete button. The End