Installation of Robot-Mounted Detector on DIAD Beamline
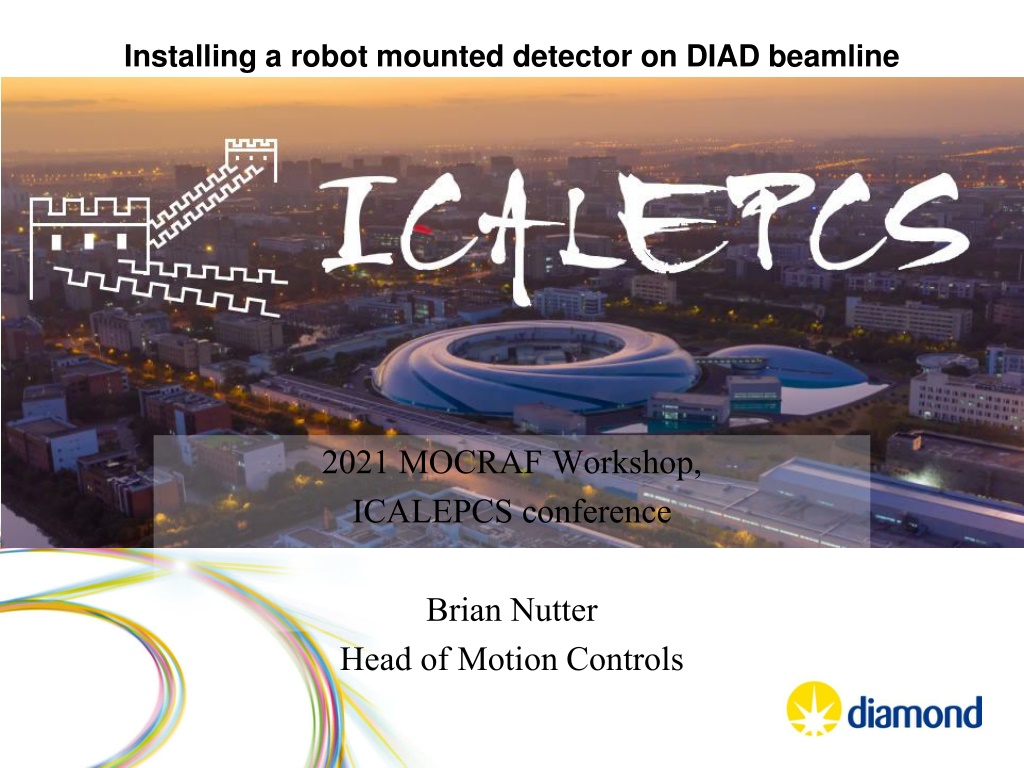
Installing a robot-mounted detector on the DIAD beamline for the 2021 MOCRAF Workshop at the ICALEPCS conference. The robot arm holds a diffraction detector for dual imaging and diffraction purposes, ensuring safety for personnel, equipment, and integration into EPICS and GDA systems. Functionality includes positioning the detector within a specific area of the experimental hutch, with system description detailing the Yaskawa MH225 Robot DX200 setup.

Download Presentation

Please find below an Image/Link to download the presentation.
The content on the website is provided AS IS for your information and personal use only. It may not be sold, licensed, or shared on other websites without obtaining consent from the author. Download presentation by click this link. If you encounter any issues during the download, it is possible that the publisher has removed the file from their server.
E N D
Presentation Transcript
Installing a robot mounted detector on DIAD beamline 2021 MOCRAF Workshop, ICALEPCS conference Brian Nutter Head of Motion Controls
DIAD: Two beamlines combined at the sample: micro-tomography and micro-diffraction. All to be done in-situ
RAHDD Robot Arm Holds a Diffraction Detector DIAD beamline Dual Imaging and Diffraction Imaging camera plus 2D diffraction detector Robot to be moved to any? position around sample Robot must NOT be a risk to personnel Robot must NOT be a risk to the detector Robot must NOT be a risk to external equipment Robot must NOT be at risk from external equipment Robot must be integrated into EPICS and GDA Safety rated PLC for Machinery Protection not PSS
Experimental Hutch under design In Use 3 sample positions: General tomography stage Mechanical test rig 3rd position for user setup Robot carries the Diffraction detector Custom built table carries the imaging detector
Functionality Summary The robot will position a detector within an area of the DIAD experiments hutch. This area is part of a sphere, the positions are all referenced to the centre of the sample: The sphere is 300 600mm radius. The closest detector position is 300mm from the sample. The furthest detector position is 600mm from the sample The detectors angular range is 0 - 155 When seen from the side; the detector will be positioned above the XZ plane (the origin of this coordinate system is the sample position).
System description Yaskawa MH225 Robot DX200 Yaskawa Robot Controller Teach pendant End station PLC Omron NX series with safety CPU Interlocks to the PSS system Connection to Beamline E-Stop system Connection to EPICS and GDA Collision Sensor
DX200 Yaskawa Robot Controller The controller contains all equipment needed to move the robot in a safe, coordinated manner. This includes 2 specific optional items relating to the safety of the robot system 1 Machine Safety board (MSB) - certified to Category 4/PLe according to EN ISO 13849-1 and SIL 3 according to EN 62061/IEC61508. The MSB is responsible for all standard safety functions including, but not limited to: Connection of emergency stop signals to external systems Supervision of operating modes, ensuring compliance to ISO 10218, e.g. ensuring teach mode is limited to 250mm/s Connection to the robot cell guarding
DX200 Yaskawa Robot Controller The controller contains all equipment needed to move the robot in a safe, coordinated manner. This includes 2 specific optional items relating to the safety of the robot system 2) according to EN ISO 13849-1 and SIL 2 according to EN 62061/IEC61508. The FSB has been added to this system to make the following functionality available: Axis Range limitation Axis speed limitation Safety range limits Tool change monitoring Speed limitation of the tool Tool angle monitoring Functional Safety Board (FSB) - certified to Category 3/PL d
DX 200 Yaskawa Robot Controller Functional safety unit The FSB allows the Functional Safety Unit (FSU) to be used by the Robot system, the above named functionality is contained in the FSU. The safety range function for the FSU allows keep-in and keep-out areas to be defined, these areas use a 3D model of the robot and tool to limit the motion of the robot. The robot is unable to move either into or out of a defined box . Each of these zones can be either permanently activated or switched using a safety input; each active zone also has a CPU utilisation overhead value, all active zones combined must not use more than 100% of the available CPU utilisation overhead or the Robot system will stop. 15 digit numeric password to enter FSU programming mode.
DX 200 Yaskawa Robot Controller Functional safety unit- 32 conditional files Must not leave Must not enter Tool Shape defined by up to 5 envelope curves- cylinders & hemispheres Cannot cross
Things to miss, and be missed by! Static Equipment- cable trays, Sample X translation base, Imaging camera base Moving equipment 3 movable sample environments Mechanical rig ( 500mm x 2300mm x 550mm) Tomography stage (400mm x 1250mm x 550mm) User plinth (400mm x 900mm x 550mm) Imaging camera
DX 200 Yaskawa Robot Controller Functional safety unit- Currently uses 15 files, Active files are selected by safe input signals. Too many to al be active at once
DX 200 Yaskawa Robot Controller And Don t get hit by The Robot will provide digital outputs to the end station PLC for interlocking other machinery. Interference zones should be setup to indicate when the Detector is within certain zones: When the detector is within the main translation stage envelope. When the detector is within the imaging camera stage space envelope. When the detector is home.
DX 200 Yaskawa Robot Controller And Don t get hit by.. The axes which must not occupy the same space as the detector are separately monitored by absolute encoders (SSI). Depending upon ranges Safety i/o interact with the safety unit of the robot
Functionality Summary There will be 3 modes of operation 1 Automatic Full Speed. ONLY when hutch searched and locked. Position requests via EPICS. 2 radii 600mm and 300mm in 5degree increments. Detector face rotation +/-45 degree. Robot operates at programmed speed. 2 Automatic safe speed. For doing set up checks Position requests via EPICS. Movement ONLY if the end station PLC allow it. Robot can only operate a safe speed or slower. Key controlled access from PBS. Trained Diamond personnel only 3 Teach Mode. For programming and recovery of the robot system Pendant controlled. Pendant in locked safe key controlled by PBS. Trained Diamond staff only
Implementation - Control System FSU needs more than 7 settings for keep out zones DX200 Can t support EPICS Comms and Safety Fieldbus (needs another LAN port) New plan to send data via the PLC PLC used as intermediary to send and receive position request data. PLC communicates using Ethernet I/P PLC is Omron NX series with a Safety CPU PLC can limit the values for position requests.
User EPICS Interface DISPLAY CURRENT STATUS Position feedback of the arm: gives the current position of the robot, both in: Cartesian coordinates (x,y,z,rx,ry,rz) Detector coordinates (Alpha, Beta, Gamma, Radius) Current status: Status of the system, including related beamline components Robot arm status, such as servo status, movement, and errors. Interlocks, including Base X and Imaging Table.
User EPICS Interface Commands for operating the robot: These are the commands to operate the robot arm, such as:Requests: Position request (Alpha, Beta, Gamma, Radius): after setting a position, moves the robot to that position. A move might trigger a safe home position automatically. Position adjust (Alpha, Beta, Gamma, Radius): Once the robot is in position, finer adjustments are allowed for correction. If the corrections go out of the tolerance allowed, this may trigger a full re-positioning. Sample position adjust (X,Y,Z): Allows adjustment of the sample center, so the detector can focus on an specific part of the sample. Detector face adjust (X,Y): Allows adjustment of the face of the detector. Offset (offset): Finer adjustment of the distance between the sample and the face of the detector.
User EPICS Interface Commands for operating the robot: These are the commands to operate the robot arm, such as:DIRECT COMMANDS: Safe home: robot goes to a known safe position. Factory home: This commands the robot to go to a factory-defined position when its encoders need to re-calibrate. This may be needed if the power to the robot is cut while it is moving. . Maintenance home: This drives the robot to a known position where the detector can be safely serviced. Stop: This soft stop is a non-emergency abort of a requested movement, stopping the robot and cancelling the movement command. Hold: This pauses the robot action without cancelling the action, so it can be resumed later. Recovery to safe: Function to try to recover from an error state of the robot, usually by returning to its safe home position.
PLC EPICS interface EPICS communicates with the PLC using the tag-based EtherNet/IP (Industrial protocol) that the NX PLC provides. Tags are names defined on the PLC as entry points, similar to addresses, but easier to understand.
PLC EPICS interface EPICS communicates with the PLC using the tag-based EtherNet/IP (Industrial protocol) that the NX PLC provides. Tags are names defined on the PLC as entry points, similar to addresses, but easier to understand Position requests values are written into tags by EPICS, while the PLC offers readback values from the robot as well Once all values are set the user can request to start the action
Implementation Robot interface PLC and Robot communicate over Ethernet I/P 100 bytes Robot uses system jobs to convert multiple bytes into one number PLC does this much easier Communication is key between programmers! ( Spreadsheet heaven!) System Job functions: Combine bytes from PLC for position data. Separate bytes for transmission to PLC. Convert Robot Coordinates into detector coordinates. Transmit Robot position data.
System Functions Position Robot Position calculated using: POS_REQ_ALPHA, POS_REQ_BETA, POS_REQ_GAMMA, POS_REQ_RADIUS DET_OFFSET DET_ADJ_X, DET_ADJ_Y SMP_ADJ_X, SMP_ADJ_Y, SMP_ADJ_Z Move to position command Check position data N.B. The position calculation includes the detector face adjustment variables Overwirte positon req data (pos calc function) Movement Sequence 1. Robot will check its position 2. Recover to stand off if not above equipment, 3. Move to the Requested Alpha, Beta and Radius. 4. Adjust position for the Detector face adjustment. 5. Apply Gamma Rotation. Move to position
First User!!!!!!! (Validation) i.e. Does it actually Work?
Thank you for your attention Questions More hidden slides below
Safety and Protection To avoid confusion when discussing similar topics this document will refer to items concerning the safety of personnel as Safety; when discussing equipment protection, from clashes and such, it will refer to Protection. General The robot has a variety of dual channel safety rated inputs and outputs (IO) available for use in our system. These IO channels are available from both the MSB and the FSB as such they have different rateable categories in terms of safety, see Error! Reference source not found. for the ratings. Standards When dealing with industrial robotics and machine safety there are several standards which can be considered: Industrial Robot Specific: oBS EN ISO 10218-1-2011, Robots and robotic devices Safety requirements for industrial robots, Part 1: Robots sets out requirements for robots and their controllers, it does not deal with integration; this is the standard robot manufacturers design to. oBS EN ISO 10218-2-2011, Robots and robotic devices Safety requirements for industrial robots, Part 2: Robot systems and integration sets out the requirements for robots systems and integration into larger machines, Diamond needs to follow this. oPD ISO/TS 15066:2016, Robots and robotic devices Collaborative robots A Technical Specification (precursor to a full standard) for dealing with collaborative robots, in the K11 case we are not using a collaborative mode. General Standards (all to be taken account of): oBS EN ISO 13849-1:2015, Safety of machinery Safety-related parts of control systems, Part 1: General principles for design oBS EN ISO 13849-2:2015, Safety of machinery Safety-related parts of control systems, Part 2: Validation oBS EN ISO 12100:2010, Safety of machinery General principles for design Risk assessment and risk reduction oBS EN ISO 60204-1:2018, Safety of machinery - Electrical equipment of machines oMachinery, EMC and Low Voltage Directives oBS EN ISO 13850:2015, Safety of machinery Emergency stop function Principles for design
While a risk assessment has been performed, the results of which will be outlined below, a minimum performance level requirement is set out in BS EN ISO 10218-1 section 5.2.2, for ease of reference the text is replicated below: Safety-related parts of control systems shall be designed so that they comply with PL=d with structure category 3 as described in ISO 13849-1:2006, or so that they comply with SIL 2 with hardware fault tolerance of 1 with a proof test interval of not less than 20 years as described in IEC 62061:2005. Therefore, the safety parts of the system integration will be designed to meet the category 3 requirement and Performance level 3 as a minimum.


")