John Deere 328D Skid Steer Loader (Manual Controls) Service Repair Manual Instant Download (TM11431)
Please open the website below to get the complete manualnn//

Download Presentation
Please find below an Image/Link to download the presentation.
The content on the website is provided AS IS for your information and personal use only. It may not be sold, licensed, or shared on other websites without obtaining consent from the author. Download presentation by click this link. If you encounter any issues during the download, it is possible that the publisher has removed the file from their server.
Presentation Transcript
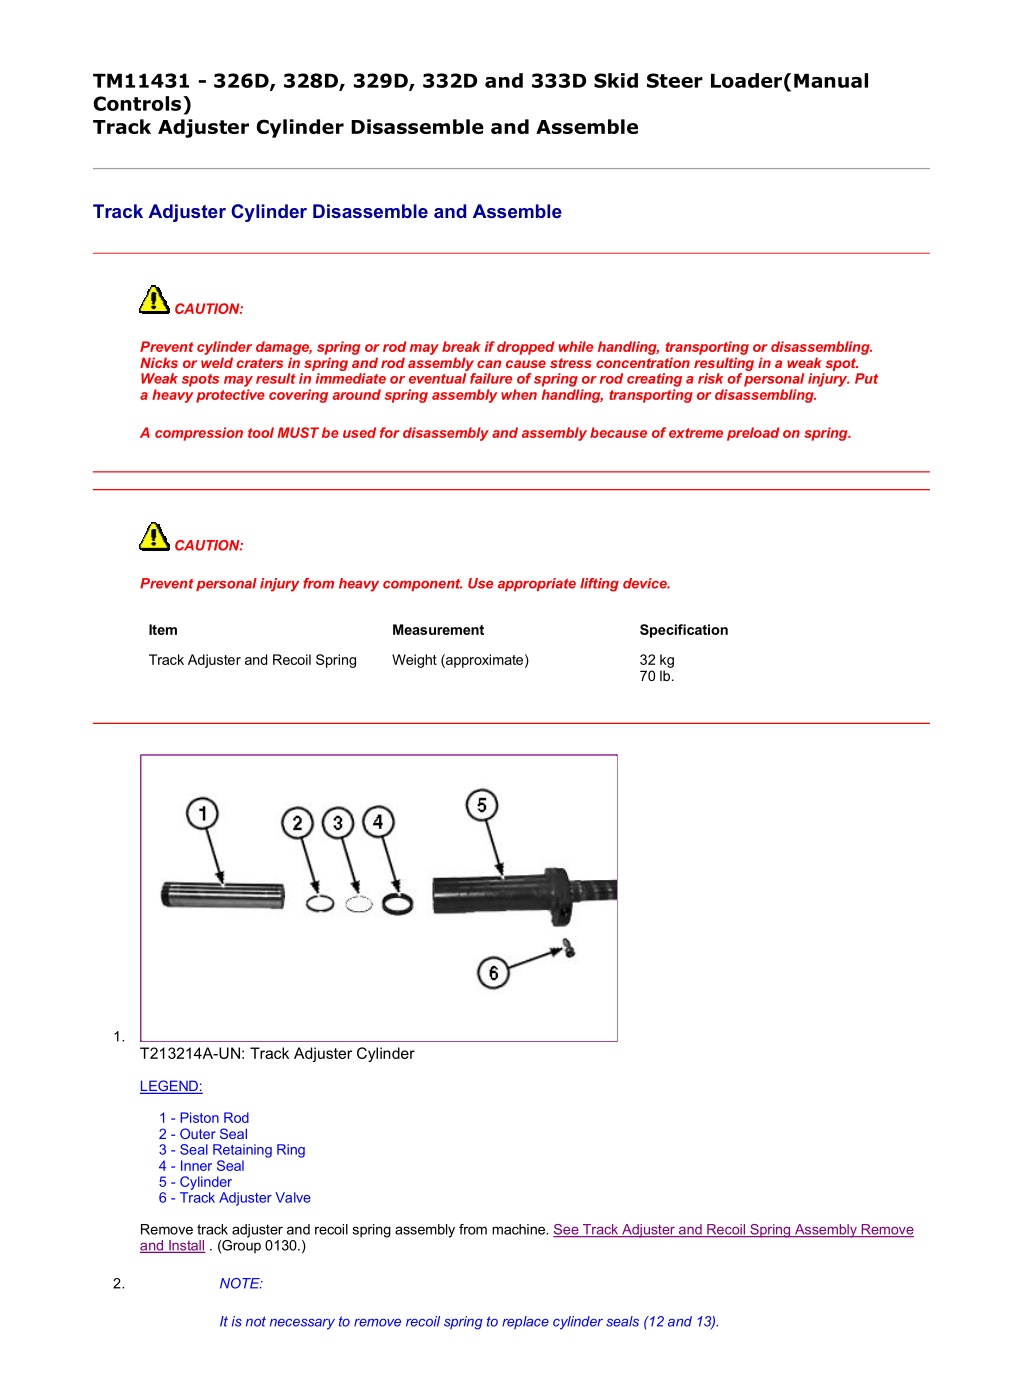
1/3 TM11431 - 326D, 328D, 329D, 332D and 333D Skid Steer Loader(Manual Controls) Track Adjuster Cylinder Disassemble and Assemble Track Adjuster Cylinder Disassemble and Assemble CAUTION: Prevent cylinder damage, spring or rod may break if dropped while handling, transporting or disassembling. Nicks or weld craters in spring and rod assembly can cause stress concentration resulting in a weak spot. Weak spots may result in immediate or eventual failure of spring or rod creating a risk of personal injury. Put a heavy protective covering around spring assembly when handling, transporting or disassembling. A compression tool MUST be used for disassembly and assembly because of extreme preload on spring. CAUTION: Prevent personal injury from heavy component. Use appropriate lifting device. Item Measurement Specification Track Adjuster and Recoil Spring Weight (approximate) 32 kg 70 lb. 1. T213214A-UN: Track Adjuster Cylinder LEGEND: 1 - Piston Rod 2 - Outer Seal 3 - Seal Retaining Ring 4 - Inner Seal 5 - Cylinder 6 - Track Adjuster Valve Remove track adjuster and recoil spring assembly from machine. See Track Adjuster and Recoil Spring Assembly Remove and Install . (Group 0130.) 2. NOTE: It is not necessary to remove recoil spring to replace cylinder seals (12 and 13). file:///C:/ProgramData/Service%20ADVISOR/Temp/TM11431_09001faa813... 2019/11/27
2/3 Remove recoil spring (8), if necessary. See Track Adjuster Recoil Spring Remove and Install . (Group 0130.) 3. Tighten track adjuster valve (6). 4. Pump cylinder (5) with grease and remove piston rod (1) from cylinder. 5. Clean out excess grease from cylinder to access seals in end of cylinder. 6. T213208A-UN: Cylinder Seals (S.N. 192141) LEGEND: 2 - Inner Seal 3 - Seal Retaining Ring 4 - Outer Seal TX1081382A-UN: Cylinder Seals (S.N. 192142 ) LEGEND: 2 - Inner Seal 3 - Seal Retaining Ring 4 - Outer Seal Remove outer seal (2) from cylinder. 7. NOTE: For cylinders on machines (S.N. 192141), remove seal retaining ring (3) from inner seal (4) before removing seal from cylinder. Remove seal retaining ring (3) and inner seal (4) from cylinder. 8. Clean and inspect parts for damage. Repair or replace parts as necessary. 9. NOTE: file:///C:/ProgramData/Service%20ADVISOR/Temp/TM11431_09001faa813... 2019/11/27
3/3 For cylinders on machines (S.N. 192141), install inner seal in cylinder with retaining ring groove facing outward. Install seal retaining ring into groove of inner seal. Install inner seal and seal retaining ring in cylinder. 10. Install outer seal in cylinder. 11. Loosen track adjuster valve. 12. Apply grease to piston rod and install in cylinder. 13. Completely compress piston rod in cylinder. 14. Tighten track adjuster valve. 15. Install recoil spring, if necessary. See Track Adjuster Recoil Spring Remove and Install . (Group 0130.) 16. Install track adjuster and recoil spring assembly to machine. See Track Adjuster and Recoil Spring Assembly Remove and Install . (Group 0130.) KK70125,0000772-19-20101022 file:///C:/ProgramData/Service%20ADVISOR/Temp/TM11431_09001faa813... 2019/11/27
https://www.ebooklibonline.com Hello dear friend! Thank you very much for reading. Enter the link into your browser. The full manual is available for immediate download. https://www.ebooklibonline.com
1/3 TM11431 - 326D, 328D, 329D, 332D and 333D Skid Steer Loader(Manual Controls) Axle Housing Remove and Install Axle Housing Remove and Install 1. Remove front attachment and park machine on flat level surface. 2. Raise and block machine. See Raising and Blocking Machine . (Group 1740.) 3. Remove wheel from axle being serviced. See Wheel Remove and Install . (Group 0110.) 4. Drain chain case oil. See Change Chain Case Oil . (Operator's Manual.) 5. Clean area around axle housing to prevent debris from entering chain case. 6. CAUTION: Prevent possible crushing injury from heavy component. Use appropriate lifting device. T198842A-UN: Axle Housing LEGEND: 1 - Axle Housing 2 - Nut (8 used) Support axle housing (1) using appropriate lifting device. Remove axle housing. Item Measurement Specification Axle Housing Weight (approximate) 33 kg 72 lb. file:///C:/ProgramData/Service%20ADVISOR/Temp/TM11431_09001faa810... 2019/11/27
2/3 7. Clean and inspect parts. Repair or replace parts as necessary. See Axle Housing Disassemble and Assemble . (Group 0201.) 8. T198847A-UN: Axle Housing O-Ring LEGEND: 3 - O-Ring Install new O-ring (3) in groove on axle housing. 9. Fill axle housing with oil. Item Measurement Specification Axle Housing Capacity 237 mL 8 oz. file:///C:/ProgramData/Service%20ADVISOR/Temp/TM11431_09001faa810... 2019/11/27
3/3 10. T198848A-UN: Chain Sprocket Position LEGEND: 4 - Chain Sprocket Hub Position chain sprocket hub (4) to be visible through hole in chain case. 11. Install UP marking in axle housing, facing up. 12. Install axle shaft into chain sprocket hub and slide axle housing over mounting studs. Loosely install nuts. 13. Slide axle housing to tighten drive chain. See Drive Chain Tension Check and Adjustment . (Group 9020-25.) 14. Fill chain case with oil. See Change Chain Case Oil . (Operator's Manual.) 15. Install wheel. See Wheel Remove and Install . (Group 0110.) 16. Remove blocking. See Raising and Blocking Machine . (Group 1740.) TF44157,0000EA2-19-20100915 file:///C:/ProgramData/Service%20ADVISOR/Temp/TM11431_09001faa810... 2019/11/27
1/3 TM11431 - 326D, 328D, 329D, 332D and 333D Skid Steer Loader(Manual Controls) Axle Housing Disassemble and Assemble Axle Housing Disassemble and Assemble TX1068755-UN: Axle Housing Assembly LEGEND: 1 - Snap Ring 2 - Washer 3 - Shim (as required) 4 - Washer 5 - Inner Bearing 6 - Inner Bearing Cup 7 - Axle Housing 8 - Outer Bearing Cup 9 - Outer Bearing 10 - Seal 11 - Axle Shaft 1. T198859A-UN: Axle Housing LEGEND: 1 - Snap Ring Place axle housing in a press. Remove snap ring (1), washer and shims. file:///C:/ProgramData/Service%20ADVISOR/Temp/TM11431_09001faa810... 2019/11/27
2/3 2. TX1068760A-UN: Axle Shaft LEGEND: 5 - Inner Bearing 11 - Axle Shaft Place axle housing in a press with support under housing flange. Press axle shaft (11) down until axle shaft drops free of inner bearing (5). 3. Remove inner bearing and cup. 4. Remove seal. 5. IMPORTANT: Outer axle bearing will be destroyed when removed. Remove bearing only if replacement is necessary. Replace bearing and cup as a set. Remove outer axle bearing and cup only if necessary. Do not reuse bearing and cup. 6. Inspect axle shaft for wear or damage. Repair or replace as necessary. 7. If removed, install new outer bearing with taper facing up. Press bearing onto shoulder of axle shaft. 8. If removed, install outer bearing cup. 9. Install seal. 10. Install axle housing over axle shaft. 11. Install inner bearing over axle shaft. 12. NOTE: Rotate axle housing while installing bearing. Press bearing onto axle housing until resistance is felt. 13. Install washer and snap ring. Push snap ring to top of groove. Do not install shims at this time. 14. T198863A-UN: Rolling Drag Torque Install a temporary cap screw and nut in one hole of the mounting flange and tighten. file:///C:/ProgramData/Service%20ADVISOR/Temp/TM11431_09001faa810... 2019/11/27
3/3 15. Place torque wrench on temporary cap screw at a right angle to the centerline. Check rolling drag torque. Apply pressure until rolling drag torque is reached. Item Measurement Specification Axle Bearing Rolling Drag Torque 4.52 13.56 N m 40 120 lb-in. 16. T198864A-UN: Bearing Pre-Load Measurement While maintaining pressure, measure distance between washer and snap ring. Add 0.025 mm (0.001 in.) to the measured value to determine the number of shims required for bearing pre-load. 17. Remove snap ring and washer. Install required shims and washer. 18. Install snap ring. 19. Apply force to axle shaft to seat bearing and shims against snap ring. Item Measurement Specification Axle Shaft Force 44 482 N 10 000 lb-force 20. Check rolling drag torque. Repeat procedure until specification is reached. Item Measurement Specification Axle Bearing Rolling Drag Torque 4.52 13.56 N m 40 120 lb-in. TF44157,0000EA3-19-20091217 file:///C:/ProgramData/Service%20ADVISOR/Temp/TM11431_09001faa810... 2019/11/27
1/1 TM11431 - 326D, 328D, 329D, 332D and 333D Skid Steer Loader(Manual Controls) Chain Case Access Plate Remove and Install Chain Case Access Plate Remove and Install 1. Remove front attachment and park machine on flat level surface. 2. Drain chain case oil. See Change Chain Case Oil . (Operator's Manual.) 3. T198871A-UN: Chain Case Access Plate LEGEND: 1 - Nut (12 used) 2 - Access Plate Remove access plate (2). 4. Clean and inspect parts. 5. Install access plate with gasket. Item Measurement Specification Chain Case Access Plate Nut Torque 45 N m 33 lb-ft 6. Fill chain case with oil. See Change Chain Case Oil . (Operator's Manual.) TF44157,0000EA4-19-20100204 file:///C:/ProgramData/Service%20ADVISOR/Temp/TM11431_09001faa810... 2019/11/27
1/2 TM11431 - 326D, 328D, 329D, 332D and 333D Skid Steer Loader(Manual Controls) Drive Chain and Sprocket Remove and Install Drive Chain and Sprocket Remove and Install 1. Remove front attachment and park machine on flat level surface. 2. Raise and block machine. See Raising and Blocking Machine . (Group 1740.) 3. Drain chain case oil. See Change Chain Case Oil . (Operator's Manual.) 4. Remove chain case access plate. See Chain Case Access Plate Remove and Install . (Group 0250.) 5. Remove axle housing for each drive chain being serviced. See Axle Housing Remove and Install . (Group 0201.) 6. NOTE: Remove rear axle housing and rear drive chain from drive sprocket before removing front drive chain. T198879A-UN: Chain Case LEGEND: 1 - Drive Sprocket 2 - Front Drive Chain 3 - Rear Drive Chain Slide rear axle sprocket forward. Remove rear drive chain (3) from drive sprocket (1) and rear axle sprocket. 7. NOTE: To remove rear axle sprocket, lift sprocket to top of chain case and pull bottom of sprocket out over lip of chain case. Remove rear axle sprocket. 8. Slide front axle sprocket rearward. Remove front drive chain (2) from drive sprocket and front axle sprocket. 9. NOTE: If removal of front axle sprocket is necessary, hydrostatic motor must be removed. See file:///C:/ProgramData/Service%20ADVISOR/Temp/TM11431_09001faa810... 2019/11/27
2/2 Hydrostatic Motor and Park Brake Remove and Install . (Group 0360.) Remove front axle sprocket. 10. Clean and inspect parts. Repair or replace parts as necessary. 11. If removed, install front axle sprocket. 12. Install front drive chain. 13. Install rear axle sprocket and rear drive chain. 14. Install axle housing. See Axle Housing Remove and Install . (Group 0201.) 15. Install chain case access plate. See Chain Case Access Plate Remove and Install . (Group 0250.) 16. Fill chain case with oil. See Change Chain Case Oil . (Operator's Manual.) 17. Lower machine to ground. TF44157,0000EA5-19-20091218 file:///C:/ProgramData/Service%20ADVISOR/Temp/TM11431_09001faa810... 2019/11/27
1/1 TM11431 - 326D, 328D, 329D, 332D and 333D Skid Steer Loader(Manual Controls) Steering Dampener Remove and Install Steering Dampener Remove and Install 1. Remove front attachment and park machine on flat level surface. 2. Raise operator's station. See Raising Operator's Station . (Group 1810.) 3. T199894A-UN: Steering Dampener LEGEND: 1 - Mounting Hardware 2 - Steering Dampener 3 - Cross Shaft Bell Crank 4 - Cap Screw Remove mounting hardware (1) from top of steering dampener (2). 4. Remove cap screw (4) from bottom of steering dampener. Lift steering dampener out of machine. 5. Inspect steering dampener. See Steering Dampener Inspection . (Group 0315.) 6. Lower steering dampener into machine. Install cap screw (4) in bottom of steering dampener. 7. Install mounting hardware to top of steering dampener. 8. Make sure the steering lever contacts the stop screws in both forward and reverse positions before dampener reaches its travel limit. Install or remove shim washer(s) on rod end as required. 9. Tighten dampener mounting cap screws to specification. Item Measurement Specification Dampener Mounting Hardware Torque 40 N m 30 lb-ft 10. Lower operator's station. See Raising Operator's Station . (Group 1810.) TF44157,0000EC2-19-20100205 file:///C:/ProgramData/Service%20ADVISOR/Temp/TM11431_09001faa810... 2019/11/27
Suggest: If the above button click is invalid. Please download this document first, and then click the above link to download the complete manual. Thank you so much for reading
1/1 TM11431 - 326D, 328D, 329D, 332D and 333D Skid Steer Loader (Manual Controls) Steering Dampener Inspection Steering Dampener Inspection 1. Move steering dampener rod through its full range of motion. Steering dampener should operate smoothly with some resistance to movement. If no resistance is noted, or if steering dampener is leaking, replace steering dampener. 2. Test steering dampener as follows: With steering dampener fully extended, apply 9 kg (20 lb) of force to rod end. It must take 1 5 seconds for dampener to fully retract. With steering dampener fully retracted, apply 9 kg (20 lb) of pull to rod end. It must take 1 5 seconds for dampener to fully extend. 3. Replace steering dampener if test results are not within specification. TF44157,0000E96-19-20091218 file:///C:/ProgramData/Service%20ADVISOR/Temp/TM11431_09001faa810... 2019/11/27
https://www.ebooklibonline.com Hello dear friend! Thank you very much for reading. Enter the link into your browser. The full manual is available for immediate download. https://www.ebooklibonline.com