Quick Reference Guide for Super Data Owners - Site Group Management
Learn how Super Data Owners in SAID can manage site groups efficiently, including creating new groups, assigning Data Owners, and editing existing groups. Follow step-by-step instructions to select, add, edit, and remove sites, ensuring proper data organization and access control within your Line of Business.

Download Presentation

Please find below an Image/Link to download the presentation.
The content on the website is provided AS IS for your information and personal use only. It may not be sold, licensed, or shared on other websites without obtaining consent from the author. Download presentation by click this link. If you encounter any issues during the download, it is possible that the publisher has removed the file from their server.
E N D
Presentation Transcript
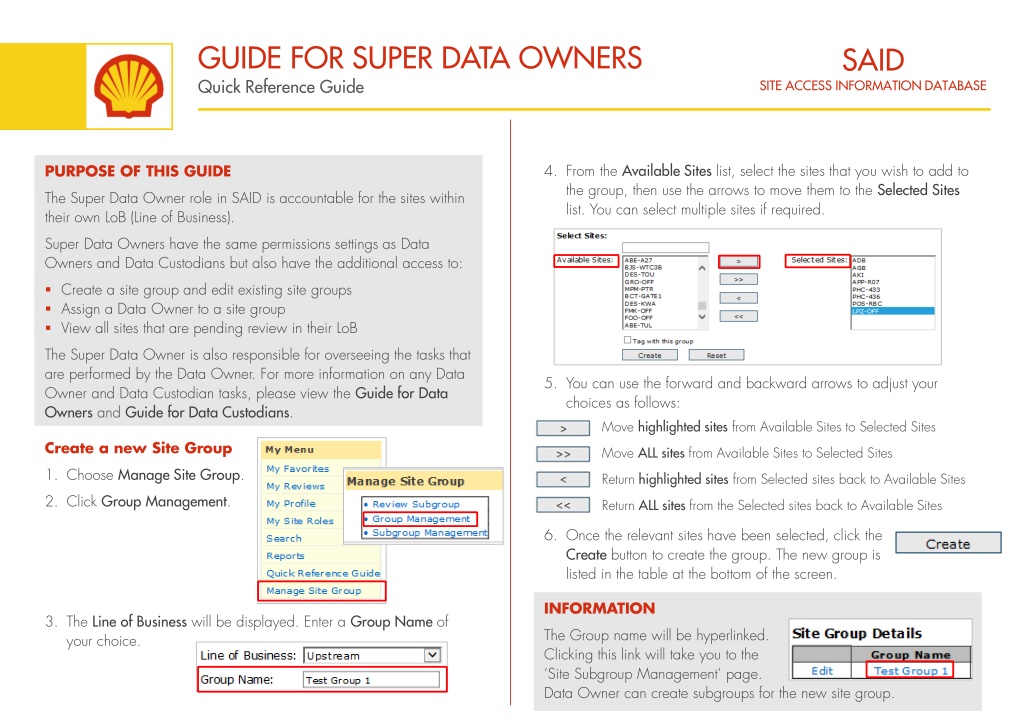
GUIDE FOR SUPER DATA OWNERS Quick Reference Guide SAID SITE ACCESS INFORMATION DATABASE PURPOSE OF THIS GUIDE 4. From the Available Sites list, select the sites that you wish to add to the group, then use the arrows to move them to the Selected Sites list. You can select multiple sites if required. The Super Data Owner role in SAID is accountable for the sites within their own LoB (Line of Business). Super Data Owners have the same permissions settings as Data Owners and Data Custodians but also have the additional access to: Create a site group and edit existing site groups Assign a Data Owner to a site group View all sites that are pending review in their LoB The Super Data Owner is also responsible for overseeing the tasks that are performed by the Data Owner. For more information on any Data Owner and Data Custodian tasks, please view the Guide for Data Owners and Guide for Data Custodians. 5. You can use the forward and backward arrows to adjust your choices as follows: Move highlighted sites from Available Sites to Selected Sites Create a new Site Group Move ALL sites from Available Sites to Selected Sites 1. Choose Manage Site Group. Return highlighted sites from Selected sites back to Available Sites 2. Click Group Management. Return ALL sites from the Selected sites back to Available Sites 6. Once the relevant sites have been selected, click the Create button to create the group. The new group is listed in the table at the bottom of the screen. INFORMATION 3. The Line of Business will be displayed. Enter a Group Name of your choice. The Group name will be hyperlinked. Clicking this link will take you to the Site Subgroup Management page. Data Owner can create subgroups for the new site group.
GUIDE FOR SUPER DATA OWNERS Quick Reference Guide SAID SITE ACCESS INFORMATION DATABASE Edit an existing group 5. Update the group as follows: 1. Choose Manage Site Group from the menu. To add a site to the group, select the site in Available Sites and use the forward arrow to add to the Selected sites. 2. Click Group Management. 3. Existing Site Groups are listed at the bottom of the screen. Click the Edit link for the group that you wish to edit. To remove a site from the group, select the site in Selected Sites and use the backward arrow to return it to Available Sites. 4. You will be taken to the Select Sites screen showing the sites selected for the group. Use the Add All or Remove All buttons to move all sites from one list to the other in one go. Note: To delete an existing group - To delete an existing group, simply click Edit on the group and remove all sites from the Selected Sites list. Then click Save. The group will be deleted. INFORMATION A site can only be selected for inclusion in one group. Once selected, it cannot be used in another group.
GUIDE FOR SUPER DATA OWNERS Quick Reference Guide SAID SITE ACCESS INFORMATION DATABASE Assign a Data Owner to a group INFORMATION 1. Choose Manage Site Group from the menu. If the Super Data Owner also wishes to be a Data Owner for a group, they can check the Tag with this group check box. 2. Click Group Management. INFORMATION 3. Select the group to which you wish to add a Data Owner ??? If you would like to assign a Data Owner for an individual site, you will need to create a group for that site and then assign a Data Owner to that group. 4. Under Assign Data Owner, enter the user s email address into the Email Id field. The system will suggest names registered in SAID, with their current role. Remove a Data Owner 1. In Assign Data Owner, locate the name that you wish to remove as Data Owner and click the Un-link option. Nicola King-Standard User Nicola King 5. Click the Add button to add the user as a Data Owner.
GUIDE FOR SUPER DATA OWNERS Quick Reference Guide SAID SITE ACCESS INFORMATION DATABASE View sites that are pending review 3. To view all sites pending review within your business, tick the View All sites pending for review in my Business check box. The list of sites will be expanded so that the Super Data Owner can view all pending sites. 1. Choose My Reviews from the menu. 2. By default, Super Data Owners will only see sites listed if they have tagged themselves as the Data Owner for the site/site group. If they are not a Data Owner for any site group, the list will be empty. WHERE DO I GO FOR HELP? BNG-WIP-Support-GF-SAID-APPLICATION@shell.com