Imaginary Flights with Dr. Lilian Clairmont, Ph.D.

Imaginary Flights, led by Dr. Lilian Clairmont, Ph.D., is an interdisciplinary project focusing on teaching vector addition and relative motion in 2D through a hands-on pilot experience. Students learn to correct for wind speed to successfully land their aircraft at the destination airport. The project's learning objectives include vector addition, relative motion, uniform motion practices, scaling, angle measurement, precision, and chart reading skills. Materials required include pre-lab handouts, flight charts, lab handouts, straight edge, and protractor. The ideal group size is 2 students per group. Planning the flights involves including test flights and regular flights, with a focus on choosing different destination landmarks to show the impact of wind corrections.

Download Presentation

Please find below an Image/Link to download the presentation.
The content on the website is provided AS IS for your information and personal use only. It may not be sold, licensed, or shared on other websites without obtaining consent from the author.If you encounter any issues during the download, it is possible that the publisher has removed the file from their server.
You are allowed to download the files provided on this website for personal or commercial use, subject to the condition that they are used lawfully. All files are the property of their respective owners.
The content on the website is provided AS IS for your information and personal use only. It may not be sold, licensed, or shared on other websites without obtaining consent from the author.
E N D
Presentation Transcript
IMAGINARY FLIGHTS Lilian Clairmont, Ph.D. How do you fly an airplane to its destination?
Lilian Clairmont, PhD Contact Information: lclairmont@ARGS.US lilian.clairmont@gmail.com LinkedIn: linkedin.com/in/lilianfclairmont
Imaginary Flights Imaginary Flights is an interdisciplinary project designed to teach addition of vectors and relative motion in 2D simultaneously. Students assume the role of pilots and explore, first hand, what happens when (a) wind speed is not corrected for; and (b) how to correct for wind speed so as to land their craft at the destination airport.
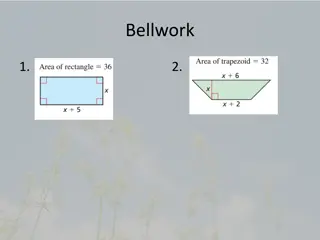
Learning Objectives & Skills Objectives Vector addition in 2D Relative Motion in 2D Practicing uniform motion Skills scaling vs. conversion angle measurement precision of measurements chart reading skills (latitude/longitude, etc.) Bonus: Geography!
Materials Pre-Lab handout (one per student); Flight charts (one per group); Lab handout (one per student) Straight edge Protractor
Group Size The ideal number of students per group is 2. It is possible to conduct the activity with 3, however 4 is too many. In the case of 3 students, the teacher should monitor progress to ensure that each student completes their flights on the chart.
Planning the Flights For each set: (A) passive and (B) active, include one test flight and three regular flights. Once you choose the origin and destination airports, look for a third airport that could be the destination when simulating no wind corrections. If a third airport is not available, choose another large landmark, such as a lake. Students need to clearly see that they would be ending at a completely different location.
Planning the Flights (contd) If possible, select all passive flights on one side of the chart, and all active flights on the other side of it. Have a sample chart (the one used to plan all flights) available to students so they can compare results and troubleshoot as they go.
Pre-Lab Assignment Typically, an individual pre-lab assignment is given two classes/days prior to when the activity is to start. The pre-lab assists students by familiarizing them with the chart prior to actually using it, and by preparing the chart for the lessons ahead. Pre-lab results should be discussed in class the day before students are to start the activity.
Project Day Each student is assigned two flights one passive and one active flight. Students in a group assist each other; however, each student is responsible for their assigned flights they will do the measuring and drawing on the chart. This is non-negotiable. Their partners help by recording the information, doing calculations, etc. They share their information so that each student has a full report.
Day 1 Passive Flying Teachers go through a test flight completely while students follow on their charts. Remind students to be extremely careful when drawing their lines and measuring their angles. Thick lines, imprecise angles, etc. introduce small errors that get magnified due to scaling. Do at least one calculation from the column Where will the plane be at ? . Show students how to figure out landmarks at the location of the airplane at that time. Students complete their passive flights after instruction.
A planned flight passive ?????
A planned flight passive ????? ?????
A planned flight passive ????? ????? ???????
A planned flight passive ????? ????? ???????
Day 2 Active Flying Teachers, repeat instructions (steps 1 and 2) for the second test flight. NOTES: The most important parts of the activity are determining the ground speeds, heading and course in each case. These should be completed in class.
A planned flight active ????? ????? ???????
Tips for Successful Project It is useful to have a mini airplane (about 1 1 ) cutout from colored paper. Position the airplane to help students visualize the difference between heading and course.
Tips for Successful Project (contd) The FAA website has downloadable charts for free. https://www.faa.gov/air_traffic/flight_info/aeron av/productcatalog/VFRCharts/Sectional/ Outdated flight charts are much cheaper than current ones (expired: $2.95 vs current: $9.00; source: https://www.mypilotstore.com/mypilotstore/.)
Activity Extensions Maritime charts


")


")