Creating Form Controls for User Input in C#
Learn how to add essential form controls for user input in a C# application. Follow step-by-step instructions to include group boxes, labels, text boxes, list boxes, radio buttons, and checkboxes on a Windows Form for collecting user details like name, address, city, gender, and course preferences.
Download Presentation

Please find below an Image/Link to download the presentation.
The content on the website is provided AS IS for your information and personal use only. It may not be sold, licensed, or shared on other websites without obtaining consent from the author.If you encounter any issues during the download, it is possible that the publisher has removed the file from their server.
You are allowed to download the files provided on this website for personal or commercial use, subject to the condition that they are used lawfully. All files are the property of their respective owners.
The content on the website is provided AS IS for your information and personal use only. It may not be sold, licensed, or shared on other websites without obtaining consent from the author.
E N D
Presentation Transcript
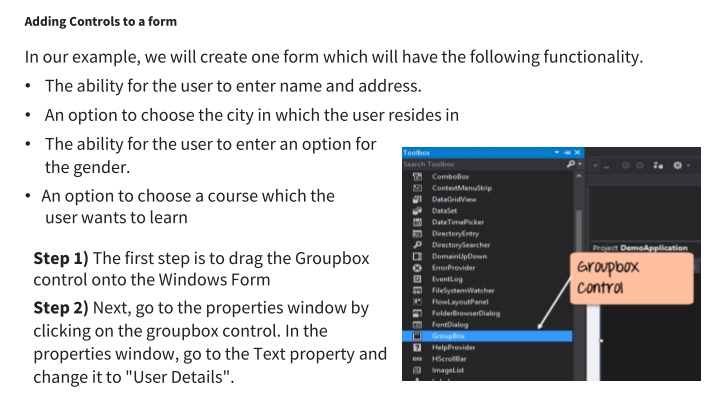
Adding Controls to a form In our example, we will create one form which will have the following functionality. The ability for the user to enter name and address. An option to choose the city in which the user resides in The ability for the user to enter an option for the gender. An option to choose a course which the user wants to learn Step 1)The first step is to drag the Groupbox control onto the Windows Form Step 2)Next, go to the properties window by clicking on the groupbox control. In the properties window, go to the Text property and change it to "User Details".
Once you make the above changes, you will see the following output. Output
Label Control Step 1)The first step is to drag the label control. Make sure you drag the label control 2 times so that you can have one for the 'name' and the other for the 'address'. Step 2)Once the label has been added, go to the properties window by clicking on the label control. In the properties window, go to the Text property of each label control.
Output Textbox Step 1)The first step is to drag the textbox control onto the Windows Form from the toolbox as shown below
Step 2) Go to the properties window, go to the Name property and add a meaningful name to each textbox. Output:-
List box Step 1)The first step is to drag the list box control onto the Windows Form Step 2)Once the list box has been added, go to the properties window by clicking on the list box control. 1. First, change the property of the Listbox box control, in our case, we have changed this to lstCity 2. Click on the Items property. This will allow you to add different items which can show up in the list box. In our case, we have selected items "collection". 3. In the String Collection Editor, which pops up, enter the city names. In our case, we have entered "Mumbai", "Bangalore" and "Hyderabad". 4. Finally, click on the 'OK' button
RadioButton Step 2) Go to the properties window by clicking on the Radiobutton control. Step 1)The first step is to drag the 'radiobutton' control onto the Windows Form
Checkbox Step 1)The first step is to drag the checkbox control onto the Windows Form Step 2) Once the checkbox has been added, go to the properties window by clicking on the Checkbox control. Output:-
Button Step 1)The first step is to drag the button control onto the Windows Form Step 2) Once the Button has been added, go to the properties window by clicking on the Button control.
1. First, you need to change the text property of the button control. Go the properties windows and change the text to 'submit'. 2. Similarly, change the name property of the control. Go the properties windows and change the name to 'btnSubmit'.
C# Event Handling for Controls The below example will showcase an event for the Listbox control. So whenever an item is selected in the listbox control, a message box should pop up which shows the item selected Step 1) Double click on the Listbox in the form designer.By doing this, Visual Studio will automatically open up the code file for the form. And it will automatically add an event method to the code. This event method will be triggered, whenever any item in the listbox is selected. This is the snippet of code which is automatically added by Visual Studio
Now let's add the below section of code to this snippet of code, to add the required functionality to the listbox event. 1. This is the event handler method which is automatically created by Visual Studio when you double-click the List box control. You don't need to worry about the complexity of the method name or the parameters passed to the method. 2. Here we are getting the SelectedItem through the lstCity.SelectedItem property. Remember that lstCity is the name of our Listbox control. We then use the GetItemText method to get the actual value of the selected item. We then assign this value to the text variable. 3. Finally, we use the MessageBox method to display the text variable value to the user.
Now let's look at the final control which is the button click Method. Again this follows the same philosophy. Just double click the button in the Forms Designer and it will automatically add the method for the button event handler. Then you just need to add the below code.
Tree Control The tree control is used to list down items in a tree like fashion. Probably the best example is when we see the Windows Explorer itself. The folder structure in Windows Explorer is like a tree-like structure. Step 1) The first step is to drag the Tree control onto the Windows Form Step 2) The next step is to start adding nodes to the tree collection so that it can come up in the tree accordingly. First, let's follow the below sub-steps to add a root node to the tree collection. 1. Go to the properties toolbox for the tree view control. Click on the Node's property. This will bring up the TreeNode Editor 2. In the TreeNode Editor click on the Add Root button to add a root node to the tree collection. 3. Next, change the text of the Root node and provide the text as Root and click 'OK' button. This will add Root node.
Step 3) The next step is to start adding the child nodes to the tree collection. Let's follow the below sub-steps to add child root node to the tree collection. 1. First, click on the Add child button. This will allow you to add child nodes to the Tree collection. 2. For each child node, change the text property. Keep on repeating the previous step and this step and add 2 additional nodes. In the end, you will have 3 nodes as shown above, with the text as Label, Button, and Checkbox respectively. 3. Click on the OK button
PictureBox Control This control is used to add images to the Windows Forms. Step 1) The first step is to drag the PictureBox control onto the Windows Form
Step 2) The next step is to attach an image to the picture box control. This can be done by following the below steps: 1. First, click on the Image property for the PictureBox control. A new window will pops out. 2. In this window, click on the Import button. This will be used to attach an image to the picturebox control. 3. A dialog box will pop up in which you will be able to choose the image to attach the picturebox 4. Click on the OK button
