Building a Simple Electric Motor Experiment

B
u
i
l
d
i
n
g
a
S
i
m
p
l
e
E
l
e
c
t
r
i
c
M
o
t
o
r
Step 1: Wind the Field Coil
1.
Cut about 800-900 mm of varnished copper wire.
2.
Wind this around the black plastic tube 10 times, then push it
off the tube.
axle
axle
30 mm
30 mm
3.
From each end, wind the
wire around the loop to
hold it together.
4.
Straighten the ends to
form two axles.
5.
Trim each axle so that it is
about 30 mm long.
Step 2: Make the Two End Contacts
6.
Cut about 150 mm of the tinned copper wire
and make the shape shown.
7.
Repeat this step, as you will need two of these
end contacts.
60 mm
Hint: the shape can be made by
wrapping the wire around the
shaft of a small screwdriver.
Step 3: Attach the End Contacts to the Battery
8.
Wrap the elastic band around the battery.
You may need to ‘double up’ the band so
it holds tight.
Elastic band
magnet
9.
Attach the end contacts as
shown.
10.
Clip the magnet to the case.
11.
Using ‘blu-tack’, support the
assembly on a work bench so
that it is standing up.
Step 4: Prepare the Field Coil
12.
Use wet and dry paper to remove the
varnish from one side of the axle at
each end.
Hints:
•
This part is quite tricky, so take
your time.
•
Be careful not to remove all of
the varnish.
•
Place paper under the axle so
you don’t damage the table top.
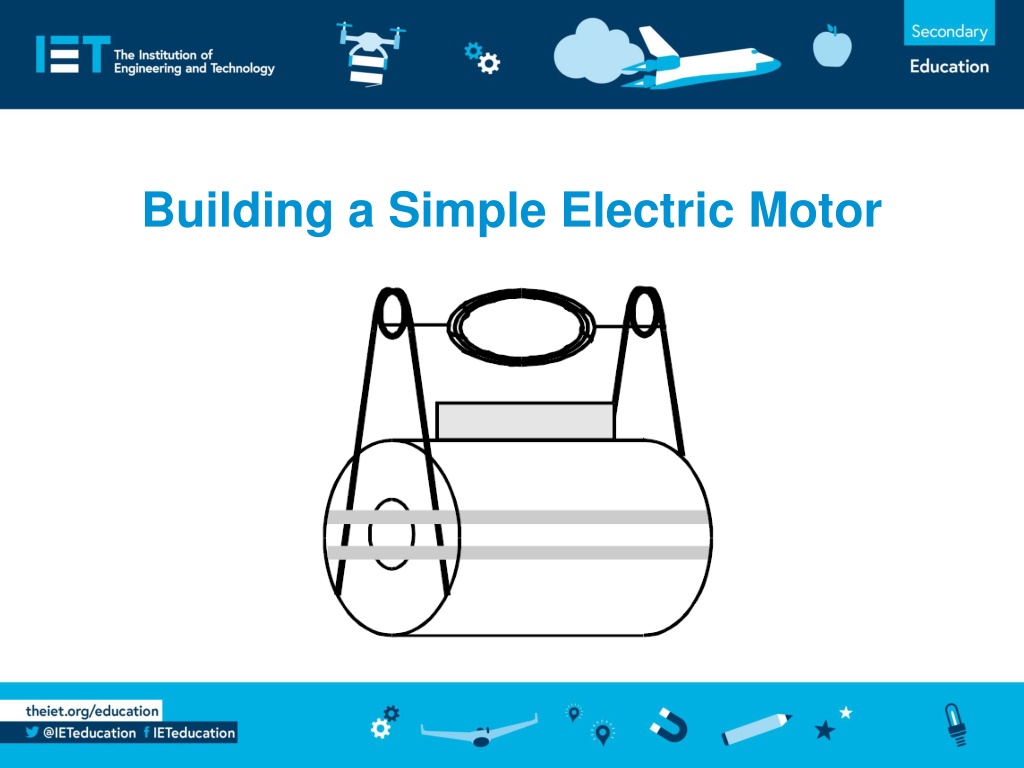
Step 5: Assemble the motor
13.
Place the field coil so that its
ends go through the loops on
the end contacts.
Congratulations, your motor is
complete. With a little push, it
should spin rapidly under its
own power!
What if it doesn’t work?
•
Check that both end contacts are firmly touching the metal
ends of the battery.
•
Check that the battery still has charge.
•
Check that you have only removed the varnish from one side of
the wire on the axle.
•
If all these don’t work – ask for help!
Experimental Investigations
1.
Which direction does your motor spin? Investigate how you
can make it spin in the opposite direction.
2.
Place a radio near the motor, set to ‘medium wave’/MW. Why
does the radio crackle? What happens if the radio is set to FM
instead?
3.
Make another coil, removing varnish from the whole of the
axis at each end. Investigate how this changes the behaviour of
the motor.
Learn how to build a simple electric motor step-by-step, including winding the field coil, making end contacts, attaching to a battery, preparing the coil, and assembly. Troubleshooting tips are provided if the motor doesn't work. Experiment ideas include changing the motor's direction, radio interference investigation, and exploring motor behavior variations with different coil preparations.

Download Presentation

Please find below an Image/Link to download the presentation.
The content on the website is provided AS IS for your information and personal use only. It may not be sold, licensed, or shared on other websites without obtaining consent from the author.If you encounter any issues during the download, it is possible that the publisher has removed the file from their server.
You are allowed to download the files provided on this website for personal or commercial use, subject to the condition that they are used lawfully. All files are the property of their respective owners.
The content on the website is provided AS IS for your information and personal use only. It may not be sold, licensed, or shared on other websites without obtaining consent from the author.
E N D
Presentation Transcript
Step 1: Wind the Field Coil 1. Cut about 800-900 mm of varnished copper wire. 2. Wind this around the black plastic tube 10 times, then push it off the tube. 3. From each end, wind the wire around the loop to hold it together. 4. Straighten the ends to form two axles. 5. Trim each axle so that it is about 30 mm long. axle axle 30 mm 30 mm
Step 2: Make the Two End Contacts 6. Cut about 150 mm of the tinned copper wire and make the shape shown. 7. Repeat this step, as you will need two of these end contacts. Hint: the shape can be made by wrapping the wire around the shaft of a small screwdriver.
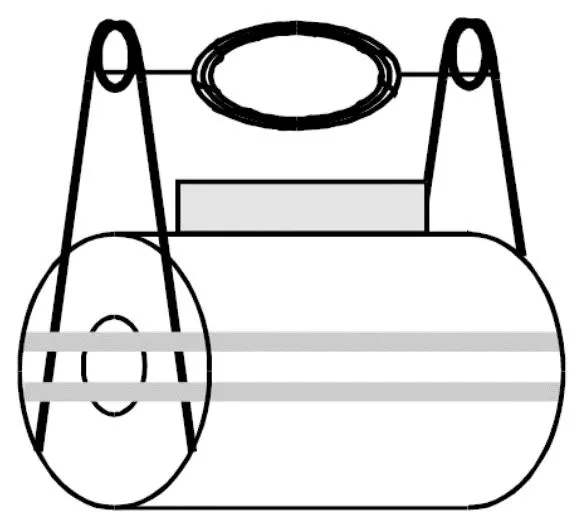
Step 3: Attach the End Contacts to the Battery 8. Wrap the elastic band around the battery. You may need to double up the band so it holds tight. 9. Attach the end contacts as shown. 10.Clip the magnet to the case. 11.Using blu-tack , support the assembly on a work bench so that it is standing up. magnet Elastic band
Step 4: Prepare the Field Coil 12. Use wet and dry paper to remove the varnish from one side of the axle at each end. Hints: This part is quite tricky, so take your time. Be careful not to remove all of the varnish. Place paper under the axle so you don t damage the table top. Plane of coil Remove varnish here only axle
Step 5: Assemble the motor 13. Place the field coil so that its ends go through the loops on the end contacts. Congratulations, your motor is complete. With a little push, it should spin rapidly under its own power!
What if it doesnt work? Check that both end contacts are firmly touching the metal ends of the battery. Check that the battery still has charge. Check that you have only removed the varnish from one side of the wire on the axle. If all these don t work ask for help!
Experimental Investigations 1. Which direction does your motor spin? Investigate how you can make it spin in the opposite direction. 2. Place a radio near the motor, set to medium wave /MW. Why does the radio crackle? What happens if the radio is set to FM instead? 3. Make another coil, removing varnish from the whole of the axis at each end. Investigate how this changes the behaviour of the motor.