JCB VM117, VM137 Tier 2 Vibratory Roller Service Repair Manual Instant Download (From 2173051 To 2173051)
Please open the website below to get the complete manualnn//

Download Presentation

Please find below an Image/Link to download the presentation.
The content on the website is provided AS IS for your information and personal use only. It may not be sold, licensed, or shared on other websites without obtaining consent from the author. Download presentation by click this link. If you encounter any issues during the download, it is possible that the publisher has removed the file from their server.
E N D
Presentation Transcript
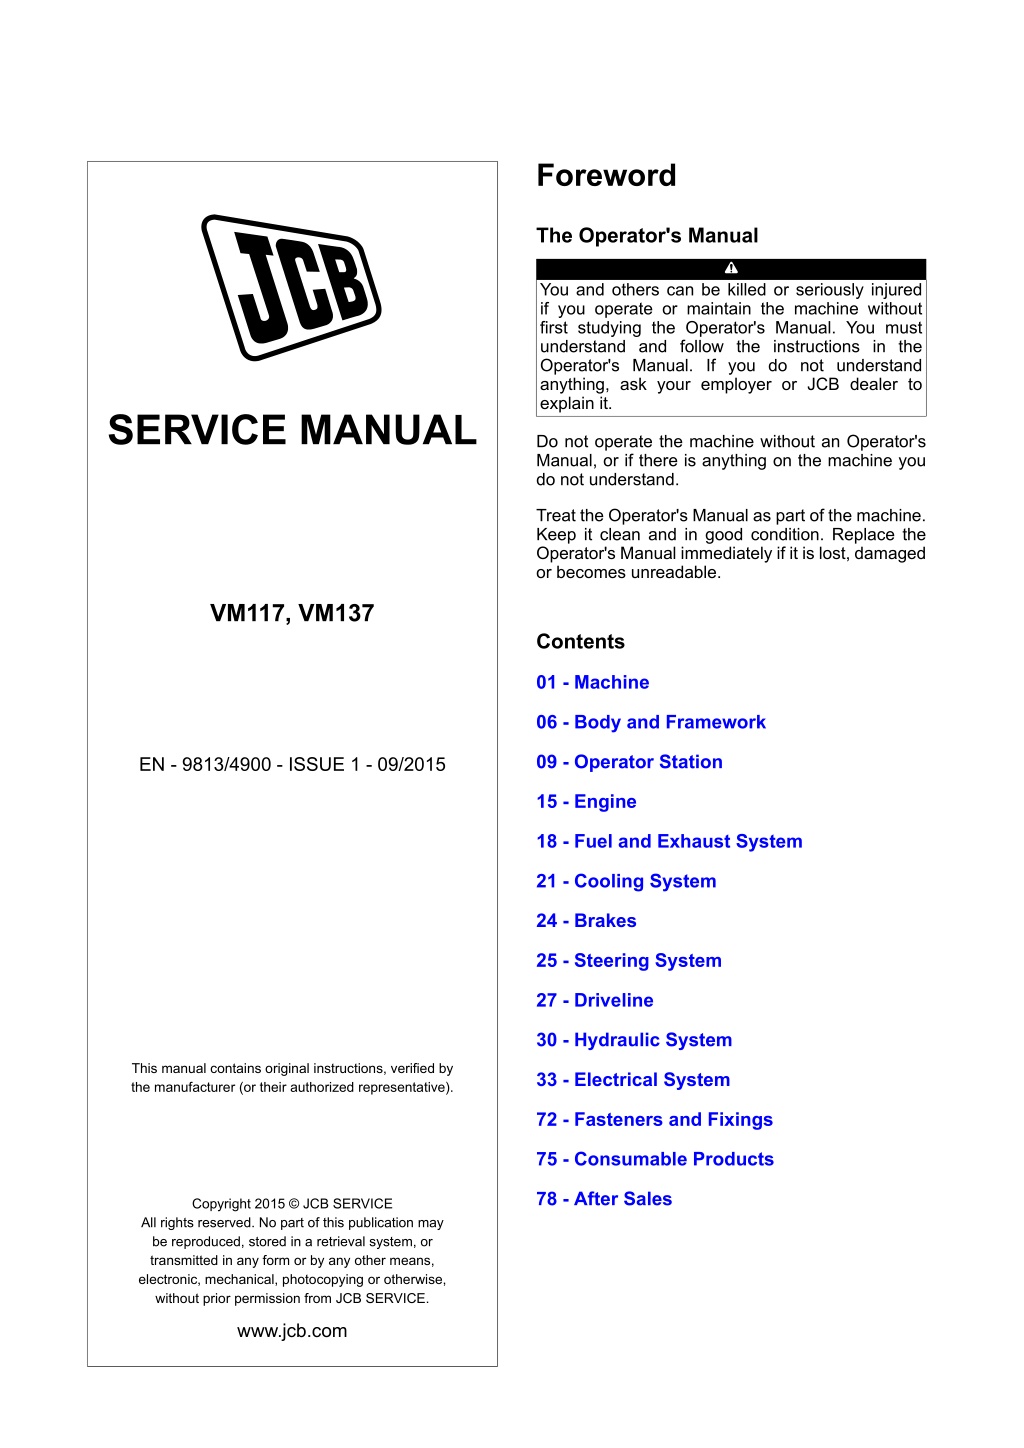
Foreword The Operator's Manual You and others can be killed or seriously injured if you operate or maintain the machine without first studying the Operator's Manual. You must understand and follow the instructions in the Operator's Manual. If you do not understand anything, ask your employer or JCB dealer to explain it. SERVICE MANUAL Do not operate the machine without an Operator's Manual, or if there is anything on the machine you do not understand. Treat the Operator's Manual as part of the machine. Keep it clean and in good condition. Replace the Operator's Manual immediately if it is lost, damaged or becomes unreadable. VM117, VM137 Contents 01 - Machine 06 - Body and Framework 09 - Operator Station EN - 9813/4900 - ISSUE 1 - 09/2015 15 - Engine 18 - Fuel and Exhaust System 21 - Cooling System 24 - Brakes 25 - Steering System 27 - Driveline 30 - Hydraulic System This manual contains original instructions, verified by the manufacturer (or their authorized representative). 33 - Electrical System 72 - Fasteners and Fixings 75 - Consumable Products 78 - After Sales Copyright 2015 JCB SERVICE All rights reserved. No part of this publication may be reproduced, stored in a retrieval system, or transmitted in any form or by any other means, electronic, mechanical, photocopying or otherwise, without prior permission from JCB SERVICE. www.jcb.com
15 - Engine 00 - General 00 - General Engine Oil Pressure 5. Start the engine, increase the engine revs to the rated speed. Record the pressure gauge reading, refer to Technical Data (PIL 15-00), for the recommended circuit pressure. Use the following procedures to measure the engine oil pressure. Refer to Oil Sump (PIL 15-45) for a full explanation of the lubricating oil circuit. Several factors can influence the engine oil pressure, the following conditions are assumed: 6. Remove the pressure gauge and install the pressure switch. High Lubrication Oil Pressure The correct engine oil has been used, refer to Consumable Products, Oil (PIL 75-03). The engine oil level is correct, refer to Oil Filter, Check Level (PIL 15-21). High oil pressure will be evident when starting in cold conditions. Typically the pressure will be 1 2bar (14.5 29.0psi) and higher in cold operation, the pressure should drop when the engine reaches normal operating temperature. 1. Make sure that the engine is safe to work on. If the engine has been running, let it cool before you start the service work. If the pressure remains high when operating temperature is achieved, check the oil level, if this is correct, suspect the oil pump relief valve is at fault. 2. Get access to the engine. 3. Disconnect the electrical connector to the oil pressure switch, and remove the switch from the oil cooler housing. Low Lubrication Oil Pressure Several factors can be the cause of low lubricating oil pressure: 4. Install a suitable test gauge into the vacant pressure switch port (M10 x 1.5mm thread). Make sure that the gauge has a sealing washer as shown. Special Tool: Pressure Gauge (0-40 Bar) (Qty.: 1) Low oil level - typically evident as a loss of pressure when operating on uneven ground or on a gradient. Blocked oil filter - a blocked filter will show as a gradual loss of pressure. Blocked suction strainer (pick-up pipe) - typically evident as low pressure on start up, if the blockage frees itself in the sump, the pressure will pick up to normal. Coolant in the oil - coolant in the lubricating oil will show as a milky discolouration of the oil and an increase in oil level. Check for damaged core plugs, lubricating oil cooler, cylinder head and/ or gasket. Fuel in the oil - fuel in the oil will result in thin' black lubricating oil, the oil will also have a diesel fuel smell. Check the fuel injection pump (FIP) shaft seal refer to (PIL 18-18), piston ring wear, lift pump diaphragm damage or injector leakage if fuel is evident in the oil. Figure 38. A B A B Oil pressure switch Sealing washer 15 - 28 9813/4900-1 15 - 28
15 - Engine 00 - General 00 - General Remove and Install Special Tools Description Lifting Bracket Front Lifting Bracket Rear Engine Lifting Spreader Bar recommended lifting equipment is shown. Use a spreader bar when lifting the engine. Never attempt to manually lift heavy components on your own. Always use lifting equipment, or obtain the help of an assistant. Inspect the lifting brackets for signs of damage. The brackets must be correctly torqued to the crankcase. Make sure the lifting equipment does not damage any of the engine dressing and the rocker cover. Part No. 320/09062 320/09063 892/01382 Qty. 1 1 1 Lifting Equipment You can be injured if you use incorrect or faulty lifting equipment. You must identify the weight of the item to be lifted then choose lifting equipment that is strong enough and suitable for the job. Make sure that lifting equipment is in good condition and complies with all local regulations. Component Identification The following component identification is for a typical engine installation. There will be some component differences depending on the machine variant. Before attempting to remove the engine ensure that all the necessary components have either been removed, or safely disconnected from the engine. The lifting equipment used must be an approved type and capable of lifting the engine safely. The Figure 39. 25 22 14 15 6 7 8 10 23 17 16 18 21 24 12 19 11 20 6 7 8 10 Engine mounting bolts Lifting bracket- front Lifting bracket fixing bolts Fuel line connector- return to tank line 11 Fuel line connector at fuel filter- feed line from fuel pump 15 - 29 9813/4900-1 15 - 29
https://www.ebooklibonline.com Hello dear friend! Thank you very much for reading. Enter the link into your browser. The full manual is available for immediate download. https://www.ebooklibonline.com
15 - Engine 00 - General 00 - General 12 Electrical connector- engine ECM (Engine Control Module) machine side connector (grey) Electrical connections- alternator Hose connection- cab heater Electrical sensor- engine oil level Electrical connections- starter motor Lifting bracket- rear 19 20 21 22 23 24 25 Lifting bracket fixing bolts Fixing bolts- gearbox to engine Electrical connector- engine harness Top hose Bottom hose Air inlet hose Exhaust pipe 14 15 16 17 18 15 - 30 9813/4900-1 15 - 30
15 - Engine 00 - General 00 - General Before Removal 16. Ensure that all relevant harnesses and hoses are unclipped from the engine and tied out of the way. 1. Make sure that the engine is safe to work on. If the engine has been running, let it cool before you start the service work. 17. Disconnect and plug the hoses at the hydraulic pump. 18. Disconnect the wiring to the hydraulic pump. 2. Position the machine on firm level ground. Make the machine safe, refer to (PIL 01-03). 19. Remove the gearbox to engine retaining bolts, pull the transmission and converter clear of the engine, make sure that the converter stays mounted on the gearbox shaft. 3. Get access to the engine. Remove 20. Attach slings to the engine lifting eyes. Special Tool: Lifting Bracket Front (Qty.: 1) Special Tool: Lifting Bracket Rear (Qty.: 1) Special Tool: Engine Lifting Spreader Bar (Qty.: 1) 1. Disconnect and remove the battery, refer to (PIL 33-03). 2. Drain the engine oil, refer to (PIL 15-21). 3. Drain the engine coolant, remove the cooling pack refer to (PIL 21-03). 21. Take the weight of the engine on the hoist and remove the engine mounting bolts. 4. Discharge the hydraulic pressure, refer to (PIL 30-00). 22. Withdraw the engine in a level attitude until the hydraulic pump is clear of the chassis. Raise the engine to lift it clear of the machine. 5. Drain the hydraulic tank. Disconnect and plug the hydraulic suction and delivery lines at the transmission pump and gear pump. Label the hoses to ensure correct reassembly. refer to (PIL 30-00). 23. Lower the engine into a suitable stand that is capable of supporting the weight of the engine. Figure 40. 6. Disconnect and plug the hydraulic cooler hoses. Label the hoses to ensure correct reassembly B 7. Disconnect the exhaust system. 8. Label the cab heater hoses at the engine block connectors. Release the hose clips and remove the hoses. 9. Disconnect the wiring connections from the starter motor, refer to (PIL 15-75). 10. Disconnect the wiring connections from the alternator, refer to (PIL 15-72). 11. Disconnect the wiring connections from the engine sensors and actuators, refer to (PIL 15-84). A A 12. Disconnect the electrical connector at the oil level sensor (if installed). 13. Disconnect the fuel supply line at the fuel lift pump and the spill line at the fuel injection pump. Cap all hoses and ports to prevent ingress of dirt. 14. Disconnect the electrical harness at the engine harness. 15. Uncouple the electrical harness at the ECM machine side connector. Important: Do not touch the connector pins on theECM or harness connectors. Cover the connectors to prevent contamination. A Lifting bracket mounting bolts 15 - 31 9813/4900-1 15 - 31
15 - Engine 00 - General 00 - General B Lifting equipment Install 1. Replacement is a reversal of the removal procedure. Note the following: 2. Important: It is vitally important that the torque converter is installed at the gearbox and engine flywheel correctly. Failure to locate the converter correctly will result in damage to the gearbox oil pump on engine start up. 3. Fill the cooling system with the correct mix of coolant fluid. 4. Fill and Check the hydraulic fluid level. 5. Fill and Check the engine oil levels. 6. On completion, check hydraulic and cooling system for leakage and levels. 7. Check the function of the drive and loader services. Table 29. Torque Values Item A Nm 47 15 - 32 9813/4900-1 15 - 32
15 - Engine 00 - General 00 - General Store and Recommission 2.6. Coat any exposed bare metal with a suitable product. 2.7. Electrical connectors and components should be coated with a protective spray if exposed. Engines should be stored in the original shipping packaging. Damaged or disturbed packaging should be made weatherproof immediately. 2.8. Cover in weatherproof packaging. If an engine is shipped with oil, it should be stored in the correct (upright) position. 2.9. Place in storage, under cover on level ground or shelving. If an engine is shipped dry of oil, after 6 months it should be filled with oil to the correct level and re- inhibited, refer to hot test description. 2.10.Record details of work as required. 2.11.Do not expose to extremes of temperature or humidity. All floor stock engines should be stored under cover in dry conditions and not subjected to extreme variations in temperature or humidity. Notice: Do not operate the starter motor for more than 20s at one time. Let the starter motor cool for at least 2min. If an engine is to be placed into storage, all external signs of surface coating damage or corrosion should be cleaned and re-coated. Electrical connectors and components should be coated with a protective spray. Table 30. Oil Pressure Switch Set Points Oil pressure switch closed Oil pressure switch open <0.6bar (8.7psi) >0.6bar (8.7psi) Capping Engine Openings OEM Commissioning Check on Engine Installation After More Than 12 Months All openings on the engine must be suitably capped to prevent ingress of water and contamination by foreign particles. 1. Flush the coolant system with proprietary flushing solution. 12 Month Revalidation Procedure 2. Refill the coolant system with 50/50 mix of long term antifreeze mixture. 1. Pre-inspection: 3. Hot test engine according to the hot test profile. Refer to Table 31. 1.1. Inspect packaging for signs of damage. 1.2. Inspect the caps for signs of damage. 4. Drain engine oil and replace engine oil filter. 1.3. Inspect openings for signs of water or dirt ingress. 5. Refill with the correct oil and inhibit the cooling system using the correct product. 1.4. Inspect the engine for signs of external corrosion. 6. Record details of work as required. 1.5. Inspect the engine for signs of fluid leaks. Hot Test Description 2. From storage: WARNING When using cleaning agents, solvents or other chemicals, you must adhere to the manufacturer's instructions and safety precautions. 2.1. Remove the air intake caps. 2.2. Make sure the engine oil level is correct. 2.3. Using a suitable power supply at the correct voltage, crank the engine over. All engines despatched from JCB will have been subjected to a hot test (checking items such as oil pressure, engines speeds, torque values etc.) and therefore the interior surfaces will have been coated with engine oil. 2.4. During cranking, check that the oil pressure switch opens using a multimeter. The switch is closed when there is no or low oil pressure and opens when oil pressure reaches a set point. After three separate 20 second cranking periods, If the oil pressure switch does not open (indicating no, or low oil pressure), contact your JCB engine dealer. All coolant galleries are coated with CRODAFLUID PA75 corrosion inhibitor. Stored engines will require re-inhibiting every 12 months, this will include hot testing the engine using a dynamometer. The hot test profile is: 2.5. Recap all engine openings. 15 - 33 9813/4900-1 15 - 33
15 - Engine 00 - General 00 - General Table 31. Hot Test Profile Stage Mode Speed (rpm) 830 Torque (Nm) 0 Time (secs) 50 1 Speed/ Torque Speed/ Torque Speed/ Torque Speed/ Torque Speed/ Torque 2 1300 50 60 3 2500 0 60 4 1300 0 25 5 800 0 35 15 - 34 9813/4900-1 15 - 34
15 - Engine 03 - Crankcase 00 - General 00 - General Introduction Introduction .................................................... 15-37 Technical Data ............................................... 15-38 The crankcase is the housing for the crankshaft. The enclosure forms the largest cavity in the engine and is located below the cylinders. It is integral with the cylinder bank and forms an engine block. It has an opening in the bottom to which an oil sump is attached with a gasket and bolted joint. The crankcase protects the crankshaft and connecting rods from foreign objects it also keeps the engine oil contained and allows the oil to be pressurised and also provide the rigid structure with which to join the engine to the transmission. Figure 41. B A A B Crankcase Crankshaft 15 - 37 9813/4900-1 15 - 37
15 - Engine 03 - Crankcase 00 - General Technical Data Table 32. Crankcase and Bedplate Data 4.4L 103 103.02mm 4.8L 106 106.02mm (1) Cylinder bore Main bearing bolts torque First stage Second stage Final stage Surface finish for cylinder head joint Diameter of first oversize bore Diameter of second oversize bore Main bearing bore (without bear- ings) Numbers 1 to 4 Number 5 Main bearing bore (with bearings) Numbers 1 to 4 Number 5 Camshaft bore Numbers 1 to 4 Number 5 (bush) Permissible wave profile (1) Nominal diameter to be measured 63mm below the cylinder head face. (2) Torque information MUST be used in conjunction with the recommended procedures contained in this manual. Failure to use the appropriate and correct removal, replacement, dismantle and assembly procedures may result in an engine failure in service. Refer also to the procedures for the correct bolt tightening sequence. (3) The crankcase to cylinder head surface may be skimmed and restored using the oversize gaskets (0.25mm and 0.5mm). (2) 50N m 115N m Turn a further 180 Rz < 15m, Rmax < 20 50N m 115N m Turn a further 180 Rz < 15m, Rmax < 20 (3) 103.5 103.52mm 104 104.02mm 106.5 106.52mm 92 92.02mm 105 105.02mm 92 92.02mm 105 105.02mm 88.047 88.09mm 100.047 100.09mm 88.047 88.09mm 100.047 100.09mm 60.04 60.07mm 60.29 60.32mm wt < 10m (2.5 distance) 60.04 60.07mm 60.29 60.32mm wt < 10m (2.5 distance) 15 - 38 9813/4900-1 15 - 38
15 - Engine 06 - Cylinder Head 00 - General Technical Data Table 33. Cylinder Head Data (1) Cylinder head distortion (maximum permissible) - End to end - Side to side Valve recess depth - Inlet - Exhaust Valve seat angle - Inlet - Exhaust Cylinder head bolts tourque - First stage - Second stage - Third stage - Fourth stage - Final stage Surface finish for cylinder head joint Permissible wave profile (1) The block to cylinder head surface may be skimmed and restored using the oversize gaskets (0.25mm and 0.5mm). (2) Torque information MUST be used in conjunction with the recommended procedures contained in this manual. Failure to use the appropriate and correct remove, install, disassemble and assemble procedure may result in an engine failure in service. Refer also to the procedures for the correct bolt tightening sequence. 0.05mm 0.03mm 0.85mm 0.85mm 120(inclusive) 90(inclusive) (2) 40 75 Repeat75 Torque angle + 90 Torque angle + 180 Rz < 15 Rmax < 20 wt < 10m 2.5 distance 15 - 42 9813/4900-1 15 - 42
15 - Engine 06 - Cylinder Head 00 - General Remove and Install Special Tools Description Torque Wrench (10-100Nm) 2. Make sure that the engine is safe to work on. If the engine has been running, let it cool before you start the service work. Part No. 993/70111 Qty. 1 3. Get access to the engine. Consumables Description Cleaner/Degreaser - General purpose solvent based parts cleaner 4. Remove the thermostat, refer to (PIL 21-12). Part No. 4104/1557 Size 0.4L 5. Remove the fuel pipes, refer to (PIL 18-96). 6. Remove the rocker cover, refer to (PIL 15-42). 7. Remove the fuel injectors, refer to (PIL 18-18). 8. Remove the rocker assembly, refer to (PIL 15-42). Before Removal 1. This procedure requires service parts. Make sure you have obtained the correct parts before you start, refer to Parts Catalogue. 9. Remove the exhaust manifold, refer to (PIL 18-24). 10. Remove the inlet manifold, refer to (PIL 18-24). 15 - 43 9813/4900-1 15 - 43
15 - Engine 06 - Cylinder Head 00 - General Figure 42. X 21 22 20 19 18 14 10 6 2 3 7 11 15 16 9 1 8 17 13 5 4 12 Y +90 +180 0 1-18 19 20 Cylinder head fixing bolts (x18) Cylinder head Crankcase 21 22 Location dowels (x2) Cylinder head gasket 15 - 44 9813/4900-1 15 - 44
15 - Engine 06 - Cylinder Head 00 - General Remove Special Tool: Torque Wrench (10-100Nm) (Qty.: 1) 1. Progressively remove the cylinder head bolts in reverse order, starting at bolt 18. Note that the bolts MUST NOT be re-used. Discard the bolts. 4.2. Then, further tighten the bolts, starting with the middle pair and working outwards (in sequence 1- 18) to the 2nd stage pre- torque. 2. Carefully lift the cylinder head from the crankcase. If necessary use a soft face hammer. DO NOT use a lever to separate the cylinder head from the crankcase. Discard the head gasket. 4.3. Then, re-tighten the bolts, starting with the middle pair and working outwards (in sequence 1-18) to the 3rd stage pre-torque. 4.4. Use the angle gauge to angle tighten the bolts, starting with the middle pair and working outwards (in sequence 1-18) to the 4th stage pre-torque. As a visual check, matchmark the bolts to the cylinder head before you start. When the bolts have been angle tightened, the matchmarks will appear as shown at Y. 3. Using a suitable cleaning agent, carefully remove all traces of the head gasket material from the cylinder head and crankcase mating faces. Consumable: Cleaner/Degreaser - General purpose solvent based parts cleaner 4. Check the cylinder head and crankcase mating faces for signs of damage and distortion, refer to Technical Data (PIL 15-06). 4.5. Finally, angle tighten the bolts, starting with the middle pair and working outwards (in sequence 1- 18) for the final stage torque. Before Assembly Table 34. 1. Obtain the correct new cylinder head bolts. Note that the original bolts MUST NOT be re-used. Description Cylinder head to crankcase bolts 1-18 - first stage torque - second stage torque - third stage torque - fourth stage torque - final stage torque Torque Value 2. Obtain the correct replacement head gasket. Note the number of identification holes as shown at X. 40N m 75N m 75N m 90 180 3. Make sure that all items are clean and free from damage and corrosion. Assemble The cylinder head bolts are tightened using a torque and angle method, refer to Fasteners and Fixings, General, Introduction (PIL 72-00). 1. Replacement is the reversal of the removal procedure. 2. Make sure that the location dowels are correctly installed into the crankcase. Use a dowel punch to install the dowels as required. 3. Position a new head gasket on to the crankcase mating face. Make sure that the gasket is installed the correct way around and correctly located over the dowels. 4. Lower the cylinder head on to the crankcase. Make sure that the cylinder head is correctly located on the dowels. Install new cylinder head bolts. Tighten the bolts in five stages, use the torque and angle method, refer to Fasteners and Fixings, General, Introduction (PIL 72-00). 4.1. Tighten the bolts, starting with the middle pair and working outwards (in sequence 1-18) to the 1st stage pre-torque. 15 - 45 9813/4900-1 15 - 45
15 - Engine 09 - Bedplate 00 - General 00 - General Introduction Introduction .................................................... 15-47 Remove and Install ....................................... 15-48 The bedplate acts as the main strength component of the engine. it maintains the correct alignment and supports the weight of the internal components. Figure 43. 1 2 1 2 Bedplate Crankcase 15 - 47 9813/4900-1 15 - 47
15 - Engine 09 - Bedplate 00 - General Remove and Install Special Tools Description Template for Sealant Bedplate to Crankcase Torque Wrench (10-100Nm) 10. Remove the rocker assembly including the push rods, refer to (PIL 15-42). Part No. 892/12356 Qty. 1 11. It is not necessary to remove the cylinder head assembly to remove the crankshaft. If however the cylinder head needs to be removed for other reasons (for piston and connecting rod removal for example) remove it now, refer to (PIL 15-06). 993/70111 1 Consumables Description Cleaner/Degreaser - General purpose solvent based parts cleaner 12. Remove the fuel injection pump, refer to (PIL 18-18). Part No. 4104/1557 Size 0.4L 13. Remove the starter motor, refer to (PIL 15-75). 14. Remove the high duty PTO (Power Take-Off) device (if installed). CAUTION This component is heavy. It must only be removed or handled using a suitable lifting method and device. 15. Position the engine upside down in a suitable jig or fixture, supported at the front of the cylinder block. Before Removal 16. Remove the flywheel, refer to (PIL 15-54). 17. Remove the flywheel housing, refer to (PIL 15-54). 1. This procedure requires service parts. Make sure you have obtained the correct service parts before you start, refer to Parts Catalogue. 18. Remove the fuel injection pump drive gear, refer to (PIL 15-51). 2. Make sure that the engine is safe to work on. If the engine has been running, let it cool before you start the service work. 19. Remove the oil pump, refer to (PIL 15-60). 20. Remove the high duty PTO idler drive gear (if installed), refer to (PIL 15-51). 3. Remove the engine, refer to (PIL 15-00). 4. Remove the drive belt, refer to (PIL 15-18). 21. Remove the crankshaft drive gear, refer to (PIL 15-51). 5. Remove the crankshaft pulley, refer to (PIL 15-12). 22. Remove the camshaft, refer to (PIL 15-15). 6. Remove the oil sump, refer to (PIL 15-45). 23. Remove the rear timing case, refer to (PIL 15-51). 7. Disconnect and remove the fuel pipes from the injectors, refer to (PIL 18-96). 24. If the pistons and connecting rods have not been removed, undo and remove the main bearing caps, refer to (PIL 15-12). 8. Remove the rocker cover, refer to (PIL 15-42). 9. Remove the fuel injectors, refer to (PIL 18-18). 15 - 48 9813/4900-1 15 - 48
15 - Engine 09 - Bedplate 00 - General Figure 44. 5 1 4 11 9 8 10 7 6 2 3 P3 X 18 12 18 18 18 18 13 18 1-10 11 12 13 Main bearing bolts (x10) Bedplate peripheral bolts (x16) Bedplate Crankcase 18 P3 T1 Upper bearing shell (x5) O-ring (if installed) Lifting bolts (obtain locally) 15 - 49 9813/4900-1 15 - 49
15 - Engine 09 - Bedplate 00 - General Remove suitable lifting equipment (if the bedplate is lifted manually, two people will be required). DO NOT use a lever to separate the bedplate. 1. Remove the bedplate peripheral bolts. 2. Progressively remove the main bearing bolts in reverse order starting at bolt 10. The bolts MUST NOT be re-used. Discard the bolts. 4. Remove and discard the O-ring. 5. Carefully remove the upper bearing shells from the bedplate, remove the bedplate. 3. Install the four temporary lifting bolts. Carefully separate the bedplate from the crankcase. Use Figure 45. P2 T4 Y Y A (T5) V T4 P2 P3 B (T5) P2 Y Y T6 18 18 18 X 18 T6 5 18 1 4 T6 11 9 8 W 18 12 T6 10 7 6 2 3 13 1-10 11 Main bearing bolts Bedplate peripheral bolts (x16) 12 13 Bedplate Crankcase 15 - 50 9813/4900-1 15 - 50
15 - Engine 09 - Bedplate 00 - General 18 A B T3 T4 T5 T6 Lower bearing shells (x5) Left side template Right side template Angle Gauge (obtain locally) Guide pins (x2 obtain locally) Sealant template Lifting bolts (x4 obtain locally) V W X Y P2 P3 Sealant template portion for removal Bearing tab Rear main bearing Bearing location tab Anaerobic sealant O-ring 15 - 51 9813/4900-1 15 - 51
15 - Engine 09 - Bedplate 00 - General Before Installation crankcase/bedplate mating face as shown to the dimension specified. Length/Dimension/Distance: 1.5mm 1. Clean off all traces of the old sealant compound from the crankcase and bedplate mating faces. 9. Remove the four fixing bolts at positions Y. Remove the templates A and B, make sure you do not smudge the sealant. Discard the templates. 2. Use a suitable degreasing agent to carefully clean the main bearing saddles in the bedplate and crankcase. Take care not to block the oil ways or the piston cooling jets. Consumable: Cleaner/Degreaser - General purpose solvent based parts cleaner 10. Add beads of sealant P2 around the four bolt holes at positions Y, so as to join the sealant beads as shown at X. Important: Anaerobic sealant will not start to cure whilst it is open to the atmosphere, however when air is excluded (for instance when the two parts are put together) it will immediately start to harden. Make sure that all the necessary tools, bolts etc. are readily available prior to assembling the components. The parts must be installed and tightened to the correct torque value within 5 minutes (with a maximum permissible time of 15 minutes). 11. Make sure that the location guide pins T4 are in position in the crankcase. Assemble the bedplate to the crankcase use the alignment guide pins. 12. Note: The bedplate is heavy. Two people will be required to lift and rotate the bedplate safely on to the crankcase. Install new main bearing bolts 1-10. Tighten the bolts to the correct torque value in pairs, starting in the centre and working outwards (in sequence 1-10) to the 1st stage pre- torque. Special Tool: Torque Wrench (10-100Nm) (Qty.: 1) Important: BEFORE installing the bedplate: DO NOT rotate the crankshaft. Make sure that the upper main bearing shells are flush with the bottom face of the crankcase. 13. Install the bedplate peripheral bolts. Tighten the bolts to the correct torque value. Install 1. Replacement is the reversal of the removal procedure. 14. After installation and tightening the bedplate peripheral bolts, further tighten the main bearing bolts in pairs, starting in the centre and working outwards (in sequence 1-10) to the 2nd stage pre-torque. 2. Make sure that all items are clean and free from damage and corrosion. 3. Install the two guide pins T4 to the crankcase bedplate fixing holes as shown. 15. Finally, angle tighten the main bearing bolts in pairs, starting in the centre and working outwards (in sequence 1-10) for the final stage torque. Use the torque and angle method, refer to Fasteners and Fixings, General, Introduction (PIL 72-00). 4. Install the four lifting bolts T6 to the bedplate as shown. 5. Install a new O-ring at the bedplate. Important: If the parts have not been tightened to the correct torque value within the maximum 15 minute time period, then the parts must be separated, thoroughly cleaned and fresh sealant applied. 6. Use a suitable degreasing agent to clean both sides of the lower bearing shells. Assemble the lower bearing shells into the bedplate. Lubricate the lower bearing shells with clean engine oil. Note: Make sure that the location tab W engages in the slot as shown. Consumable: Cleaner/Degreaser - General purpose solvent based parts cleaner After Installation 1. Check that the crankshaft can be freely rotated by hand. Remove the bedplate lifting bolts T6. 2. Carry out the procedures listed, Before removal in reverse order. 7. Note: The sealant template T5 is used on the crankcase, NOT the bedplate. The sealant template T5 comprises of two pieces, A and B. Modify the template A by removing portion V. Special Tool: Template for Sealant Bedplate to Crankcase (Qty.: 1) Table 35. Torque Table Item 1-10 (1st Stage) 1-10 (2nd Stage) 1-10 (Final Stage) 11 Torque Value 50N m 115N m 180 24N m 8. Locate the holes in the templates A and B using four fixing bolts at positions Y. Use the templates as a guide apply beads of sealant P2 around the 15 - 52 9813/4900-1 15 - 52
Suggest: If the above button click is invalid. Please download this document first, and then click the above link to download the complete manual. Thank you so much for reading
15 - Engine 12 - Crankshaft 00 - General 00 - General Introduction Introduction .................................................... 15-55 Technical Data ............................................... 15-56 Component Identification ............................... 15-57 Operation ....................................................... 15-58 Check (Condition) .......................................... 15-59 Remove and Install ....................................... 15-60 Figure 46. B A A B Crankcase Crankshaft 15 - 55 9813/4900-1 15 - 55
https://www.ebooklibonline.com Hello dear friend! Thank you very much for reading. Enter the link into your browser. The full manual is available for immediate download. https://www.ebooklibonline.com