Photography Journey: From Exploration to Expression
Olivia Hughes shares her journey into photography, from experimenting with local landscapes to capturing the essence of urban life in Birmingham. Inspired by street photography, her work showcases the beauty and complexity of everyday moments, blending elements of photojournalism and editorial styles to create evocative visual narratives.

Download Presentation

Please find below an Image/Link to download the presentation.
The content on the website is provided AS IS for your information and personal use only. It may not be sold, licensed, or shared on other websites without obtaining consent from the author.If you encounter any issues during the download, it is possible that the publisher has removed the file from their server.
You are allowed to download the files provided on this website for personal or commercial use, subject to the condition that they are used lawfully. All files are the property of their respective owners.
The content on the website is provided AS IS for your information and personal use only. It may not be sold, licensed, or shared on other websites without obtaining consent from the author.
E N D
Presentation Transcript
Photography: Research and Development Olivia Hughes 8556110
An Introduction I have always been interested in photography after an uncle of mine became a professional photographer. Having very little knowledge, I used to experiment around local areas with my camera strictly on the automatic setting. I took this advantage module to begin to learn the basics of photography and I believe that my skills have developed greatly. I have thoroughly enjoyed getting out of my comfort zone, such as still life photography, and researching in to different photographers as before learning the basics, I felt that I was unable to truly appreciate photographs. This module has allowed me to look at not only photographs, but also the world in a completely new way and I hope to build on my basic understanding in the future.
Final Landscape Submission - Photojournalism
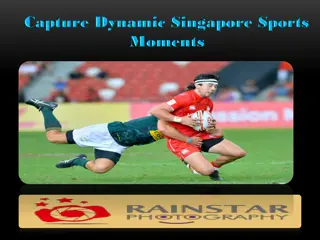
My final landscape submission was taken on the streets of Birmingham, inspired by street photography. I wanted to capture something close to home and expose that busy city life can be beautiful. I chose to categorise this as photojournalism because it is documenting everyday life. The clash of modernism and old-fashioned buildings create a picture of what the city is like today, but also how It could have looked in the past.
Inspiration: Street/Urban Photography Urban Photography has always been a great interest of mine. I find cities compelling. The dirty, industrialised photographs filled with vibrant lights and interesting characters make fascinating captures of city life. Photos taken by Mazz Elias; a self-taught photographer based in New York. Her moody New York City photographs inspired me to try a similar thing on the streets of Birmingham., creating my final submission.
Final Portrait Submission - Editorial
My final portrait submission was taken in the outskirts of Birmingham. I searched for a location with an interesting background and purposely asked the model to wear plain black clothing, as I wanted to capture an interesting part of the city, as well as a flattering portrait. I chose to categorise this image as editorial due to the fact that the main focus is on the subject s face and the background. Rather than a fashion image that promotes style/clothing, I wanted to make a bold statement of urban city life.
Inspiration: Urban Photography For my portrait shoot, I decided to go with my gut instinct. I wanted to create a complementing photograph that still had some sort of urban aspect. I went to several locations, looking for backgrounds that would accompany the subject. I decided on this location due to the symmetry of the image, as well as how it grabs the attention of the viewer. By getting the subject to stand in the middle of the eyes, it allows the focus to be drawn to the subject at first and then, the background. I feel that the colours complement each other perfectly and that I achieved what I set out to do. Original photo before editing
Final Still Life Submission - Advertising
My final still life submission is a photograph of a collectible figure from a popular 1990s arcade game. I chose to photograph this figure as I believe it really works with the background colour and I felt that experimenting with lighting worked best with this figure. I chose to categorise the image as advertising because I believe that it promotes the subject in an appropriate way and could be used to advertise the figure.
Still life set up: For my still life shoot, I created my own make-shift studio at home using some sellotape, tin foil, a roll of a red paper and a desk lamp. This may not have been as good as a professional studio, however, it still allowed me to experiment with moving the light source and softening shadows using different materials. I tried this with several objects to see if light affected objects of a variety of sizes. I found that smaller objects were more challenging to photograph due to the light hitting the object in several smaller places.
Examples of the variety of objects I experimented with during the shoot.
In each photo, I experimented with moving the light source to create alternative shadows. This portrays the character in different ways, as when his face is lowly lit it portrays him as a villain, where as where his face is fully lit he appears to be a more heroic character.
Landscape Photography Landscape photography is the genre I had experimented mostly with before this module, due to the fact that this was most accessible. Nico Goodden: Nico Goodden is a London-based urban landscape photographer who I have admired for quite some time. I took Goodden s work into account when shooting my final landscape and portrait images. Photographs by Nico Goodden
Portrait Photography I was most apprehensive to try portrait photography due to not being very confident behind the camera, as well as being completely unfamiliar with the genre. However, these images turned out to be some of my favourite and gave me the opportunity to truly utilize my newly acquired knowledge of aperture, shutter speed and white balance gained on this module. Nico Goodden s work was also my inspiration for many of the images I took, particularly from his Portraits of Londoners collection. Photograph by Nico Goodden
Still Life Photography Martin Pitonak: A still life photographer that focuses on work for brands (usually cosmetic and jewelry) Pitonak s experimentation with shadows and light is fascinating and when creating still life photographs, I wanted to take inspiration from the unusual lighting choices Pitonak makes in several of his works.
Aperture The aperture of a camera is the hole that lets in light, which determines the DOF (Depth of Field) of an image. The lower the aperture, the larger the Depth of Field. This allows a photographer to emphasize focus on a particular subject Using a smaller aperture is more suitable for landscape photography, or photos that require a lot to be in focus. A larger aperture is more suitable for portrait photography, creating a thinner depth of focus, meaning the subject is the only thing in focus. www.petapixel.com A Comprehensive Beginners Guide to Aperture, Shutter Speed and ISO
AFTER BEFORE My first few attempts at experimenting with A (Aperture priority) were not successful, as seen in the above picture. It took several attempts to realize that it was the shutter speed making my pictures a lower quality. After changing these settings, I managed to take a better quality picture (seen on the right) and experiment with the depth of field. After experimenting with the depth of field, I decided that the picture above was the best quality. I chose to take a picture of this sign due to being interested in more urban photography that showcases the reality of life, as well as it being close to home.
For this photo, I set my camera to Aperture priority and a low setting of F4. This allowed me to make the background of the photo blurry, creating more focus and attention on the subject.
ISO and Sensitivity ISO determines the exposure of an image. The higher the ISO value, the more sensitive to light the camera sensor becomes. The usual range of ISO used is 200-1600 although cameras today are capable of a much wider range. Lower values are used for bright conditions. www.petapixel.com A Comprehensive Beginners Guide to Aperture, Shutter Speed and ISO
White balance on pictures effect the colours and the overall temperature of a photograph. By changing the white balance, a photograph can go from being completely unrealistic (like my photo featured below taken with Fluorescent ) to a more accurate, realistic representation (like the photo taken with Shade ). White Balance
White Balance: Shade Despite this location not particularly being shade I believe that this white balance works best and captures how the location looked at the time, giving it a more welcoming, warm tone.
Shutter Speed Shutter speed is the length of time the camera remains open, allowing light to hit the camera s sensor. A slower shutter speed will blur the motion in a photograph Contrasting to this, a faster shutter speed will freeze the motion, creating more of a sharper image. www.petapixel.com A Comprehensive Beginners Guide to Aperture, Shutter Speed and ISO Photography: John Lamb
To find out how shutter speed effects photographs, I decided that the best way to gain an understanding was to go out and try it for myself. I drove to a nearby bridge that overlooked the motor way and set my camera to S (Shutter speed priority) with the lowest shutter speed my camera could manage, mainly of a second. My Experimentation with Shutter Speed Methods I used to create different patterns: - Zooming in as I took the photograph (4) - Purposely moving the camera in a circling motion (6) - Moving the camera along with the moving cars (2), (3) - Staying stationary (1), (5) Numbers located in the bottom left corner of the following pictures
2 3 1 4 5 6
Rule of Thirds The Rule of Thirds is a composition technique that many photographers use to align their photos so that they are better balanced. The points where the lines meet are where the most important elements of the photograph are supposed to be positioned.
Experimenting with the Rule of Thirds is something that at first I found difficult to comprehend. However, I believe that these pictures work particularly well, due to the fact that the subject is a silhouette, meaning the eyes are drawn to it naturally. Using this kind of composition allowed me to capture the street in the background, as well as have an interesting subject to focus on. Also the lines in the pavement contribute to this rule, particularly in the left picture, making something that would usually seem mundane more fascinating.
Leading Lines and Symmetry Leading lines are lines in a photograph that lead the viewer s eye straight to the subject or often, a certain point (usually the middle, however, not always) Symmetry in photography often works hand- in-hand with leading lines, to create aesthetically pleasing and well-balanced photographs. Personally, I believe that these composition techniques are very effective as they can make someone view a certain are in a completely different way. Choosing to photograph a subject in a particular way can make a huge difference. http://meaganisfabulous.blogspot.com/2010/05/this-photograph-is-example-of-rule-of. Html
Editing images I edited all the images featured in this project using Adobe Lightroom. Having experience with using photoshop previously in Media Studies, I found using Lightroom particularly easy. However, this module has built on my knowledge greatly. For example, I previously did not understand the importance of colour temperature or how to level images effectively and I had never edited images for a photography purpose as I only had experience with Graphic Design. Below are a few examples of images before and after being edited.
BEFORE AFTER
Adjusting several factors such as clarity, contrast and particular colours bettered the image, making the fire appear more prominent.


 – F5.6")