How Do You Remove Floor Tiles Without Damaging The Subfloor?
Learn expert tips for removing floor tiles without harming the subfloor, ensuring a smooth and damage-free process.

Download Presentation

Please find below an Image/Link to download the presentation.
The content on the website is provided AS IS for your information and personal use only. It may not be sold, licensed, or shared on other websites without obtaining consent from the author. If you encounter any issues during the download, it is possible that the publisher has removed the file from their server.
You are allowed to download the files provided on this website for personal or commercial use, subject to the condition that they are used lawfully. All files are the property of their respective owners.
The content on the website is provided AS IS for your information and personal use only. It may not be sold, licensed, or shared on other websites without obtaining consent from the author.
E N D
Presentation Transcript
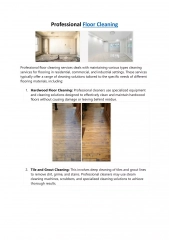
How Do You Remove Floor Tiles Without Damaging The Subfloor? The rhythmic tapping of a hammer, the satisfying crack of loosening tiles, and the prospect of a fresh new floor these are the sounds and visions of a home improvement project in full swing. But beneath the excitement lies a crucial challenge: how to remove those stubborn floor tiles without wreaking havoc on the subfloor beneath? Moreover, the key is to get the job done as perfectly as a floor removal company would. No worries, as we bring you some of the best tips and tricks. The Art of Preparation Before you get into the world of floor tile removal, proper preparation is key. Think of it as setting the stage for a performance every prop and costume must be in place for the show to go on smoothly. Whether it's for your bedroom or you re planning bathroom floor tile removal, a little preparation can go a long way. Tools of the Trade First things first, let's gather tools that will make this job possible:
Essential Tools Safety Equipment Hammer Chisel Pry bar Scraper Utility knife Shop vacuum Safety goggles Heavy-duty gloves Dust mask/respirator Knee pads Preparing Your Canvas With your tools at the ready, it's time to set the scene: 1. Clear the room of all furniture and fixtures. 2. Cover any remaining items with plastic sheeting. 3. Seal off the work area to contain dust think of it as creating your own little renovation bubble. Know Your Subfloor Before the first tile cracks, identify what lies beneath. Is it plywood, cement backerboard, or a mortar bed? This knowledge is crucial, as each subfloor type requires a slightly different approach to avoid damage. Furthermore, remember that different rooms may have different subflooring, same as the flooring. As a result, the bathroom floor tile removal may be different compared to say, the living room floor or bedroom floor. Read More Articles: Understanding the Costs of Private Flights from Los Angeles The Removal Process Act 1: Breaking Ground 1. Choose your starting point a corner or edge is ideal. 2. Using your hammer and chisel, carefully break up a few tiles to create an opening.
3. Aim for the center of tiles to protect the grout lines, which can provide valuable leverage later. Act 2: The Great Lift 1. Insert your pry bar under the loosened tiles at a low angle. 2. Gently lift to separate the tiles from their adhesive grip. 3. Work methodically across the floor, as if you're uncovering a hidden treasure map piece by piece. Act 3: Cleaning the Canvas 1. Once the tiles are up, use your scraper to remove the remaining adhesive. 2. For stubborn spots, a heat gun can be your secret weapon, softening the adhesive for easier removal. 3. Caution is key avoid gouging or scratching the subfloor. The Final Act: A Clean Sweep 1. Sweep and vacuum thoroughly to remove all debris. 2. If needed, give the subfloor a gentle wipe-down with a damp cloth. Special Considerations Every floor tells a different story, and sometimes you need to adjust your approach based on the subfloor you're working with. The age of your home, its location, and even the original builder's preferences can all play a role in determining what lies beneath your tiles. Plywood Pirouettes Plywood subfloors are common in many homes. They offer a stable base for various flooring types, but they come with their own set of challenges: Tread lightly to avoid splitting or damaging the plywood. For extremely well-adhered tiles, consider cutting through the plywood in sections. Why special care? Plywood is essentially layers of wood veneer glued together. While this makes it strong, it's also vulnerable to splintering or delaminating if too much force is applied.
Cement Backerboard Ballet Cement backerboard is often used in areas prone to moisture, like bathrooms and kitchens. It provides a stable, water-resistant surface for tile installation: A reciprocating saw with a carbide-grit masonry blade can be your dance partner for tricky spots. Be prepared to replace damaged sections think of it as understudying for the main performance. Why special care? The cement backerboard is durable, but it can crack or break if subjected to too much force. Its rough surface also tends to bond very strongly with tile adhesives, making separation challenging. Mortar Bed Maneuvers Mortar beds are old-school but still found in many older homes. They consist of a thick layer of sand and cement mixture: Chisel down through the mortar to reach the tar paper underneath. Use a large pry bar to remove chunks of mortar and tile together it's like lifting a dance partner in a grand finale. Why special care? Mortar beds are typically very thick and hard. They're often so well-bonded to the subfloor that removal attempts can damage the structural elements underneath. Underfloor Heating Hustle Homes with radiant floor heating systems require an extra level of caution: Exercise extreme caution to avoid damaging heating elements. When in doubt, call in a professional choreographer er, contractor to ensure your heating system stays intact. Why special care? Radiant heating systems involve electrical wires or water pipes running through or under the subfloor. Damaging these during tile removal can lead to expensive repairs and the loss of your heating system. Read More Articles: What to Expect When Booking Private Jet Charters in Los Angeles?
Tips for a Flawless Performance 1. Patience work slowly and deliberately. 2. Keep your tools sharp to reduce the force needed. 3. Avoid using excessive force or prying at steep angles. 4. Heat can be your ally for stubborn adhesive. 5. For large areas, consider renting a powered floor scraper. Conclusion Removing floor tiles without damaging the subfloor is a delicate dance of precision, patience, and the right techniques. Whether you're a DIY devotee or considering professional removal services, this guide equips you with the knowledge to approach the task with confidence. Don t let your floor removal fears hold you back! Let the best floor removal company help you! Tear It Up Floor Removal is here to help. Our expert team specializes in asbestos floor tile removal and other comprehensive floor removal services, ensuring your subfloor stays pristine throughout the process. Contact us today for a free consultation and transform your space together! FAQs How long does it typically take to remove floor tiles from an average-sized room? The time can vary greatly depending on the size of the room, type of tiles, and adhesive used. On average, expect to spend 6-8 hours in a 200-square-foot room. Is it always necessary to remove the old adhesive completely? While it's ideal to remove all old adhesive, sometimes a thin layer can remain if it's well-bonded and level. However, consult with a flooring professional to ensure compatibility with your new flooring. Can I reuse the tiles I've removed? It's possible, but challenging. Many tiles break during removal. If you manage to salvage some, they can be repurposed for smaller projects or mosaic work. How do I dispose of the old tiles and debris?
Check with your local waste management facility. Many offer special disposal services for construction materials, and a dumpster can be rented for larger projects. Site Article: How Do You Remove Floor Tiles Without Damaging The Subfloor?