Heart and Neck Vessels Assessment Overview
This information presents a comprehensive guide for heart and neck vessels assessment, including objectives, necessary equipment, preparation steps, subjective data to consider, techniques for palpating and auscultating the carotid artery, normal findings, and more. It emphasizes the importance of safely and accurately completing this assessment and documenting the data properly. The content covers essential details such as positioning the client, palpation methods, auscultation steps, and common subjective data related to heart health, providing a valuable resource for healthcare professionals and students.
Download Presentation

Please find below an Image/Link to download the presentation.
The content on the website is provided AS IS for your information and personal use only. It may not be sold, licensed, or shared on other websites without obtaining consent from the author.If you encounter any issues during the download, it is possible that the publisher has removed the file from their server.
You are allowed to download the files provided on this website for personal or commercial use, subject to the condition that they are used lawfully. All files are the property of their respective owners.
The content on the website is provided AS IS for your information and personal use only. It may not be sold, licensed, or shared on other websites without obtaining consent from the author.
E N D
Presentation Transcript
HEART & NECK VESSELS ASSESSMENT Prof Dr. Salma Khadim Jehad Dr. Ali Faris M.Sc Hassanain Mohammed Kadhim Lecture -7-
Objectives: At the end of this lab, the students will be able to: 1. Demonstrate the ability to safely & accurately complete heart & neck vessels assessment. 2.Demonstrate the ability to accurately document heart & neck vessels assessment data in organized manner.
Equipment Needed I . Marking Pen 2. Small centimeter 3. Stethoscope with diaphragm & bell 4. Alcohol swab 5- Watch with second hand
Preparation 1. To evaluate the carotid arteries, the client can be sitting. 2. To assess the jugular veins & the pericardium, the person should be supine with the head & chest slightly elevated. 3. Stand on the client's right side. 4. The room should be warm. 5. Ensure the female's privacy by keeping her breasts draped. 6. Gently displace the breast upward, or ask the client to hold it out of the way.
Subjective data: 1. Cough 2. Nocturia 3. Dyspnea 4. Fatigue 5. Past cardiac history 6. Orothopnea 7. Cyanosis or pallor 8. Family cardiac history 9. Edema 10.Chest pain 1 1. Personal habits
The Neck Vessels Palpate the carotid artery - Palpate each carotid artery medial to the sternomastoid muscle in the neck. -Avoid excessive pressure on the carotid sinus area. - Palpate gently. - Palpate only one carotid artery at a time. - Feel the contour & amplitude of the pulse. - Compromise finding to the other side.
Normal finding : Contour is smooth with rapid upstroke & slower down stroke. Strength is 2+ or moderate. Findings should be same bilaterally
Auscultation of the carotid artery - Keep the neck in a neutral position. - Lightly apply the bell of the stethoscope over the carotid artery at three levels: o Angle of jaw. o Mid line area. o Base of the neck. -Ask the client to take a breath. Exhale & hold it briefly while you listen. Normally no sound present
Inspect the Jugular Venous Pulse - Put the client in supine position anywhere from 30-40 degree angle. - Remove the pillow to avoid flexing of the neck. - Turn the client's head slightly away from the examined side. - Direct strong light onto the neck. - Note the external jugular veins overlying the stemomastoid muscle. - Look for pulsation of internal jugular veins in the area of suprasternal notch Internal jugular vein pulsations 3cm above sternal angel
Palpate the Apical impulse: - localize the apical impulse using one finger pad. -Ask the client to "exhale & then hold". - Role the client midway to the left. Note the following: Location Size Amplitude Apical impulse occupy only on intercostals space, the 5*, & be at or medial to the MCL. *2cm. Note: apical impulse is not palpable in obese or in clients with thick chest wall.
Palpate across the precordium - Using the palm aspect of your four fingers, gently palpate the apex. - Search for any pulsation : Normally no pulsation Percussion - place your stationary finger in the client's 5th ICS over on left side of chest near the anterior axillary line. - Slide your hand toward yourself, percussing as you go. - Note the change of sound. .
The left border of cardiac dullness is at the midclavicular line in the 5' interspace, & slopes toward the sternum progress upward, so that by the 2"d interspace the border of dullness coincides with the left sternal border.
Auscultation - clean the end pieces with alcohol swab. - After you place the stethoscope, try closing your eyes briefly to get out any distraction. - Begin with the diaphragm end piece & note the following: Rate & rhythm Identify S1 & S2 Listen for murmurs
Normal finding: Rate range from 60-IOO bpm, & the rhythm is regular. Sl is louder than S2 at the apex, & S2 is louder than S1 at the base. Should not be heard.
S1 : produced by click of the ateroventracular valve S2 : produced by click of the semiluner valve After auscultating in supine position, role the client toward his \ her left side. - Listen with the bell at the apex. -Ask the client to sit up, lean forward slightly, & exhale. - Listen with the diaphragm firmly pressed at the base, right, & left side. - Check for the soft high- pitched sound.
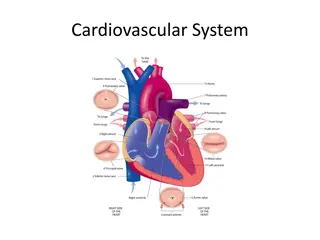
Where to place your stethoscope As with palpation of the heart, auscultation should proceed in a logical manner over 5 general areas on the anterior chest, beginning with the patient in the supine position. Examined with diaphragm, including: 1- Aortic region at the 2nd intercostal spaces at the right 2- Pulmonic region at the 3rd intercostal spaces at the left
3- Erbs point at the 4thintercostal spaces 4- Tricuspid region at the 5th intercostal spaces at the left border of sternum 5- Mitral region (near the apex of the heard between the 5th intercostal spaces in the mid- clavicular line) (apex of the heart).
 undefined


