Comprehensive Guide to Acrylic Painting Tools, Tips, and Techniques


Acrylic
Paint
ing
Tools,
Tips
and
Techniques


Acrylic Paint
Basics…
Developed in
the
late
1940s
.
In the 1950's, the
water-based
acrylics
were
developed.
They became
popular in
the
1960's
when
pop artists used
them, such
as
Andy
Warhol. Other art
styles
that explored
this
medium
were
photorealism
and
Op
Art
Hi
s
t
ory
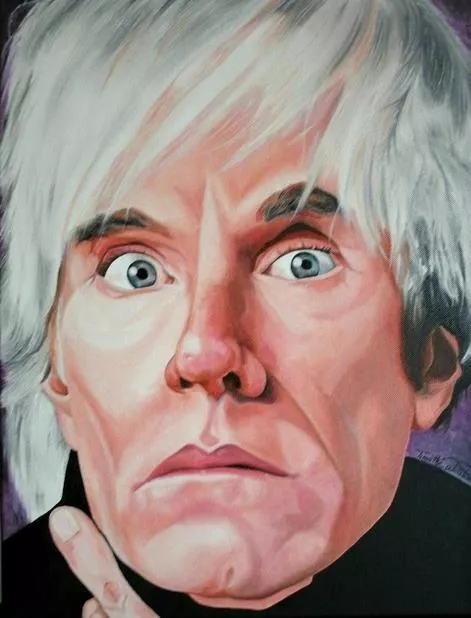

Andy
Warhol-
Portrait


Your
footer
here
-
2
Acrylic Paint
Basics…
Acrylic paints are made from pigment,
water
and an acrylic
binder,
which
forms
a
hard, clear
film as the
water
evaporates. It
is
this
transparent film, reflecting light from the
pigment
inside
it, that gives acrylic
color
its
brilliance.
Acrylics are water-soluble,
non-toxic,
easy to
clean, and dry
quickly.
They
can be used
opaque (no light
shows
through) either
through
thick
paint
application
or by
adding
white.
They
can be diluted
with
water
and painted so they
are transparent (light
shows
through).
Contents
Drawing
and
Painting
II
-
3
Acrylic Paint
Tools…
Acrylic
paintbrushes
come in
various
shapes
& sizes. Never
use one brush size for an
entire painting
Brushes
Drawing
and
Painting
I
-
4
A
p
a
i
n
t
b
r
u
s
h
i
s
m
a
d
e
u
p
o
f
t
h
r
e
e
p
a
r
t
s
:
T
h
e
h
a
n
d
l
e
,
the ferrule, and tuft (brush hairs or
bristles).
Understanding
Paintbrush
Construction &
Use
-
6
Care
of Acrylic
Brushes
•
Always
clean
your
brush
immediately
after
use.
•
If color has
dried
on the brush, it
is
ruined
.
•
Do
not stand
a
brush on its
handle-
will
cause
water
to leak
down
into
the ferrule, loosening the
glue
that
holds the
bristles
together.
•
Never leave
brushes standing on
their
bristles to
dry-
they
will
dry to
that
shape.
6
Drawing
and
Painting
II
-
-
•
under-painting
in large
flat
shapes to
lay
out
composition.
•
After
color blocking start painting details
in
the
background
(like
the
sky)
and then paint the
next
ground
when
finished
completely-
work
from
the back to the
front.
Techniqu
e
s
13
Color
Blocking
Keep
it
simple…
-
Techniqu
e
s
Transparent
(watercolor)
•
By thinning acrylics
with
water
have
similar
effects of transparent
watercolor.
8
-
Techniqu
e
s
9
Wet-on-Wet
•
mixing
two wet
colors/values of paint on
canvas
to
help blend/gradient
colors
•
Acrylics
dry
fast-
to
help
keep
paint
moist, spritz
with
water to
slow
the
drying
process
down.
Drawing
and
Painting
II
-
Techniqu
e
s
Impasto
•
thick
applied paint- usually done
with
a
pallet
knife
10
-
Techniqu
e
s
Hard
Edge
•
Creating a clean, straight edge
between
objects
•
(colors/values)
11
-
Techniqu
e
s
12
Scumbling
•
The
application of broken color;
letting the color
underneath
to show
through.
•
using a dry brush to create stippling
or
texture-
Dip tips of dry brush in
thin
layer
of paint and either pounce
the brush on the
canvas
or
sweep
the brush across the
canvas
to
create
different
textures.
-
Instead
of using black and
brown
out of
the
of
the
bottle
you
should
mix
them from
Primary
colors.
B
L
A
C
K
:
•
Cool
Brown:
Base
Blue and little less
orange
22
a
b
o
u
t
9
0
%
b
a
s
e
c
o
l
o
r
a
n
d
1
0
%
c
o
m
p
l
e
m
e
n
t
•
Warm
black: start
with
red
and add
green
•
Cool
black: start
with
blue
and add
orange
B
R
O
W
N
:
a
b
o
u
t
5
0
%
b
a
s
e
c
o
l
o
r
a
n
d
5
0
%
c
o
m
p
l
e
m
e
n
t
•
Warm
Brown:
base
is red
and little
less
green
Mixing
Neutrals:
-
:
•
S
T
A
R
T
f
r
o
m
t
h
e
B
A
C
K
G
R
O
U
N
D
a
n
d
w
o
r
k
y
o
u
r
w
a
y
f
o
r
w
a
r
d
.
T
h
i
s
w
i
l
l
k
e
e
p
y
o
u
f
r
o
m
h
a
v
i
n
g
t
o
p
a
i
n
t
i
n
b
e
t
w
e
e
n
l
i
t
t
l
e
d
e
t
a
i
l
s
-
i
t
s
f
a
s
t
e
r
t
o
w
o
r
k
t
h
i
s
w
a
y
!
!
•
Diffuse edges
(blend)
with
a
dry brush by dabbing
lightly.
•
Acrylics
become darker
in
tone as they
dry,
so
remember
to
allow
for
this effect
when
mixing
your
colors.
•
Acrylics are
resistant to
water
once
dry,
which
means they
can be
over-painted without
disturbing
the
previous
color.
Once
dry,
colors cannot be
dissolved
with
a damp
brush.
21
Helpful
Hints:
-
v
:
Preliminary
Work:
In your sketchbook
try
to
replicate
the
picture
of
this pear
using
the
color blocking
technique.
First do a simplified
color blocked underpainting
focusing on
value
. Then do a slightly
transparent
(thin with water) top layer
to smooth out your transitions.
23
P
a
i
n
t
i
n
g
t
e
c
h
n
i
q
u
e
s
t
o
c
o
n
s
i
d
e
r
…
Color
Blocking
Transparent
Wet-on-Wet
Impasto
Scumbling
Hard
Edge
ACRYLIC PAINTING STEPS
C
r
e
a
t
e
Y
o
u
r
P
a
l
e
t
t
e
C
o
l
o
r
m
a
t
c
h
p
h
o
t
o
r
e
f
e
r
e
n
c
e
a
n
d
m
i
x
e
n
o
u
g
h
p
a
i
n
t
f
o
r
e
n
t
i
r
e
p
a
i
n
t
i
n
g
S
K
E
T
C
H
B
A
S
I
C
s
h
a
p
e
s
o
n
t
o
c
a
n
v
a
s
&
B
L
O
C
K
I
N
f
i
r
s
t
l
a
y
e
r
(
2
–
3
c
o
l
o
r
s
)
REMEMBER
:
•
NO DETAILS AT
THIS STAGE!
•
“WRAP PAINTING”
background colors
should extend onto
all sides of canvas
through entire
process
A
d
d
s
h
a
d
o
w
s
T
H
R
O
U
G
H
O
U
T
REMEMBER
:
•
PAY ATTENTION TO
BRUSH STROKES.
Choose correct
techniques:
•
Should you be
using wet-on-wet
to blend or dry
brush to add
texture? Both?
Add highlights, mid-tones throughout
DIRECTION OF BRUSH STROKES MATTERS!
Add more detail….and more detail…and more detail
Consider painting transparently on top layers, allowing under layers
to show through. Also, use different size brushes.
Explore the history of acrylic paints, the basics of acrylic painting, essential tools like brushes, paintbrush construction and care tips, as well as techniques such as color blocking and creating transparent effects with acrylics. Enhance your acrylic painting skills with this detailed guide.

Download Presentation

Please find below an Image/Link to download the presentation.
The content on the website is provided AS IS for your information and personal use only. It may not be sold, licensed, or shared on other websites without obtaining consent from the author. Download presentation by click this link. If you encounter any issues during the download, it is possible that the publisher has removed the file from their server.
E N D
Presentation Transcript
Acrylic Painting Tools, Tips and Techniques
Acrylic PaintBasics History Developed in the late 1940s. In the 1950's, the water-based acrylics were developed. They became popular in the 1960's when pop artists used them, such as Andy Warhol. Other art styles that explored this medium were photorealism and OpArt Andy Warhol- Portrait Your footer here - 2
Acrylic PaintBasics Contents Acrylic paints are made from pigment, water and an acrylic binder, which forms a hard, clear film as the water evaporates. It is this transparent film, reflecting light from thepigment inside it, that gives acrylic color itsbrilliance. Acrylics are water-soluble, non-toxic, easy to clean, and dry quickly. They can be used opaque (no light shows through) either through thick paint application or by adding white.They can be diluted with water and painted so they are transparent (light shows through). Drawing and PaintingII - 3
Acrylic PaintTools Brushes Acrylic paintbrushes come in various shapes & sizes. Never use one brush size for an entire painting Drawing and PaintingI - 4
Understanding Paintbrush Construction &Use A paintbrush is made up of three parts: Thehandle, the ferrule, and tuft (brush hairs or bristles). - 6
Care of AcrylicBrushes Always clean your brush immediately after use. If color has dried on the brush, it is ruined. Do not stand a brush on its handle- will cause water to leak down into the ferrule, loosening the glue that holds the bristles together. Never leave brushes standing on their bristles to dry- they will dry to that shape. 6 Drawing and PaintingII -
Techniques ColorBlocking under-painting in large flat shapes to lay out composition. After color blocking start painting details in the background (like the sky) and then paint the next ground when finished completely- work from the back to the front. Keep it simple 13 -
Techniques Transparent(watercolor) By thinning acrylics with water have similar effects of transparent watercolor. 8 -
Techniques Wet-on-Wet mixing two wet colors/values of paint on canvas to help blend/gradient colors Acrylics dry fast- to help keep paint moist, spritz with water to slow the drying process down. 9 Drawing and PaintingII -
Techniques Impasto thick applied paint- usually done with a pallet knife 10 -
Techniques HardEdge Creating a clean, straight edge between objects (colors/values) 11 -
Techniques Scumbling The application of broken color; letting the color underneath to show through. using a dry brush to create stippling or texture- Dip tips of dry brush in thin layer of paint and either pounce the brush on the canvas or sweep the brush across the canvas to create different textures. 12 -
Mixing Neutrals: Instead of using black and brown out of the of the bottle you should mix them from Primary colors. BLACK: Warm black: start with red and add green Cool black: start with blue and add orange about 90% base color and 10% complement BROWN: about 50% base color and 50% complement Warm Brown: base is red and little less green Cool Brown: Base Blue and little less orange 22 -
Helpful Hints: : START from the BACKGROUND and work your way forward. This will keep you from having to paint in between little details- its faster to work thisway!! Diffuse edges (blend) with a dry brush by dabbing lightly. Acrylics become darker in tone as they dry, so remember to allow for this effect when mixing your colors. Acrylics are resistant to water once dry, which means they can be over-painted without disturbing the previous color. Once dry, colors cannot be dissolved with a damp brush. 21 -
PreliminaryWork: v In your sketchbook try to replicate the picture of this pear using the color blocking technique. First do a simplified color blocked underpainting focusing on value. Then do a slightly transparent (thin with water) top layer to smooth out your transitions. : 23 -
Painting techniqu Painting technique es to consider s to consider Impasto ColorBlocking Wet-on-Wet Scumbling Hard Edge Transparent
Create Your Palette Create Your Palette Color match photo reference and mix enough paint for entire painting
REMEMBER: NO DETAILS AT THIS STAGE! WRAP PAINTING background colors should extend onto all sides of canvas through entire process SKETCH BASIC shapes onto canvas SKETCH BASIC shapes onto canvas & BLOCK IN first layer & BLOCK IN first layer (2 (2 3 colors) 3 colors)
REMEMBER: PAY ATTENTION TO BRUSH STROKES. Choose correct techniques: Should you be using wet-on-wet to blend or dry brush to add texture? Both? Add shadows Add shadows THROUGHOUT THROUGHOUT
Add highlights, mid-tones throughout DIRECTION OF BRUSH STROKES MATTERS!
Add more detail.and more detailand more detail Consider painting transparently on top layers, allowing under layers to show through. Also, use different size brushes.