Brock Cavity Installation and Alignment Process
"Follow the steps for Brock cavity installation: isolating beamline, removing components, aligning in lab, and reconnecting. Includes visuals of the process."

Uploaded on | 0 Views
Download Presentation

Please find below an Image/Link to download the presentation.
The content on the website is provided AS IS for your information and personal use only. It may not be sold, licensed, or shared on other websites without obtaining consent from the author. If you encounter any issues during the download, it is possible that the publisher has removed the file from their server.
You are allowed to download the files provided on this website for personal or commercial use, subject to the condition that they are used lawfully. All files are the property of their respective owners.
The content on the website is provided AS IS for your information and personal use only. It may not be sold, licensed, or shared on other websites without obtaining consent from the author.
E N D
Presentation Transcript
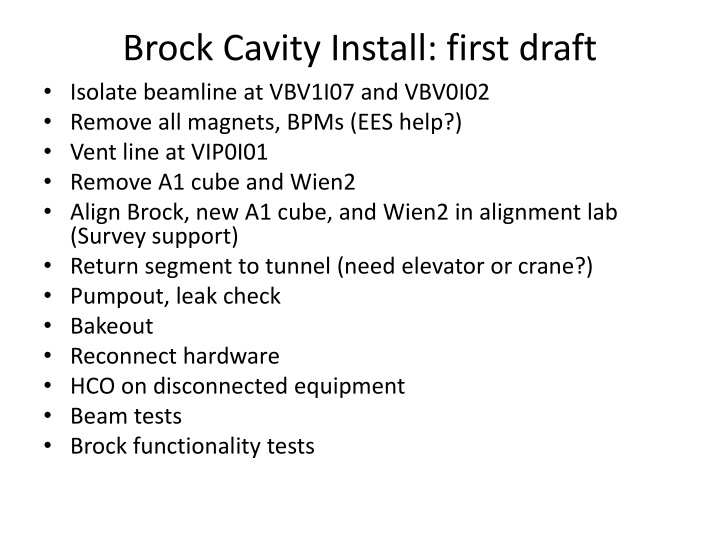
Brock Cavity Install: first draft Isolate beamline at VBV1I07 and VBV0I02 Remove all magnets, BPMs (EES help?) Vent line at VIP0I01 Remove A1 cube and Wien2 Align Brock, new A1 cube, and Wien2 in alignment lab (Survey support) Return segment to tunnel (need elevator or crane?) Pumpout, leak check Bakeout Reconnect hardware HCO on disconnected equipment Beam tests Brock functionality tests
Flanged A1 cube Wien2 Wien2 Welded A1 cube Brock cavity